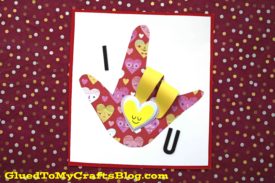
Get the whole family involved in creating a special gift this year! Kids and adults alike will love making this handprint sign language “I Love You” card craft!
I Love You Handprint Sign Language Card
Hi friends! If you are like me, you are ALWAYS on the look out for super sweet ideas for your child to send to their grandparents.
Well… you are in luck {and in the right place} because not only is today’s Sign Language Paper Handprint Card post a sweet heart-felt idea that is super simple to make on the fly – but it’s also a great, inexpensive handprint keepsake that children can personalize and send to grandparents, relatives and even close friends.
And since they already have the most important part of making this keepsake – a hand – it’s going to be a cinch for them to pull it together!
So what are you waiting for? Follow the simple Handprint I Love You Paper Card step-by-step tutorial below to help your child create a one-of-a-kind “love” piece that is sure to put a smile on someone’s face! Happy crafting my friends!!!
RELATED TUTORIALS: Celery Stamped Flower Card and Love You Watts Craft
Surprise a loved one with this adorable handprint sign language card! This easy craft project is perfect for kids of all ages.
Card Supplies:
- Cardstock Paper
- Scrapbook Paper
- Large Letter Scrapbook Stickers
- Pencil or Marker
- Paper Scissors
- Glue Stick or Tape Runner Adhesive
Directions:
- First is the paper handprint. Simply trace your child’s hand on the printed scrapbook paper with a pencil or pen.
- Lift up their hand and trim out the traced handprint with paper craft scissors.
- Next, go ahead and fold down the 3rd and 4th fingers of the cutout to create the sign language for “I Love You.”
- Set aside.
- Grab another sheet of cardstock paper and trim out a simple, small heart.
- Glue to the center of the handprint you just made.
- Now it’s time to assemble your Handprint I Love You keepsake card. Simply glue your finished handprint to the center of the card front and add an “I” & “U” sticker around it. You can either stop there OR add other embellishments to really personalize it.
- Then write a heartfelt message inside and mail to the lucky recipient!
- Don’t forget to share pictures of your sign language cards with us! #gluedtomycrafts
RELATED —> Handprint Welcome Sign
Handprint Sign Language I Love You Card
Here’s your checklist of supplies to bring this craft to life:
- Cardstock Paper
- Scrapbook Paper
- Scrapbook Letter Stickers
- Pencil or Marker
Prepare your creative haven by laying down a protective cover before the crafting magic begins!
Directions:
- First is the paper handprint. Simply trace your child's hand on the printed scrapbook paper with a pencil or pen.
- Lift up their hand and trim out the traced handprint with paper craft scissors.
- Next, go ahead and fold down the 3rd and 4th fingers of the cutout to create the sign language for "I Love You."
- Set aside.
- Grab another sheet of cardstock paper and trim out a simple, small heart.
- Glue to the center of the handprint you just made.
- Now it's time to assemble your Handprint I Love You keepsake card. Simply glue your finished handprint to the center of the card front and add an "I" & "U" sticker around it. You can either stop there OR add other embellishments to really personalize it.
- Then write a heartfelt message inside and mail to the lucky recipient!

CLICK HERE TO PRINT THE DIRECTIONS FOR THIS CRAFT


