
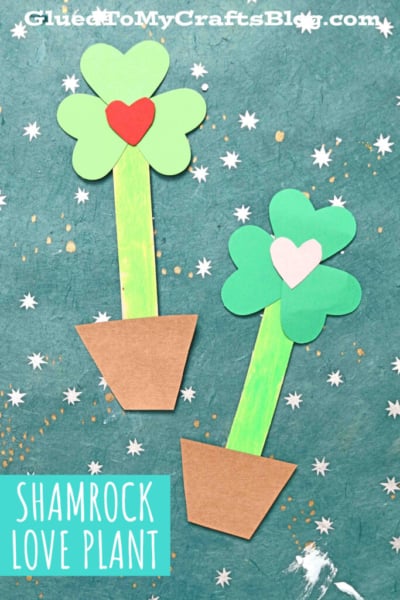
Start off the St. Patrick’s Day festivities by crafting a paper shamrock love plant. A beautiful and easy craft that can be enjoyed by the whole family!
Popsicle Stick Shamrock Plant
Hi friends! Welcome to our Paper & Popsicle Stick Shamrock Love Plant kid craft tutorial! I’m so glad you landed on our tutorial and have decided to check it out today!
On that note, you probably already know that Saint Patrick’s Day is fast approaching. Like REALLY fast!
With every holiday that passes by, it’s a good excuse for me {and you} to do crafts with our children centered around the time of year. So without further ado and the theme of all things lucky & green – today I’m sharing this “Shamrock Love Plant” kid craft idea. It’s basically a paper shamrock flower that I “potted” together for the upcoming holiday.
And like with all my kid craft tutorials on Glued To My Crafts, the supplies are super affordable and the craft itself – REALLY EASY! All you need is popsicle sticks, cardstock paper and a little bit of glue. Really simple stuff you probably {more than likely!} have in your home right now.
So on that note, no excuses! Let’s grab our supplies, check out the tutorial below and get to cracking! I just know you are going to LOVE growing these paper shamrock plants with your child today! Happy crafting, my friends!
RELATED —> Cupcake Liner Shamrock

Get creative this St. Patrick’s day! Making a fun and festive craft with your kids can be an excellent way to bring out the luck of the Irish spirit!
Craft Supplies:
- Green Cardstock Paper
- Pink or Red Cardstock Paper
- Brown Cardstock Paper
- Scissors
- Heart Paper Punch
- Green Paint Crayon
- Jumbo Popsicle Sticks – 1 per craft
- School Glue
Directions:
- First things first – grab ONE jumbo popsicle stick and your green paint crayon.
- Paint your craft stick completely green. This will be the stem of your plant.
- Set it aside to let it dry completely.
- Next up – grab your green cardstock and the heart paper punch.
- Punch our THREE heart shapes for the shamrock flower.
- Out the remaining red & brown cardstock paper, cut out a small heart shape for the center, as well as a large flower pot for the bottom.
- Now to finish the craft! Start off by gluing the three heart shapes, in a flower formation, on one end of the painted popsicle stick.
- Follow that up with the small heart in the center.
- The last step for the paper shamrock love plant craft, is to glue the paper pot cutout to the bottom of the painted popsicle stick.
- And that’s it! Allow your piece to dry completely before you display it proudly. You could even gift it away if you choose!
RELATED —> Handprint Clover

AFFILIATE LINK – PAIR OUR CRAFT IDEA WITH THIS BOOK RECOMMENDATION
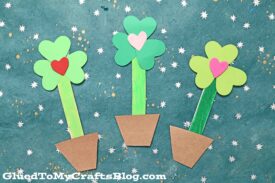
You can either use this Shamrock Love Plant as a decoration in your home or gift it to a friend to spread the “luck.” And as always – you can always change out the colors to reflect what you have/want!
If you enjoyed this craft tutorial, you may also enjoy these from us:
- Cupcake Liner Cactus
- Puffy Paint Shamrock
- Raining Luck Craft Idea
- Bucket Of Luck Cauldron
- Popsicle Stick Sunshine
- Paper Plate Leprechaun
- Paper Plate Love Plant

Paper Shamrock Love Plant Craft
Here’s your checklist of supplies to bring this craft to life:
- Cardstock Paper green, brown and pink
- 1 Jumbo Popsicle Sticks
- Paint Crayons green
- 1 Scissors
- School Glue
Prepare your creative haven by laying down a protective cover before the crafting magic begins!
Directions:
- First things first - grab ONE jumbo popsicle stick and your green paint crayon.
- Paint your craft stick completely green. This will be the stem of your plant.
- Set it aside to let it dry completely.
- Next up - grab your green cardstock and the heart paper punch.
- Punch our THREE heart shapes for the shamrock flower.
- Out the remaining red & brown cardstock paper, cut out a small heart shape for the center, as well as a large flower pot for the bottom.
- Now to finish the craft! Start off by gluing the three heart shapes, in a flower formation, on one end of the painted popsicle stick.
- Follow that up with the small heart in the center.
- The last step for the paper shamrock love plant craft, is to glue the paper pot cutout to the bottom of the painted popsicle stick.
- And that's it! Allow your piece to dry completely before you display it proudly. You could even gift it away if you choose!

CLICK HERE TO PRINT THE DIRECTIONS FOR THIS CRAFT