Glued To My Crafts

Join thousands of others who have gotten GLUED to our craft tutorials!

  • Home
  • Privacy Policy
  • Craft Safety Guidelines
  • Seasonal Themes
    • New Years
    • Valentine’s Day
    • St. Patrick’s Day
    • Spring
    • Easter
    • Mother’s Day
    • Summer
    • Father’s Day
    • Patriotic
    • Halloween
    • Thanksgiving
    • Fall
    • Winter
    • Christmas
    • Snowmen
    • Story Time
  • About Us
  • Our Amazon Storefront
  • Monthly Themes
    • January Craft Ideas
    • February Craft Ideas
    • March Craft Ideas
    • April Craft Ideas
    • May Craft Ideas
    • June Craft Ideas
    • July Craft Ideas
    • August Craft Ideas
    • September Crafts
    • October Crafts
    • November Crafts
    • December Crafts

Hot Chocolate Mug Photo Frame w/Handprint Steam

When engaging in craft activities, it is important for young children to have adult supervision at ALL times. It is also recommended to use supplies that are suitable for your child's age. Feel free to modify materials or steps to meet your specific requirements. Please refer to our safety guidelines for more information.

As an Amazon Associate I earn from qualifying purchases. This post may contain affiliate links. For more information, please see our disclosure policy.

UPDATE FOR 2026 - To reduce storage costs and download fees, we recently made some changes to our website. The password for all our files this year is GLUEDTOMYCRAFTS2026. No sign-up is required to download our free printables! You can enjoy our printables without creating an account or paying for Box.com. Simply follow the download instructions on our FAQ PAGE.

Create a unique and personalized popsicle stick mug photo frame with this simple DIY tutorial. Perfect for preserving precious memories!
SKIP THE FLUFF AND PRINT THE DIRECTIONS
A homemade popsicle stick mug photo frame showcases a blue mug decorated with cotton ball marshmallows and glittery white paper steam, perfectly framing a black-and-white photo of a smiling boy.

A homemade popsicle stick mug photo frame showcases a blue mug decorated with cotton ball marshmallows and glittery white paper steam, perfectly framing a black-and-white photo of a smiling boy.

Nothing warms the heart more than a steaming mug of hot chocolate on a chilly day. Now, imagine combining that cozy feeling with a cherished memory, captured forever in a charming DIY photo frame.

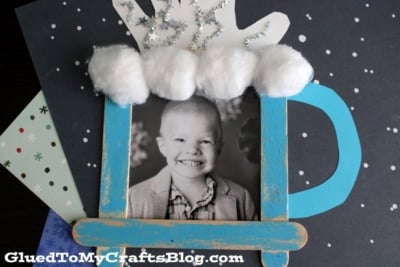
Today’s Popsicle Stick Hot Chocolate Mug Photo Frame with Handprint Steam tutorial is more than just a craft project; it’s a delightful way to preserve memories while engaging in a fun, hands-on activity for the winter months.

Whether you’re a parent, teacher, or craft enthusiast, this guide will show you how to create a keepsake that captures both the warmth of hot cocoa and the joy of creativity.

A homemade popsicle stick mug photo frame showcases a blue mug decorated with cotton ball marshmallows and glittery white paper steam, perfectly framing a black-and-white photo of a smiling boy.

The simplicity and flexibility of this project make it a family favorite. It’s an excellent way to spend an afternoon together, fostering creativity and conversation.

Craft Supplies:

Before you begin, it’s essential to gather all the materials you’ll need. This project is simple and requires items that are likely already in your home or easily found at a local craft store.

  • FOUR Jumbo Popsicle Sticks
  • Hot Glue Gun {adult use only, please!}
  • Blue Craft Paint
  • Paint Brush
  • Scissors
  • Pencil
  • Blue Cardstock Paper
  • White Cardstock Paper
  • White Cotton Balls
  • Silver Glitter Glue
  • 4×6″ Color Picture

Directions:

  • ADULTS ONLY – Get the glue gun hot and ready.
  • Grab FOUR popsicle sticks.
  • Hot glue the base of your hot cocoa frame, in a square formation. This way you have an opening in the center for your picture.
  • Set it aside to let it dry a bit {instead of a hot glue gun, you can also use school glue but drying time takes longer.}
  • When it’s dry, it’s time for paint. Squirt some blue craft paint on a paper plate.
  • Have children paint the front of their popsicle stick shape completely blue.
  • Follow that up by having them add a line of cotton balls {the marshmallows} on side of the frame.
  • Set it aside.
  • Next trace your child’s hand on the white paper and cut it out to create the “steam.”
  • Go ahead and use the silver glitter to add some “steamy” dimension on the cutout.
  • Finally, out the remaining blue cardstock paper, cut out a simple “handle” shape for the mug.
  • Now for assembling. Start by gluing the picture in place inside the popsicle stick frame. You might have to trim your picture down a little to make it fit in the frame. Just use your scissors.
  • Follow that up by gluing the handprint cutout {fingertips going up} and the mug handle design to the back of the frame as well.
  • Once done decorating the popsicle stick mug picture frame and it’s completely dry, display it proudly for ALL to see. You can either prop it on a shelf as is or hot glue ribbon and/or magnets to the back!

RELATED —> Inside My Hot Cocoa Mug Craft

A children’s book titled “It’s Winter!” by Renée Kurilla features a child in winter clothes with a cat, snowflakes, a “LET IT SNOW” sign, and @GLUEDTOMYCRAFTS label—perfect inspiration for your next terra cotta pot snowman craft!.

AFFILIATE LINK – PAIR OUR CRAFT IDEA WITH THIS BOOK RECOMMENDATION

Crafting our unique “popsicle stick hot chocolate mug photo frame with handprint steam” tutorial is a delightful way to create a personalized keepsake while enjoying the creative process.

This project combines the versatility of popsicle sticks with the warmth and nostalgia of cherished memories, resulting in a charming and meaningful piece of art. Whether you’re crafting for yourself or as a thoughtful gift for others, this craft offers endless possibilities for customization and personalization.

BTW – if you are looking for even MORE winter themed craft ideas, be sure to check out these fun posts listed below. Happy crafting, my friends!

  • Peppermint Playdough
  • Snowman Snow Globe
  • Paper Plate Hot Cocoa Mug
  • Coffee Filter Snowflakes
  • Mug Photo Ornament
  • Cotton Ball Melted Snowman
  • Snowman Playdough Recipe
  • Paper Mitten Craft
  • Cotton Ball Polar Bear

stacey-signature-2023


A homemade popsicle stick mug photo frame showcases a blue mug decorated with cotton ball marshmallows and glittery white paper steam, perfectly framing a black-and-white photo of a smiling boy.
PRINT

Hot Chocolate Mug Photo Frame w/Handprint Steam

Create a unique and personalized popsicle stick mug photo frame with this simple DIY tutorial. Perfect for preserving precious memories!

Here’s your checklist of supplies to bring this craft to life:

  • 4 Jumbo Popsicle Sticks
  • Craft Paint
  • Cardstock Paper
  • Cotton Balls
  • 1 Printed Picture
  • Embellishments
  • Hot Glue Gun - adult supervision required
  • Pencil
  • Paint Brush
  • Scissors
  • Glitter Glue
  • Christmas Book Recommendations - link to our Amazon shop

Prepare your creative haven by laying down a protective cover before the crafting magic begins!

Directions:

  • ADULTS ONLY - Get the glue gun hot and ready.
  • Grab FOUR popsicle sticks.
  • Hot glue the base of your hot cocoa frame, in a square formation. This way you have an opening in the center for your picture.
  • Set it aside to let it dry a bit {instead of a hot glue gun, you can also use school glue but drying time takes longer.}
  • When it's dry, it's time for paint. Squirt some blue craft paint on a paper plate.
  • Have children paint the front of their popsicle stick shape completely blue.
  • Follow that up by having them add a line of cotton balls {the marshmallows} on side of the frame.
  • Set it aside.
  • Next trace your child's hand on the white paper and cut it out to create the "steam."
  • Go ahead and use the silver glitter to add some "steamy" dimension on the cutout.
  • Finally, out the remaining blue cardstock paper, cut out a simple "handle" shape for the mug.
  • Now for assembling. Start by gluing the picture in place inside the popsicle stick frame. You might have to trim your picture down a little to make it fit in the frame. Just use your scissors.
  • Follow that up by gluing the handprint cutout {fingertips going up} and the mug handle design to the back of the frame as well.
  • Once done decorating the popsicle stick mug picture frame and it's completely dry, display it proudly for ALL to see. You can either prop it on a shelf as is or hot glue ribbon and/or magnets to the back!
    A homemade popsicle stick mug photo frame showcases a blue mug decorated with cotton ball marshmallows and glittery white paper steam, perfectly framing a black-and-white photo of a smiling boy.
MINI-HEARTS-page-separator-logo-gluedtomycrafts


CLICK HERE TO PRINT THE DIRECTIONS FOR THIS CRAFT

If you've enjoyed our content or have any thoughts to share, we'd love to hear from you! Mention @gluedtomycrafts or tag #gluedtomycrafts on Instagram!

Craft Activity Safety Guidelines:

Always Ensure Adult Supervision - Young children should be supervised at all times when engaging in craft activities. This is essential to keep them safe and ensure materials are used correctly. Use Age-Appropriate Supplies - Choose craft supplies that are suitable for your child’s age. Check labels for recommendations and avoid items with small parts or sharp edges for younger children. Modify as Needed - Feel free to adapt materials or steps to meet your child's abilities and safety needs. For example, substitute scissors with safety scissors if necessary. Keep an Eye on Allergies - Be mindful of potential allergens in craft materials like glue, paint, or certain fabrics. Opt for non-toxic and hypoallergenic options whenever possible. Organize and Secure Supplies - Keep all craft tools and materials organized. Store sharp objects, small parts, and potentially hazardous items out of reach when not in use. Following these guidelines will ensure that crafts remain fun, creative, and, most importantly, safe for everyone involved!


OUR PRIVACY POLICY

OUR COPYRIGHT POLICY

  • Email
  • Facebook
  • Instagram
  • Pinterest
  • Twitter
  • YouTube

LOOKING FOR SOMETHING?

EXPLORE OUR SITE:

TRENDING TODAY:

  • A pink hand-shaped bookmark with red heart stickers and star confetti surrounds a round note that reads a heartfelt message about love and reading. The image is from GluedToMyCraftsBlog.com. Handprint Bookmark Keepsake: A Gift That Holds Your Spot
  • A colorful craft project featuring a yellow felt moon, sparkly stars, and heart shapes, with glue and a heartfelt message. Torn Paper Love You To The Moon and Back Card Craft Idea For Kids
  • A handmade card with a rocket drawing, hearts, and messages of love. Felt hearts and an envelope are around it. Handprint Rocket Keepsake - I Love You Because
  • A vibrant Valentine's Day craft showcasing a torn-paper bumblebee with googly eyes on a white sheet, accompanied by the text "MY VALENTINE!" The scene is decorated with felt hearts, heart-shaped gems, and patterned papers, with a glue bottle and crafting supplies adding to the creative atmosphere. Torn Paper Bee My Valentine Card Craft Idea For Valentine's Day
  • Flat lay of a torn paper dandelion craft featuring a white sheet with a black dandelion outline. Torn yellow, pink, and purple paper pieces are glued to the dandelion head, simulating seeds. Surrounding the craft are Elmer's glue, felt hearts, paper flowers, and patterned scrapbook paper. The text 'MAKING WISHES, ONE PIECE OF PAPER AT A TIME.' and 'GluedToMyCraftsBlog.com' are printed on the white sheet. Torn Paper Dandelion Craft: Making Wishes, One Piece at a Time
  • A flat lay of handmade Valentine’s Day cards and decorations, including paper flowers, felt hearts, an envelope, and printed cards with romantic poems, arranged on a gray and pink background. Capture Memories With These 6 Handprint Flower Poems
  • A playful torn paper cactus craft with hearts and flowers. Includes glue and felt hearts. Torn Paper Cactus Card: A Sweet Mother's Day Craft
  • A colorful handprint craft made from purple paper with glitter edges sits on a multicolored polka dot background. A round tag with a poem is attached below, tied with red and white string. Flowers are visible in the corner. Easy Handprint Flower Craft with Poem – Perfect Spring DIY for Kids
  • A purple paper butterfly made from handprint cutouts is decorated with glitter and a smiling face. A round poem about sending love is in the center. The background is colorful and the GluedToMyCraftsBlog.com watermark is visible. Handprint & Popsicle Stick Butterfly Poem Keepsake
  • A craft project with yellow crepe paper fries in a red-striped paper container, a label reading Youre UN-FRY-GETTABLE!, red heart decorations, Elmers glue, and a roll of yellow crepe paper on a purple background. Torn Crepe Paper Fries Craft Idea For Kids

© 2012–2026 Glued To My Crafts
All activities should be supervised by an adult at all times. Please refer to our safety guidelines for more information.


Please note that all the content of the website, including printables, are for classroom and personal use only. This means that any digital item you download from our site can be used for non-commercial use only. We kindly request that you do not reproduce or sell our creations. We appreciate your understanding and cooperation in respecting our content and intellectual property rights.

Accessibility Adjustments

Powered by OneTap

How long do you want to hide the toolbar?
Hide Toolbar Duration
Select your accessibility profile
Vision Impaired Mode
Enhances website's visuals
Seizure Safe Profile
Clear flashes & reduces color
ADHD Friendly Mode
Focused browsing, distraction-free
Blindness Mode
Reduces distractions, improves focus
Epilepsy Safe Mode
Dims colors and stops blinking
Content Modules
Font Size

Default

Line Height

Default

Color Modules
Orientation Modules