
It’s the most wonderful time of the year! Add a unique, handmade touch to your holiday decorations with our Wood Slice Charlie Brown Ornament tutorial!
Charlie Brown Christmas Ornament Craft
It’s time to celebrate the beautiful holiday season and make a craft that will simply MELT YOUR HEART!
If you are like us, we absolutely LOVE the Peanuts Gang in our home!
With that being said, with our extra simple & really inexpensive Charlie Brown Inspired Wood Slice Ornament craft idea, you are going to be making memories not only today as you craft it up BUT every year as you put it on the Christmas tree!
RELATED POST —> Popsicle Stick Snoopy’s Dog House

Make a handcrafted wooden slice ornament of your favorite cartoon character this Christmas!
CRAFT SUPPLIES:
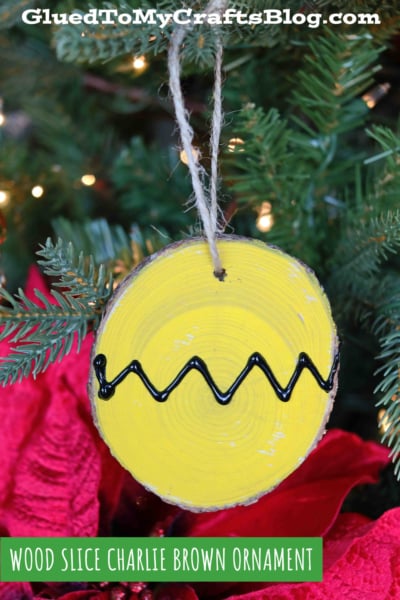
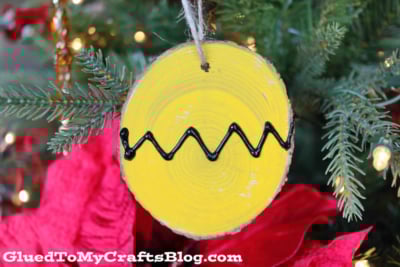
- All you need for this handmade Charlie Brown ornament is a medium sized flat wood slice piece {I found mine at Hobby Lobby} some yellow craft paint, a paint brush, black Tulip Puffy Paint, some twine, scissors and a hot glue gun.
RELATED —> Wood Slice Unicorn Gift Tags
DIRECTIONS:
- First things first – make sure you have a good working area. I suggest placing your wood slice on a large paper plate to protect your work surface.
- Next up – simply paint one side of your wood slice completely YELLOW.
- Follow that up by adding a simple {not perfect!} zig-zag black line in the center of it, afterwards.
- And that’s it! That’s literally TWO painting steps.
- You will then set it aside to let it dry completely before you hot glue some twine or a piece ribbon to the back for easy hanging.
- Then hang it on the tree before you sit down to watch the classic holiday movie or read the book afterwards to celebrate your masterpiece!!! It’s easy peasy – just how we LOVE it on Glued To My Crafts!
RELATED —> Charlie Brown Christmas Tree Keepsake

What better way to celebrate the Christmas season, than with some awesome craft time?! At Glued To My Crafts, we can help you find the right tutorial!
Are you by chance looking for more Christmas themed kid crafts from us? Check out these awesome blog posts from Glued To My Crafts:
Paper Plate Reindeer
Thumbprint Christmas Tree
Popsicle Stick Charlie Brown
Paper Plate Christmas Gnome
Wood Slice Grinch Ornament
Mixed Media Santa In The Chimney
Popsicle Stick Christmas Trees
Footprint Reindeer Keepsake Card
Cork Reindeer Ornaments
Be sure to also follow us on Facebook and Pinterest so you never miss a new tutorial from us!

Wood Slice Charlie Brown Ornament Craft Idea
Here’s your checklist of supplies to bring this craft to life:
- Large Circular Wood Slice
- Craft Paint yellow
- Tulip Puffy Paint black
- Twine or Ribbon
Prepare your creative haven by laying down a protective cover before the crafting magic begins!
Directions:
- First things first - make sure you have a good working area. I suggest placing your wood slice on a large paper plate to protect your work surface.
- Next up - simply paint one side of your wood slice completely YELLOW.
- Follow that up by adding a simple {not perfect!} zig-zag black line in the center of it, afterwards.
- And that's it! That's literally TWO painting steps.
- You will then set it aside to let it dry completely before you hot glue some twine or a piece ribbon to the back for easy hanging.

CLICK HERE TO PRINT THE DIRECTIONS FOR THIS CRAFT