
Today’s Paper Plate & Chalk Art Troll Hair kids craft tutorial is drenched with so much COLORFUL FUN!
Keep scrolling to see how we made this Paper & Chalk Troll craft idea come to life with a few simple supplies and steps! I’ll show YOU how easy it really is!

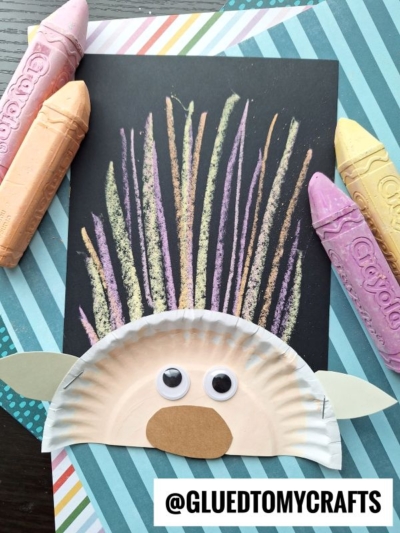
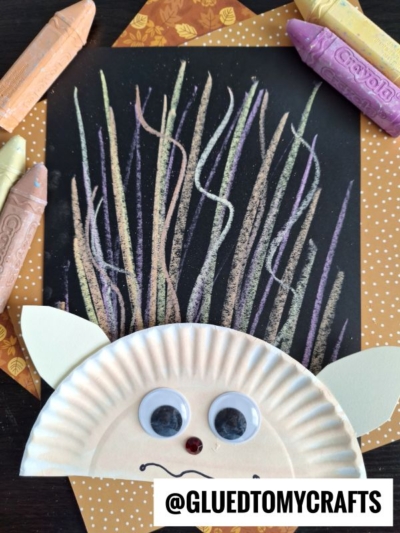
Chalk Art Troll Hair Craft Idea
You guys – I’ve done it again! I just can’t stop thinking of NEW ways to bring sidewalk chalk to paper and today I’m super excited to be sharing MY version of TROLL HAIR with this fun technique!
Our latest and greatest troll craft idea can be made ANY day of the year and only uses inexpensive materials such as sidewalk chalk, paper and an inexpensive, white paper plate.
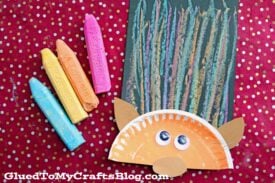
Kids can also make their rainbow hair as full or as colorful as they want! From there, they can also custom it and no two magical troll craft pieces will look alike!
Now what are we waiting for?! All the details can be found below in our step-by-step tutorial. Although I don’t have a free printable like my past chalk art tutorials, this troll inspired tutorial is really easy to start on your own and complete just as fast. Promise!
So friends – don’t let this crafty idea slip away! Bookmark this very chalk art troll hair post and later this week, make some colorful “one-of-a-kind” chalk art and paper plate trolls with your child. Happy crafting, my dear friends! I can’t wait to see your paper and chalk rainbow hair creations!
RELATED: Thumbprint Troll Hair and Sidewalk Chalk Butterfly

This fun kids craft is perfect for a rainy day. Learn how to make colorful troll hair with paper plates and chalk!
Craft Supplies:
- Small Paper Plate
- Craft Scissors
- Skin Tone Craft Paint
- Paint Brush
- Black Cardstock Paper
- Kraft/Tan Cardstock Paper
- Sidewalk Chalk
- Baby Wipes
- School Glue or Glue Stick
- Stapler
- Wiggle Eyes
Directions:
- First things first – grab your small paper plate and scissors.
- Cut the paper plate, straight down the center, into TWO equal halves.
- Reserve one half for today’s troll hair craft and save the other for a rainy day.
- Now grab your skin tone craft paint and foam paint brush.
- Squirt some paint in the middle of the paper plate half and move it around with the foam paint brush, until the paper plate is completely covered.
- When done painting, set aside the paper plate to allow it to dry completely.
- Now grab your black cardstock and the scissors again.
- Fold the black cardstock paper in half and open it back up.
- Use scissors to again to cut straight up the center, to create two equal pieces.
- Reserve one black paper piece for today’s craft and save the other for another day.
- Now grab your various pieces of colored chalk.
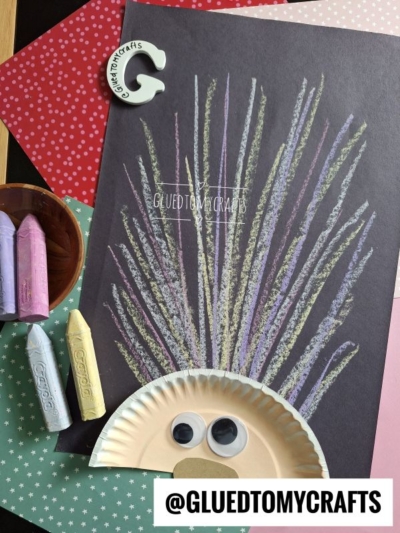
- Make several lines, all over the black cardstock, to recreate troll hair. Add as much or as little as you like.
- When done with the chalk, set aside the paper piece and clean your hands off with a few baby wipes.
- Now grab your kraft colored cardstock.
- Cut out a small oval nose and two pointy ears for the troll.
- Once you have all your paper pieces cut out and the paper plate is dry to touch, it’s time to assemble your craft! Go ahead and grab all your paper pieces, the glue, wiggle eyes and stapler.
- Start off by stapling the painted paper plate half to the bottom of the black cardstock with the chalk lines.
- From there – you can staple and/or glue the nose piece and ears to the paper plate.
- Add any other embellishments you see fit {maybe some glitter for extra sparkle!}
- Then display your custom one-of-a-kind paper chalk art troll piece proudly for all to see!
- Don’t forget to share pictures of your rainbow troll hair craft with us on your social media sites! #gluedtomycrafts
RELATED —> Popsicle Stick Trolls

At Glued To My Crafts, we have a BIG goal to step outside the traditional. It kinda gives us a thrill when we keep coming up with new ideas and we really do strive to be different from our competitors online!
So before you leave, come check out our popular Chalk Art Jellyfish, Thumbprint Dandelion and Handprint Owl Hug craft posts. All three are super unique to our craft website and sure to impress the crafty fingers that recreate them as well!

Paper Plate & Chalk Art Troll Hair Craft Idea
Here’s your checklist of supplies to bring this craft to life:
Prepare your creative haven by laying down a protective cover before the crafting magic begins!
Directions:
- First things first - grab your small paper plate and scissors.
- Cut the paper plate, straight down the center, into TWO equal halves.
- Reserve one half for today's troll hair craft and save the other for a rainy day.
- Now grab your skin tone craft paint and foam paint brush.
- Squirt some paint in the middle of the paper plate half and move it around with the foam paint brush, until the paper plate is completely covered.
- When done painting, set aside the paper plate to allow it to dry completely.
- Now grab your black cardstock and the scissors again.
- Fold the black cardstock paper in half and open it back up.
- Use scissors to again to cut straight up the center, to create two equal pieces.
- Reserve one black paper piece for today's craft and save the other for another day.
- Now grab your various pieces of colored chalk.
- Make several lines, all over the black cardstock, to recreate troll hair. Add as much or as little as you like.
- When done with the chalk, set aside the paper piece and clean your hands off with a few baby wipes.
- Now grab your kraft colored cardstock.
- Cut out a small oval nose and two pointy ears for the troll.
- Once you have all your paper pieces cut out and the paper plate is dry to touch, it's time to assemble your craft! Go ahead and grab all your paper pieces, the glue, wiggle eyes and stapler.
- Start off by stapling the painted paper plate half to the bottom of the black cardstock with the chalk lines.
- From there - you can staple and/or glue the nose piece and ears to the paper plate.
- Add any other embellishments you see fit {maybe some glitter for extra sparkle!}
- Then display your custom one-of-a-kind paper chalk art troll piece proudly for all to see!

CLICK HERE TO PRINT THE DIRECTIONS FOR THIS CRAFT