
We are going to show you how easy it is to make this super fun and completely customizable craft project using dark colored cardstock, sidewalk chalk AND our free butterfly printable!
Keep scrolling to learn more about our unique and first seen here Paper & Chalk Butterfly tutorial!

Chalk Drawn Butterfly Craft
I’ve done it again on Glued To My Crafts! Our outside the traditional chalk art ideas have been so popular as of late, that today I decided to add a SPRING THEMED version to the blog archives.
This time we are focusing on BUTTERFLIES and making them FLUTTER & pop out of the paper we are building them on!
Everything you need to begin this sidewalk chalk and paper butterfly craft can be found below, including a FREE butterfly body printable to make the process even easier. From there, all you need is a few pieces of vibrant colored sidewalk chalk and a sheet of dark colored paper. That’s it! Very basic materials you probably already have on hand!
If your child can “cut and color” they will a pro at this spring themed art project! I could easily see this idea being done with a large crowd during a family gathering, Easter celebration or in the classroom. Even adults can participate in this one too and design their own brightly colored butterfly to show off this season!
So what are we waiting for?! Let’s get this project started right now!
All the details and the free butterfly shape printable can be found below. Don’t let this blossoming abstract idea slip away. Bookmark it now and later this week, make some colorful “one-of-a-kind” chalk art butterflies with the kids & then show off those creations, with pride, with us! Happy crafting, my dear friends!
RELATED: Footprint Butterfly Keepsake and Paint Splat Butterflies

Try this fun and easy craft idea with your kids! They’ll love making these paper and chalk butterflies!
Craft Supplies:
- Butterfly Printable on our spring landing page
- White Cardstock Paper
- Crayons, Pencils, Markers etc.
- Craft Scissors
- Wiggle Eye Stickers
- Black or Gray Cardstock Paper
- Sidewalk Chalk
- Baby Wipes
- Glue Stick or School Glue
Directions:
- First things first – grab our free butterfly body shape printable listed above in the supply list.
- Next go ahead and find it on your computer, right click & print the file on a single sheet of white cardstock. One print makes TWO butterflies at once. Print as many as you like!
- Now that you have the printable, it’s time to color it ONE of the butterfly shapes with your choice of craft medium. I used crayons on mine but markers, coloring pencils etc. will work just fine!
- When done coloring in the shape, use your craft scissors to trim it out.
- Set aside the remaining/extra butterfly shape for later.
- At this point in time, if desired, add a face to your cutout. Add some wiggle eyes and use a black marker to draw on a smile.
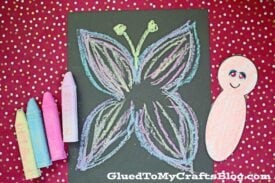
- Now grab a single sheet of black cardstock and two-three different pieces of chalk.
- Turn your black paper so it’s “portrait” on your working area.
- Envision your butterfly on the paper. Using the chalk to make several lines to make the wings. My best suggestion is to envision a four petal flower and build from there. Add as little or as many lines/colors as you like! Don’t forget to also draw on some antennas.
- When done with the chalk, use baby wipes to clean off excess chalk from fingers and hands.
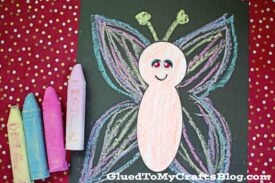
- Now grab your butterfly body cutout from earlier and choice of adhesive.
- Secure your paper piece in the center of the black paper so it looks like the butterfly wings are behind it.
- Add any other embellishments you see fit {maybe some glitter or small stickers!}
- Then display your custom one-of-a-kind paper and chalk butterfly piece proudly for all to see!
- Don’t forget to share pictures with us on your social media sites! #gluedtomycrafts
RELATED —> Paper Plate Butterfly


We really hope you enjoyed this chalk art butterfly tutorial! It’s something I’m really proud of and hope you consider recreating with your child this season!!
Also, before you leave, please consider checking out our popular Balloon Elephant Cards, Balloon Butterfly Cards and Paper Plate Carrot House craft posts!
All three are unique to us and sure to bring VIBRANT smiles to your child’s face, when you help them recreate each one this spring season!

Paper & Sidewalk Chalk Butterfly Craft
Here’s your checklist of supplies to bring this craft to life:
Prepare your creative haven by laying down a protective cover before the crafting magic begins!
Directions:
- First print out our provided printable, in color, on a single sheet of white cardstock paper. You only need one print per craft.
- Now that you have the printable, it's time to color it ONE of the butterfly shapes with your choice of craft medium.
- When done coloring in the shape, use your craft scissors to trim it out.
- Set aside the remaining/extra butterfly shape for later.
- At this point in time, if desired, add a face to your cutout. Add some wiggle eyes and use a black marker to draw on a smile.
- Now grab a single sheet of black cardstock and two-three different pieces of chalk.
- Turn your black paper so it's "portrait" on your working area.
- Envision your butterfly on the paper. Using the chalk to make several lines to make the wings. My best suggestion is to envision a four petal flower and build from there. Add as little or as many lines/colors as you like! Don't forget to also draw on some antennas.

- When done with the chalk, use baby wipes to clean off excess chalk from fingers and hands.
- Now grab your butterfly body cutout from earlier and choice of adhesive.
- Secure your paper piece in the center of the black paper so it looks like the butterfly wings are behind it.
- Add any other embellishments you see fit {maybe some glitter or small stickers!}
- Then display your custom one-of-a-kind paper and chalk butterfly piece proudly for all to see!

NEED MORE HELP DOWNLOADING OUR FREE PRINTABLES? PLEASE REFER TO OUR FAQ PAGE