
We have awoken our sleeping friend and found him hiding in a pumpkin. Keep scrolling to see how YOU and your child can recreate our Paper Plate Sloth In Pumpkin kid craft idea!

Brown Sloth In Paper Plate Pumpkin Craft
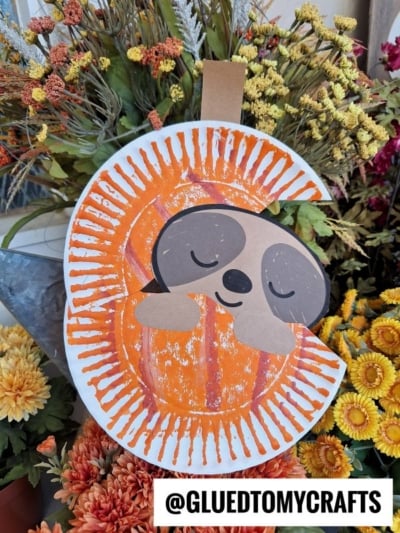
At Glued To My Crafts we just can’t stop with the new ideas! We are brewing up yet ANOTHER easy fall art project idea for our lovely readers to recreate with their children, this season. This time, it’s a paper plate pumpkin w/an adorable sloth inside! You could make him either sleeping or awake like mine 🙂
For everything you love and more this autumn season, we hope this idea is one you add to the bucket list. Hopefully you see my vision of a sloth hiding inside a pumpkin and want to join your child in the crafting fun, as well. It’s #cutenotscary and kids {and adults} can recreate it with just a few steps like cutting & gluing. Plus you don’t need to go crazy on the supply list either. A simple paper plate and cardstock paper will do!
We have all the details listed below, to help you navigate this “peeking sloth in pumpkin” craft idea today!
Happy crafting, my friends! Please don’t forget to share some pictures of your paper plate sloth in pumpkin creations on our Facebook page or tag us on Instagram! #gluedtomycrafts
RELATED: Craft Stick Hedgehog and Hedgehog In Pumpkin

All you need is a large paper plate and our free printable to make it happen. It’s an easy craft idea for kids to make at home this fall season and we hope you are inspired to recreate it today!
Craft Supplies:
- Large Paper Plate
- Orange Craft Paint
- Paint Brush
- Scissors
- Stapler
- School Glue
- Sloth Printable – on our landing page
- Printer
- Kraft Cardstock Paper
- Brown Cardstock Paper
- Green Pipe Cleaner
- Black Sharpie Marker
Directions:
- First things first – paint your paper plate completely orange. Simply squirt some paint in the center and move it around with the paint brush.
- When done painting, set it aside to let it dry completely.
- While that is drying, go ahead and grab your sloth head printable & your scissors.
- Cut out ONE of the sloth heads from the printable.
- Before you set aside the remaining paper go ahead and cut out TWO oval shapes for the paw shapes {from the blank edges of the printable.}
- At this point in time, go ahead and also cut out a rectangle shape from the brown cardstock paper, for the stem of the pumpkin.
- Set aside all your paper pieces for now.
- Next up – the “carving” of the pumpkin! Cut your orange painted paper plate in half with the scissors. But not just straight up the center. You want it a little jaggeder like a pumpkin that is cut in half.
- Now grab your stapler and staple it back together in one of the corners, so it looks like it’s propped open.
- Grab the sloth head cutout and staple it, inside the propped paper plate piece, so it looks like he is peeking from inside the pumpkin.
- Follow that up by gluing down his paws, on the front of the pumpkin.
- Use the black Sharpie marker to draw on claws on the paws and give it some dimension.
- Finally – take the green pipe cleaner and curl it around your fingers.
- Now take the brown cardstock stem you made earlier and staple it, along with the curled pipe cleaner, to the top of the paper plate.
- Add other embellishments you see fit before displaying proudly!
- Don’t forget to share pictures of your paper plate sloth in pumpkin creations with us on your social media sites! #gluedtomycrafts
RELATED —> Paper Plate Sleeping Bear
For crafty memories kids will treasure long after the holidays – please check out our popular Popsicle Stick Sloth, Leaf Lion Mane and Crinkle Paper Llama craft tutorials.
You can also keep the conversation going by joining our private Glued To My Crafts community on Facebook! It’s a great place to ask questions and share pictures of your child’s sloth creations – hint hint!

Paper Plate Sloth In Pumpkin Craft Idea
Here’s your checklist of supplies to bring this craft to life:
- School Glue
Prepare your creative haven by laying down a protective cover before the crafting magic begins!
Directions:
- First things first - paint your paper plate completely orange. Simply squirt some paint in the center and move it around with the paint brush.
- When done painting, set it aside to let it dry completely.
- While that is drying, go ahead and grab your sloth head printable & your scissors.
- Cut out ONE of the sloth heads from the printable.
- Before you set aside the remaining paper go ahead and cut out TWO oval shapes for the paw shapes {from the blank edges of the printable.}
- At this point in time, go ahead and also cut out a rectangle shape from the brown cardstock paper, for the stem of the pumpkin.
- Set aside all your paper pieces for now.
- Next up - the "carving" of the pumpkin! Cut your orange painted paper plate in half with the scissors. But not just straight up the center. You want it a little jaggeder like a pumpkin that is cut in half.
- Now grab your stapler and staple it back together in one of the corners, so it looks like it's propped open.
- Grab the sloth head cutout and staple it, inside the propped paper plate piece, so it looks like he is peeking from inside the pumpkin.
- Follow that up by gluing down his paws, on the front of the pumpkin.
- Use the black Sharpie marker to draw on claws on the paws and give it some dimension.
- Finally - take the green pipe cleaner and curl it around your fingers.
- Now take the brown cardstock stem you made earlier and staple it, along with the curled pipe cleaner, to the top of the paper plate.
- Add other embellishments you see fit before displaying proudly!


NEED MORE HELP DOWNLOADING OUR FREE PRINTABLES? PLEASE REFER TO OUR FAQ PAGE