Our Leaf Lion Mane craft idea will be MANE attraction you will recreate this your child this fall season!

Get ready for a fun and engaging craft that will keep kids entertained while creating stunning art pieces to showcase throughout the fall season.

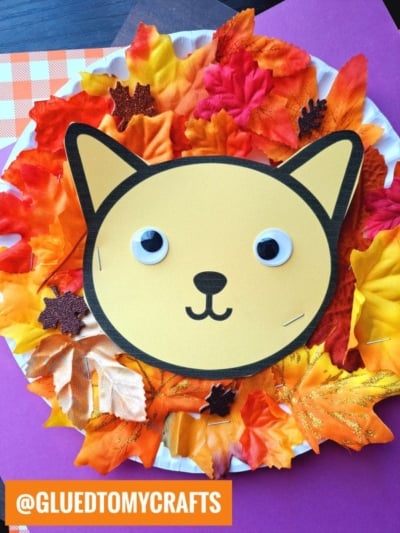
Today, we’ll be sharing a creative and inexpensive fall craft idea – making a lion’s mane out of leaves! You can easily find affordable plastic leaves at Dollar Tree, with a bag of about 50 pieces costing just one dollar. It’s a great activity to keep kids engaged while creating beautiful art pieces for the fall season.
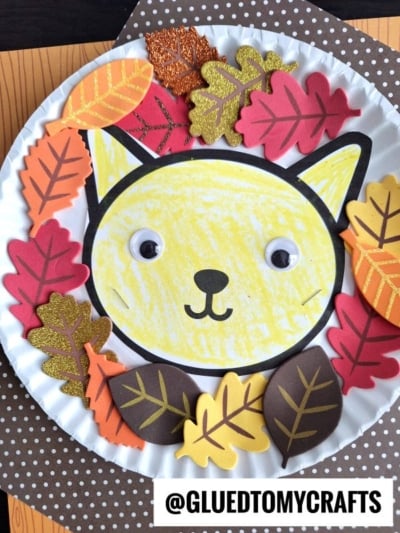
For those who prefer a more nature-inspired approach, you can also use real leaves instead of the fake ones. It’s a fun twist that allows you to head outside on a mission to find leaves to glue down.
Without further ado, let’s dive into the crafty details! You can also download the free blank lion face printable, which is upcycled from our previous chalk art lion mane post in May. Find all the information below.
Happy crafting! Don’t let this crafty abstract idea slip away. Bookmark it now and later this week, make some colorful “one-of-a-kind” leaf lion manes with your child & then show them off, with pride, with us on our Facebook page! I love seeing those pictures of your creations! #gluedtomycrafts

Craft time is a magical opportunity to explore creativity, bond with your little ones, and create memorable experiences. If you’re looking for a fun and engaging project, this Paper Plate & Leaf Lion Mane Craft is purr-fect for you!
Craft Supplies:
Before starting, gather all the materials you’ll need. For this project, you’ll require:
- Lion Printable – on our landing page
- Yellow Cardstock Paper
- Large Paper Plate
- School Glue
- Decorative Leaves
- Large Googly Eyes
Directions:
- First things first – download our free lion face printable, listed above in the supply list.
- Next, go ahead and find it on your computer {it will say chalk art lion} right click and print the file on a single sheet of YELLOW cardstock. You only need ONE printable per lion craft. Print as many as you like but only use our file for personal use please.
- Now that you have the printable, go ahead and use the scissors to trim out the lion head.
- Discard the leftover cardstock paper and set aside the paper piece lion head till later.
- Now grab your paper plate.
- Make several circular lines of glue, going outward from the center of the plate.
- Start laying the decorative leaves on top of the glue, until it starts to look like a lion’s mane. Add as many or as little as you like. Add more glue as you continue working on it.
- When done with the gluing step, go ahead and grab your lion head cutout.
- Glue the lion head to the center of your leaf design you just made.
- Add any other embellishments you see fit.
- Then display proudly for all to see!
- Don’t forget to share pictures of your Leaf Lion Mane creations on your social media sites! #gluedtomycrafts
RELATED —> Washi Tape Lion
At Glued To My Crafts, we strive to inspire YOU to do something creative EVERYDAY! Especially when it comes to crafting with little ones in your home!
So before you leave, come check out our popular Craft Stick Hedgehog, Hedgehog In Pumpkin and Unicorn Hair craft tutorials! All three are super unique and sure to impress the crafty fingers that recreate them this fall!

Paper Plate & Leaf Lion Mane Craft
Our Leaf Lion Mane craft idea will be MANE attraction you will recreate this your child this fall season!
Here’s your checklist of supplies to bring this craft to life:
- School Glue
Prepare your creative haven by laying down a protective cover before the crafting magic begins!
Directions:
- First things first - download our free lion face printable, listed above in the supply list.
- Next, go ahead and find it on your computer {it will say chalk art lion} right click and print the file on a single sheet of YELLOW cardstock. You only need ONE printable per lion craft. Print as many as you like but only use our file for personal use please.
- Now that you have the printable, go ahead and use the scissors to trim out the lion head.
- Discard the leftover cardstock paper and set aside the paper piece lion head till later.
- Now grab your paper plate.
- Make several circular lines of glue, going outward from the center of the plate.
- Start laying the decorative leaves on top of the glue, until it starts to look like a lion's mane. Add as many or as little as you like. Add more glue as you continue working on it.
- When done with the gluing step, go ahead and grab your lion head cutout.
- Glue the lion head to the center of your leaf design you just made.
- Add any other embellishments you see fit.
- Then display proudly for all to see!


NEED MORE HELP DOWNLOADING OUR FREE PRINTABLES? PLEASE REFER TO OUR FAQ PAGE
If you've enjoyed our content or have any thoughts to share, we'd love to hear from you! Mention @gluedtomycrafts or tag #gluedtomycrafts on Instagram!