Our latest art project tutorial is for those who love sloths as much as we do! Keep scrolling {don’t be slow!} to learn how to make these valentine inspired popsicle stick sloth come to life with simple craft materials and steps!

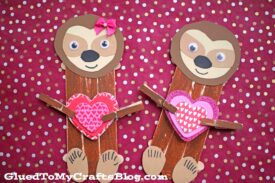
Sloth Puppet Craft Made From Wood Sticks
Don’t be a slow-poke! This latest popsicle stick kids craft idea from us may be inspired by the adorable “slow” sloth BUT I promise you it’s a quick art project that ANYONE can tackle this season! The overall project level on this one is simple. If you can glue some sticks together and paint them, YOU can make your own sloth friend within minutes!
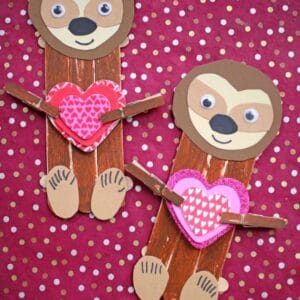
My favorite part of this Valentine’s Day inspired sloth kid craft idea, is the fact that these craft stick and paper sloth creations are holding a small, decorative heart cutout in their clothespin “paws.” I mean – hello?! It doesn’t get any cuter than that! It’s like they are handing them to YOU, the crafter.
So friends – what are you waiting for?! I told you – don’t be slow about getting to recreating this one! You can find all the crafty details that you need to know, in the full tutorial below, so you recreate it with your child today. I highly suggest adult supervision on this one though, since a glue gun is involved in the making. Other than that – this sloth inspired craft tutorial is super easy, just like ALL the tutorials you can find on Glued To My Crafts right now!
RELATED: Valentine Gingerbread House and Valentine Love Truck

Kids will love making these adorable popsicle stick sloths and you’ll love how fun & easy it is!
Craft Supplies:
- Jumbo Popsicle Sticks – 3 per craft
- Mini Popsicle Sticks – 2 per craft
- Mini Clothespins – 2 per craft
- Low Temp Glue Gun
- Brown Craft Paint
- Small Paper Plate
- Foam Paint Brush
- Small Craft Foam Hearts
- Dark Brown Cardstock Paper
- Light Brown Cardstock Paper
- Basic Paper Scissors
- Black Sharpie Marker
- Small Wiggle Eyes
- Embellishments
Directions:
- First get the glue gun hot and ready!
- Assemble the base of your sloth friend by gluing THREE jumbo popsicle sticks and TWO mini popsicle sticks together to look like a fence {3 next to each other and the mini popsicle sticks across}
- Set aside to let it dry completely. Repeat for each valentine sloth friend you want to make today.
- When dry enough, go ahead and squirt some brown craft paint on the paper plate.
- Take the foam paint brush and paint your newly made popsicle stick shape completely.
- Go ahead and also paint your TWO mini clothespins with the craft paint, as well.
- Set all the painted pieces aside.
- Now grab all your sheets of cardstock paper and scissors.
- Cut out a large circular head, nose, face, paws etc. for your valentine sloth.
- Use the sharpie marker to draw on the details.
- Go ahead and adhere the wiggle eyes in place as well.
- Now go ahead and glue ALL the paper pieces to the painted popsicle stick shape from earlier. The head towards the top and the paw cutouts on the bottom.
- This next step is CRUCIAL. Take your TWO painted mini clothespins and pinch them around the heart shape, to give the look like it’s hands/arms are holding it.
- To finish off the Popsicle Stick Heart Holding Sloth craft, hot glue the combined piece you just made, to the center of the painted popsicle stick shape.
- Add any other embellishments you see fit {maybe a small bow or a little bit of glitter!}
- Then let it dry completely before displaying proudly!!!
RELATED —> Cupcake Liner Sloth Cards

AFFILIATE LINK – PAIR OUR CRAFT IDEA WITH THE “MAMA IN THE MOON” BOOK
At Glued To My Crafts we strive to have the BEST craft tutorials on the internet! I, Stacey, am really proud of every post I hit publish on. It’s always my goal to inspire you in someway!
Just check out our Monkey, Gnome Love Bug and Handprint LOVE Keepsake craft posts to see what I’m talking about.
Hundreds of our readers have been recreating these this season and the response is amazing! All three of these posts are super unique to us and I just know you are going to love them & want to pair it with today’s sloth art project idea!

Popsicle Stick and Clothespin Sloth Craft Idea For Kids
Here’s your checklist of supplies to bring this craft to life:
Prepare your creative haven by laying down a protective cover before the crafting magic begins!
Directions:
- First get the glue gun hot and ready!
- Assemble the base of your sloth friend by gluing THREE jumbo popsicle sticks and TWO mini popsicle sticks together to look like a fence {3 next to each other and the mini popsicle sticks across}
- Set aside to let it dry completely. Repeat for each valentine sloth friend you want to make today.
- When dry enough, go ahead and squirt some brown craft paint on the paper plate.
- Take the foam paint brush and paint your newly made popsicle stick shape completely.
- Go ahead and also paint your TWO mini clothespins with the craft paint, as well.
- Set all the painted pieces aside.
- Now grab all your sheets of cardstock paper and scissors.
- Cut out a large circular head, nose, face, paws etc. for your valentine sloth.
- Use the sharpie marker to draw on the details.
- Go ahead and adhere the wiggle eyes in place as well.
- Now go ahead and glue ALL the paper pieces to the painted popsicle stick shape from earlier. The head towards the top and the paw cutouts on the bottom.
- This next step is CRUCIAL. Take your TWO painted mini clothespins and pinch them around the heart shape, to give the look like it's hands/arms are holding it.
- To finish off the Popsicle Stick Heart Holding Sloth craft, hot glue the combined piece you just made, to the center of the painted popsicle stick shape.
- Add any other embellishments you see fit {maybe a small bow or a little bit of glitter!}
- Then let it dry completely before displaying proudly!!!

Grab our favorite books via our Amazon affiliate link! In our Amazon storefront you will find books, toys and craft supplies we absolutely love using for our Glued To My Crafts tutorials!