
Say so long to the boredom blues today! Our Paper Owl On Branch craft tutorial is great for kids of ALL ages and adults will love it too! You can make them bright and colorful & fit any season you like!

Learn how to make a paper owl on a branch with this easy and fun craft tutorial for kids!
At Glued To My Crafts, we love super easy paper craft ideas. After all, paper is a crafting material we ALL have on hand. Whether plain white or a colorful stack, it’s the easiest thing to buy at pretty much any store.
Today’s owl themed paper kid craft idea has tons of cutting and gluing, so it will really work those fine motor and scissor skills with your little ones. Not to mention it’s super fun to make and kids can color their new owl friend whatever color they like, while also making him him sit in whatever SEASON they want.
Ours, for the purpose of this tutorial, is sitting in a more “spring like” setting but I could see this craft being altered in it color scheme for a snowy or even breezy fall day!
Did I mention I’ve even included a free printable to get you started with ease?! Yup! I’ve thought of it all when it comes to this wide-eyed owl friend craft!
Now friends.. what are you waiting for?! It’s going to be a HOOT for your child to make! Find all the details below, so they can make their own paper owl sitting on a tree branch craft come to life today! Happy crafting. my friends!
RELATED —> Paper Plate Owl

What a hoot! Your little ones will love this paper owl craft. It’s a perfect activity for a rainy day.
Craft Supplies:
- OWL Printable – on our landing page
- Cardstock Paper
- Choice of Coloring Medium
- Scissors
- Glue Stick
Directions:
- First things first. We are going to print out the FREE owl file listed above. You only need ONE print per paper craft. Print as many as you like!
- Use your choice of coloring medium to color in “owl shape” in the printable. Add as much or as little color as you like to really customize it.
- Once done decorating it, use scissors to trim out the owl body shape.
- Discard excess paper and set aside the owl.
- Next grab all your sheets of colored cardstock, your scissors and choice of adhesive.
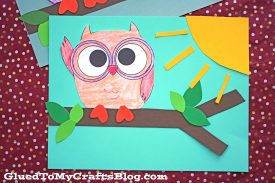
- We are going to start off my cutting out a branch from the brown cardstock and adhering it to the center of some blue cardstock.
- Then go ahead and glue the owl cutout on top of the branch, so he’s sitting nicely.
- Add leaf cutouts and two little owl feet from orange paper, to complete the scene.
- Finally, if you like, add a sun and/or cloud cutouts in the background.
- Then display your paper owl masterpiece proudly for all to see!
RELATED —> Cupcake Liner Owl

Don’t let the crafty fun stop here!!!
Love this paper owl craft idea? Be sure to check out our Handprint Owl Keepsake post and pair it together with today’s idea!
FOLLOW US ON PINTEREST SO YOU NEVER MISS A NEW TUTORIAL FROM US!

Paper Owl On Branch Craft
Here’s your checklist of supplies to bring this craft to life:
- Cardstock Paper
- Free Owl Printable - Landing Page
- Embellishments
Prepare your creative haven by laying down a protective cover before the crafting magic begins!
Directions:
- First things first. Print our provided printable on a single sheet of white cardstock paper.
- Use your choice of coloring medium to color in "owl shape" in the printable. Add as much or as little color as you like to really customize it.
- Once done decorating it, use scissors to trim out the owl body shape.
- Discard excess paper and set aside the owl.
- Next grab all your sheets of colored cardstock, your scissors and choice of adhesive.
- We are going to start off my cutting out a branch from the brown cardstock and adhering it to the center of some blue cardstock.
- Then go ahead and glue the owl cutout on top of the branch, so he's sitting nicely.
- Add leaf cutouts and two little owl feet from orange paper, to complete the scene.
- Finally, if you like, add a sun and/or cloud cutouts in the background.
- Then display your paper owl masterpiece proudly for all to see!


NEED MORE HELP DOWNLOADING OUR FREE PRINTABLES? PLEASE REFER TO OUR FAQ PAGE