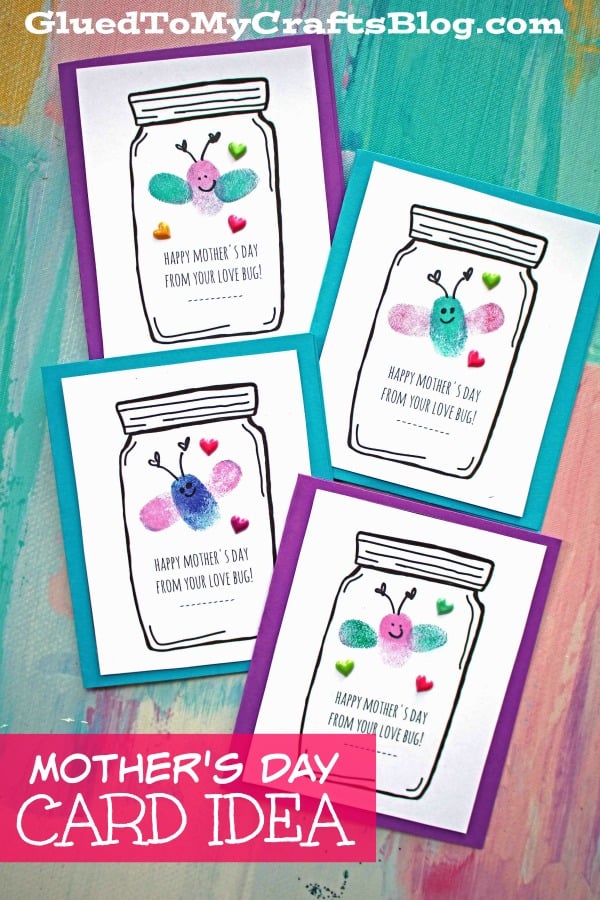
We have our latest and greatest Thumbprint Mother’s Day Love Bug Cards tutorial that is sure to bring some smiles to those who receive them! Keep scrolling for the free mason jar printable and the full how-to!
Mother’s Day Love Bug Cards For Kids To Make!
First things first – it’s the Glued To My Crafts way to make it super easy for you! You are going to start this craft by snagging the FREE MASON JAR CARD PRINTABLE below. This will make the start of your “crafting experience” seamless!
From there, you are going to print it out on simple white cardstock paper and hand it over to your child. They will complete the craft by adding a “thumbprint bug” of choice to the center of each card front and signing their name. Then – they will cut it out and make cards. That’s it! Easy peasy, just how we like it around here!!!
Our Mother’s Day Love Bug Jar Cards idea is just too easy and oh so cute! I know you are going to love it as much as I do!
So what are you waiting for?! All the details are listed below and we hope we inspired you with this quick DIY! Remember – this “Happy Mother’s Day From Your Love Bug” idea is also great for the classroom too! Happy crafting, my friends!
RELATED —> Craft Foam Love Bug

These easy and fun cards come together quickly in just a few simple steps — all you need is some paper, ink pads and your imagination to bring them to life!
Craft Supplies:
- Love Bug Card Printable – on our landing page
- White Cardstock Paper
- Paper Trimmer
- Glue Stick or Tape Runner
- Colored Cardstock Cards
- Washable Ink Pads
- Baby Wipes
- Thin Tip Sharpie Markers
- Small Heart Stickers or Rhinestones
Directions:
- First click the link listed in the supply list and print out the mason jar card template on white cardstock. One printable makes FOUR cards at a time. Please only use our file for personal use.
- Use a paper trimmer to trim out each section and make FOUR cards total.
- Adhere each cut out piece to a single cardstock card front.
- Next open your ink pads up.
- Have children place their thumb on the ink pad, then in the center of the mason jar design. Follow that up by adding two more thumbprints for “wings” on the side of the first one.
- Repeat the thumbprint step on each card.
- Use baby wipes to remove excess ink off of fingers before washing hands completely at the sink.
- Once done, they can draw on their embellishments with various markers to bring their thumbprint love bug to life.
- Add other embellishments you see fit. I highly encourage small sticker embellishments on the antennas!
- Then the last step is to sign their name on the front of the card and write a sweet message inside before they gift it away to someone special on Mother’s Day!
RELATED —> You My Sunshine Keepsake


At Glued To My Crafts we really enjoy incorporating those little thumbprints into our craft tutorials! Be sure to check out our Thumbprint Unicorn Hair, Flower and Poem and Fishbowl w/Thumbprint Fish tutorial posts for even MORE crafty inspiration.
All three of them would pair nicely with today’s thumbprint Mother’s Day love bug card tutorial – hint hint!
RELATED —> Father’s Day Love Bug Cards
