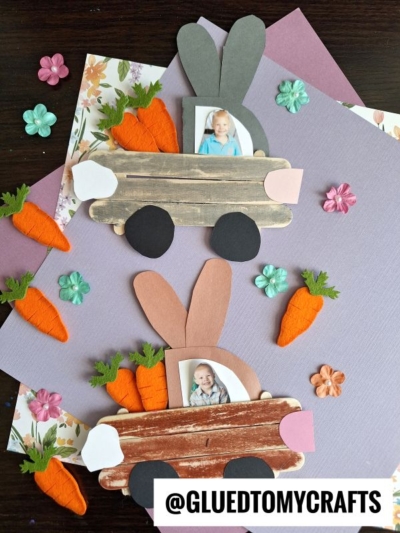
Keep the kids busy and have fun making something together! This awesome Popsicle Stick Easter Bunny Truck Craft Idea is sure to bring out their creative side.


I’ve taken our popular Christmas Truck tutorial from 2018 and I’ve upgraded it for the upcoming EASTER themed holiday!
With just a few supplies and some imagination, you can create a masterpiece that’s perfect for this joyful time of year!
This Popsicle Stick Easter Bunny Truck craft idea is simple enough for young children and even adults who are looking to explore their creative side, while giving everyone an exciting activity during all the festivities.
So on that note, what are you waiting for?! Let’s put on our creative hats, it’s time to make some lovely Easter Bunny Cars that will bring smiles all around this spring! Find all the details below, in the full tutorial from us!
Happy crafting, my friends! Be sure to follow us on Pinterest so you never miss a new tutorial from us!

These Popsicle Stick Easter Bunny Trucks will make the perfect holiday project for any mom, teacher, or crafter!
Craft Supplies:
- Jumbo Popsicle Sticks – 3 per craft
- Mini Popsicle Sticks – 2 per craft
- Small Paper Plate
- Craft Paint
- Paint Brushes
- Cardstock Paper
- Scissors
- School Glue
- Easter Stickers
Directions:
- First grab THREE jumbo popsicle sticks, TWO mini sized ones and the school glue for your craft {the popsicle stick amounts are per truck you are going to make}
- Lay the three large popsicle sticks next to each other, one by one, on a flat surface.
- Now grab your other two mini one and glue them the other direction to create a fence or door.
- Set aside to let it dry a bit.
- Repeat for each Easter truck you want to make.
- While those are drying, grab all your cardstock paper sheets and scissors.
- Cut out ALL embellishments for your truck {like circular wheels, the window of the truck, the cab, pointy ears, tail and small circle bunny nose!}
- Set all the paper pieces aside when done.
- Once the popsicle stick shape you made earlier is dry enough, go ahead and paint it with your choice of color in craft paint.
- To finish off the Popsicle Stick Easter Bunny Truck, glue the cardstock paper pieces you made earlier in place on the popsicle stick shape, as well as any other embellishments you see fit {think rhinestones, glitter, etc.}
- Don’t forget to add your Easter friend or flower stickers to the back of the truck, so it looks like they are riding along 🙂
- If desired – go ahead and use Sharpie markers to draw a “driver” in the window of your truck but I opted for a more plain look.
- When it’s all done and dry, display it or play with proudly!
RELATED —> Cherry Blossom Popcorn Tree
AFFILIATE LINK – PAIR OUR CRAFT IDEA WITH THIS BOOK RECOMMENDATION
Make the Easter season extra memorable with tons of crafty inspiration from us! So on that note, before you leave, we want YOU to check out our popular Carrot Car, Bunny Puppet and Egg Bunny House craft ideas! All three of which would pair nicely with today’s tutorial!

Popsicle Stick Bunny Truck Craft
Keep the kids busy and have fun making something together! This awesome Popsicle Stick Easter Bunny Truck Craft Idea is sure to bring out their creative side.
Here’s your checklist of supplies to bring this craft to life:
- 3 Jumbo Popsicle Sticks
- 2 Mini Popsicle Sticks
- Craft Paint
- Cardstock Paper
- Embellishments
- 1 Scissors
- School Glue
Prepare your creative haven by laying down a protective cover before the crafting magic begins!
Directions:
- First grab THREE jumbo popsicle sticks, TWO mini sized ones and the school glue for your craft {the popsicle stick amounts are per truck you are going to make}
- Lay the three large popsicle sticks next to each other, one by one, on a flat surface.
- Now grab your other two mini one and glue them the other direction to create a fence or door. Set aside to let it dry a bit. Repeat for each Easter truck you want to make.
- While those are drying, grab all your cardstock and glitter paper. Cut out ALL embellishments for your truck {like circular wheels, the window of the truck, the cab, pointy ears, tail and small circle bunny nose!}
- Set all the paper pieces aside when done.
- Once the popsicle stick shape you made earlier is dry enough, go ahead and paint it with your choice of color in craft paint.
- To finish off the Popsicle Stick Easter Bunny Truck, glue the cardstock pieces you made earlier in place on the popsicle stick shape, as well as any other embellishments you see fit {think rhinestones, glitter, etc.}
- Don't forget to add your Easter friend or flower stickers to the back of the truck, so it looks like they are riding along 🙂
- If desired - go ahead and use Sharpie markers to draw a "driver" in the window of your truck but I opted for a more plain look.
- When it's all done and dry, display it or play with proudly!


CLICK HERE TO PRINT THE DIRECTIONS FOR THIS CRAFT
If you've enjoyed our content or have any thoughts to share, we'd love to hear from you! Mention @gluedtomycrafts or tag #gluedtomycrafts on Instagram!