Get the kids involved in this super fun and easy craft! Let them get creative with paper plates and make their very own groundhog to celebrate Groundhog's Day.

Ladies and gentlemen, it’s that time of year again where we eagerly await the fate of spring being officially declared.
On February 2nd, all eyes turn to a chubby little creature known as the groundhog, who is said to have the power to predict how much longer winter will last. And what better way to celebrate this fun and quirky tradition than with an adorable craft idea for kids?!

Get ready to channel your inner Punxsutawney Phil and create some paper plate groundhogs with your little ones!
This simple and budget-friendly activity is perfect for any age group and guarantees hours of enjoyment while waiting for winter’s end.
So grab those paper plates and tissue paper, because we’re about to dive into this delightful crafting adventure!

With Groundhog Day just around the corner, what better way to get into the spirit than creating a cute paper plate groundhog craft together? This simple yet creative project is suitable for kids of all ages and can be easily adapted for different skill levels!
Craft Supplies:
- Large Paper Plate {1 per craft}
- Light Brown Tissue Paper
- Scissors
- School Glue
- Cardstock Paper {brown, white & tan}
- Pencil
- Stapler
- Large Wiggle Eyes {2 per craft}
Directions:
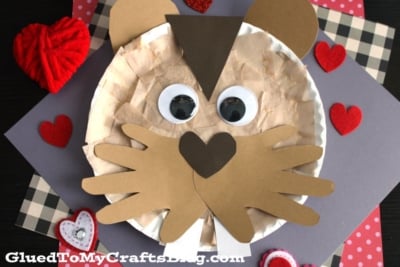
- First have children cut up the light tan tissue paper into small squares.
- Now take the large paper plate and put a good amount of glue all over it.
- Have children place the tissue paper on top of the glue, until the paper plate is completely covered.
- When done, set aside the paper plate to allow it dry a bit.
- Now grab ALL the sheets of cardstock, pencil and scissors.
- Trace your child’s hands on the light tan cardstock.
- Trim out the traced handprint pieces.
- Use the stapler to staple them together to look like a beard.
- Next, out the remaining cardstock, cut out some ears, teeth and a heart shaped nose for the groundhog.
- To finish off the paper plate groundhog craft, simply glue/staple the cardstock and wiggle eyes pieces in place.
- Then display proudly for all to see!!!
- Don’t forget to share pictures of your completed craft on your various social media sites! #gluedtomycrafts
RELATED —> Popsicle Stick Groundhog

Let us work our craft magic on you! If you are looking for even MORE easy kids craft ideas using paper plates, be sure to check out these fun posts listed below.

Paper Plate Groundhog Craft Idea For Groundhog's Day
Get the kids involved in this super fun and easy craft! Let them get creative with paper plates and make their very own groundhog to celebrate Groundhog's Day.
Here’s your checklist of supplies to bring this craft to life:
Prepare your creative haven by laying down a protective cover before the crafting magic begins!
Directions:
- First have children cut up the light tan tissue paper into small squares.
- Now take the large paper plate and put a good amount of glue all over it.
- Have children place the tissue paper on top of the glue, until the paper plate is completely covered.
- When done, set aside the paper plate to allow it dry a bit.
- Now grab ALL the sheets of cardstock, pencil and scissors.
- Trace your child's hands on the light tan cardstock.
- Trim out the traced handprint pieces.
- Use the stapler to staple them together to look like a beard.
- Next, out the remaining cardstock, cut out some ears, teeth and a heart shaped nose for the groundhog.
- To finish off the paper plate groundhog craft, simply glue/staple the cardstock and wiggle eyes pieces in place.
- Then display proudly for all to see!!!

CLICK HERE TO PRINT THE DIRECTIONS FOR THIS CRAFT
If you've enjoyed our content or have any thoughts to share, we'd love to hear from you! Mention @gluedtomycrafts or tag #gluedtomycrafts on Instagram!