eady for a crafty adventure? Follow along with us as we use popsicle sticks and some imagination to create an adorable groundhog! Your kids will love it!


It’s “typically” not a holiday a lot of us focus on or plan to celebrate these days BUT I “still” think it would be a lot of fun to pull together a quick craft with your child, to mark the occasion. Just something to say, “Hey, we celebrated!”
So on that note if you are looking for something unique, that is also super easy, I’m happy to say you landed on the PERFECT Groundhog Day themed craft that I designed in honor of the special guest!
Our craft stick groundhog idea actually came together from things we already had in our craft stock pile and I’m sure you can say the same. With that being said, there really is no excuse! All you need is jumbo popsicle sticks {as you know, my fav!} cardstock paper, craft paint and glue. Really basic materials!
So friends – keep scrolling because I’ll be showing YOU how simple it is to pull together this Popsicle Stick Groundhog Friend Kid Craft in no time! No doubt about it, with it, you are sure to have a great day talking about the history of Groundhog Day and showing off those crafty creations. Maybe you can even take them outside to see if THEY see their shadow that day!
Whatever you decide to do, I hope you have fun with it! Now check out the full tutorial below and make a game plan for February 2nd!

Our Popsicle Stick Groundhog tutorial for kids is so easy to follow and sure to be a big hit with your little ones!
Craft Supplies:
Gather these supplies before starting your popsicle stick groundhog craft:
- Jumbo Wood Sticks – 3 per craft
- School Glue
- Brown Craft Paint
- Paper Plate
- Paint Brush
- Scissors
- Brown Cardstock Paper
- White Cardstock Paper
- Black Cardstock Paper
- Wiggle Eyes – 2 per craft
Directions:
- The fun starts here! First things first – grab three popsicle sticks {three per groundhog} as well as the craft paint supplies.
- Squirt your brown craft paint on the paper plate.
- Grab your paint brush and go ahead & paint the THREE popsicle sticks completely.
- Next up – glue the three painted sticks together to look like a triangle with the school glue.
- Set aside the triangle piece to let it dry completely.
- Repeat for each groundhog face you want to make today.
- While that is drying, grab all your paper sheets and scissors.
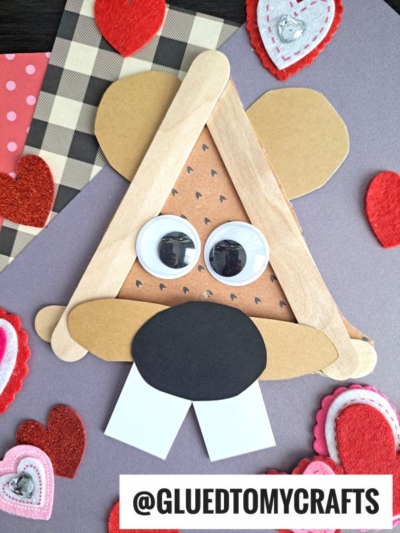
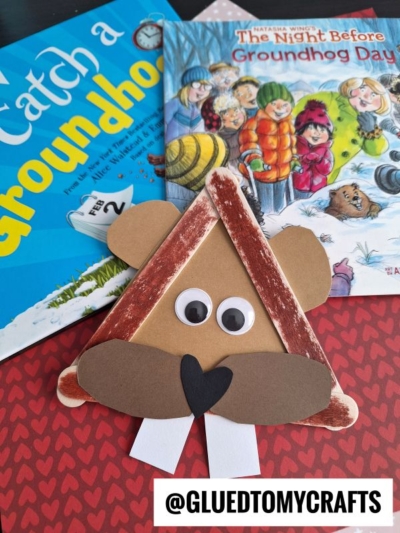
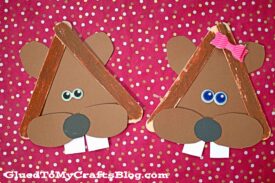
- Cut a triangular shape, from the brown cardstock paper, that will be placed within the popsicle stick design and be the face of the groundhog.
- Out of the remaining cardstock, you want to cut out ears, his snout, nose and teeth.
- To finish off the Popsicle Stick Groundhog – go ahead and glue all your paper pieces in place, with some school glue on the painted popsicle stick shape. The large brown triangle will go on the back of the popsicle stick shape, while all the other pieces go on the front.
- Then add other embellishments they see fit to complete the look {like maybe a small bow for a girl groundhog!}
- Once done, set aside to let it dry completely before displaying proudly!
RELATED —> Popsicle Stick Turkey

AFFILIATE LINK – PAIR OUR CRAFT IDEA WITH THIS BOOK RECOMMENDATION
Let us work our craft magic on you!
If you are looking for even MORE easy kids craft ideas from Glued To My Crafts, be sure to check out these fun posts listed below.

Popsicle Stick Groundhog Craft
eady for a crafty adventure? Follow along with us as we use popsicle sticks and some imagination to create an adorable groundhog! Your kids will love it!
Here’s your checklist of supplies to bring this craft to life:
- School Glue
- 1 Scissors
Prepare your creative haven by laying down a protective cover before the crafting magic begins!
Directions:
- The fun starts here! First things first - grab three popsicle sticks {three per groundhog} as well as the craft paint supplies.
- Squirt your brown craft paint on the paper plate.
- Grab your paint brush and go ahead & paint the THREE popsicle sticks completely.
- Next up - glue the three painted sticks together to look like a triangle with the school glue.
- Set aside the triangle piece to let it dry completely.
- Repeat for each groundhog face you want to make today.
- While that is drying, grab all your paper sheets and scissors.
- Cut a triangular shape, from the brown cardstock paper, that will be placed within the popsicle stick design and be the face of the groundhog.
- Out of the remaining cardstock, you want to cut out ears, his snout, nose and teeth.
- To finish off the Popsicle Stick Groundhog – go ahead and glue all your paper pieces in place, with some school glue on the painted popsicle stick shape. The large brown triangle will go on the back of the popsicle stick shape, while all the other pieces go on the front.
- Then add other embellishments they see fit to complete the look {like maybe a small bow for a girl groundhog!}
- Once done, set aside to let it dry completely before displaying proudly!

CLICK HERE TO PRINT THE DIRECTIONS FOR THIS CRAFT
If you've enjoyed our content or have any thoughts to share, we'd love to hear from you! Mention @gluedtomycrafts or tag #gluedtomycrafts on Instagram!