This spring season let your child’s creativity shine by making some one-of-a-kind puppets together!


Are you looking for a fun and easy craft activity to do with your kids? If so, look no further because Glued To My Crafts is here to help!
Our latest “wooden spoon fairy” tutorial is the perfect way to get creative with your little ones!
Not only will this project keep them from getting bored on rainy or cold days, but it also teaches them important skills like following directions and using their imagination. So let’s get crafty!
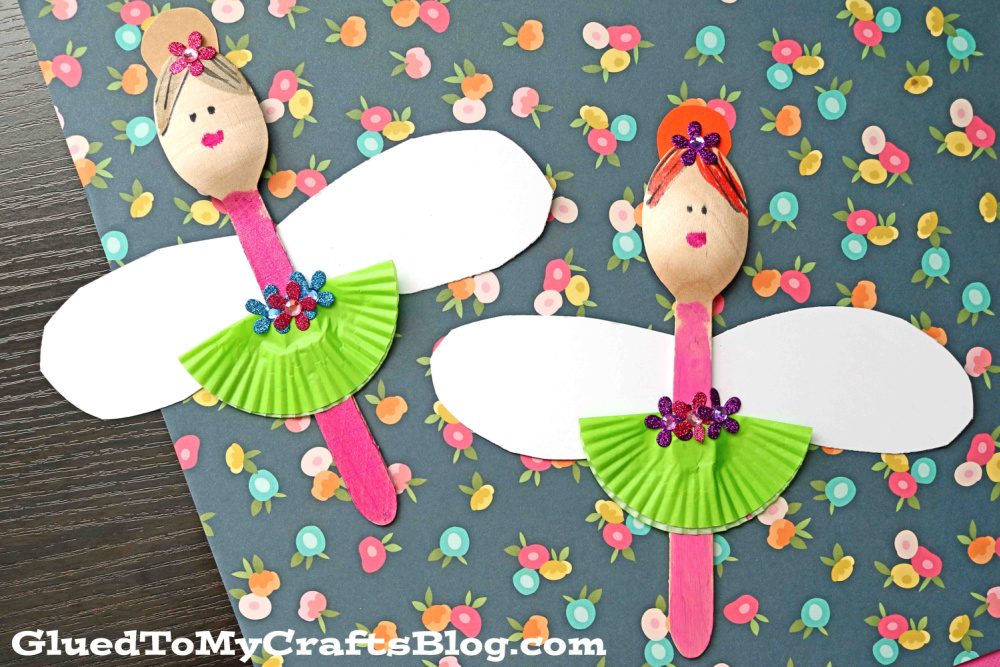
Make your child’s fairy dreams come true with today’s Wooden Spoon Fairies kids craft idea! These beautiful fairies are absolutely perfect for pretend play pieces and/or spring decorations in your home! Heck – you can also place these in your very own garden to admire.
With just a few simple supplies such as cupcake liners, cardstock paper and of course an inexpensive wooden spoon – you and you child can create some adorable fairy puppets that are sure to bring hours of imaginative playtime fun. Not just for kids – but adults too!
Craft Supplies:
- Wooden Craft Spoons – 1 per craft
- Craft Paint
- Paint Brushes
- Thin-Tip Markers
- School Glue
- Cardstock Paper
- Mini Cupcake Liners
- Craft Scissors
Directions:
- First things first – color the handle of the wooden spoon completely. This is the body of the fairy.
- When done, set aside to let it dry completely.
- Now grab your sheets of cardstock paper.
- Cut out the hair and wings for the fairy.
- Go ahead and glue those pieces in place, on the decorated spoon.
- Finally, take ONE mini cupcake liner and flatten it out with your hands.
- Go ahead and now fold it in half & glue it to your spoon to create the tutu for the fairy.
- To finish off the Wooden Spoon Fairy – use the thin tip markers to draw on a face, on the larger end of the spoon.
- Follow that up with other embellishments you see fit. The possibilities are endless on this step!
- Once done, set aside to let it dry completely before displaying/playing with proudly!!!
RELATED —> Paper Bag Mermaid

AFFILIATE LINK – PAIR OUR CRAFT IDEA WITH THIS BOOK RECOMMENDATION
If you are looking for even MORE easy spring themed kid craft ideas, be sure to check out these fun posts listed below:
- Carrot Garden Sensory Bin
- Handprint Bunny Keepsake
- Paper Plate Honey Bee
- Dirt Pudding Snack Cups
- Popsicle Stick Flowers
- Paper Bag Bunny
- Thumbprint Bunny Cards
- Magical Fairy Crafts

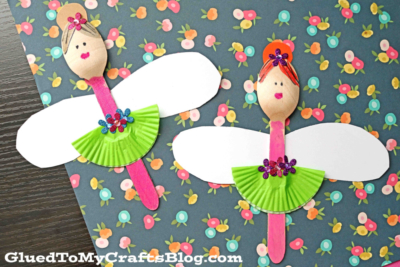
Wooden Spoon Fairy Puppet Craft Idea
This spring season let your child’s creativity shine by making some one-of-a-kind puppets together!
Here’s your checklist of supplies to bring this craft to life:
- School Glue
Prepare your creative haven by laying down a protective cover before the crafting magic begins!
Directions:
- First things first - color the handle of the wooden spoon completely. This is the body of the fairy.
- When done, set aside to let it dry completely.
- Now grab your sheets of cardstock paper.
- Cut out the hair and wings for the fairy.
- Go ahead and glue those pieces in place, on the decorated spoon.
- Finally, take ONE mini cupcake liner and flatten it out with your hands.
- Go ahead and now fold it in half & glue it to your spoon to create the tutu for the fairy.
- To finish off the Wooden Spoon Fairy - use the thin tip markers to draw on a face, on the larger end of the spoon.
- Follow that up with other embellishments you see fit. The possibilities are endless on this step!
- Once done, set aside to let it dry completely before displaying/playing with proudly!!!

CLICK HERE TO PRINT THE DIRECTIONS FOR THIS CRAFT
If you've enjoyed our content or have any thoughts to share, we'd love to hear from you! Mention @gluedtomycrafts or tag #gluedtomycrafts on Instagram!