Glued To My Crafts

Join thousands of others who have gotten GLUED to our craft tutorials!

  • Home
  • Privacy Policy
  • Craft Safety Guidelines
  • Seasonal Themes
    • New Years
    • Valentine’s Day
    • St. Patrick’s Day
    • Spring
    • Easter
    • Mother’s Day
    • Summer
    • Father’s Day
    • Patriotic
    • Halloween
    • Thanksgiving
    • Fall
    • Winter
    • Christmas
    • Snowmen
    • Story Time
  • About Us
  • Our Amazon Storefront
  • Monthly Themes
    • January Craft Ideas
    • February Craft Ideas
    • March Craft Ideas
    • April Craft Ideas
    • May Craft Ideas
    • June Craft Ideas
    • July Craft Ideas
    • August Craft Ideas
    • September Crafts
    • October Crafts
    • November Crafts
    • December Crafts

Paper Bag Mermaid Puppet Craft Idea

When engaging in craft activities, it is important for young children to have adult supervision at ALL times. It is also recommended to use supplies that are suitable for your child's age. Feel free to modify materials or steps to meet your specific requirements. Please refer to our safety guidelines for more information.

As an Amazon Associate I earn from qualifying purchases. This post may contain affiliate links. For more information, please see our disclosure policy.

UPDATE FOR 2026 - To reduce storage costs and download fees, we recently made some changes to our website. The password for all our files this year is GLUEDTOMYCRAFTS2026. No sign-up is required to download our free printables! You can enjoy our printables without creating an account or paying for Box.com. Simply follow the download instructions on our FAQ PAGE.

Not only is this mermaid craft idea simply adorable but it's also completely customizable & perfect for some puppet play
SKIP THE FLUFF AND PRINT THE DIRECTIONS
Two handmade mermaid paper bag puppets with yarn hair, googly eyes, shell bras, painted tails, and glitter details shine on a star-patterned background. Text reads MERMAIDS PUPPETS—perfect for your next mermaid paper party bags craft!.

We are splashing into craft heaven with this awesome Paper Bag Mermaid Puppet kid craft tutorial! Keep scrolling for the full how-to and a quick joke as well!

Two handmade mermaid paper bag puppets with yarn hair, googly eyes, shell bras, painted tails, and glitter details shine on a star-patterned background. Text reads MERMAIDS PUPPETS—perfect for your next mermaid paper party bags craft!.

Mermaid Puppet Made From A Brown Paper Bag

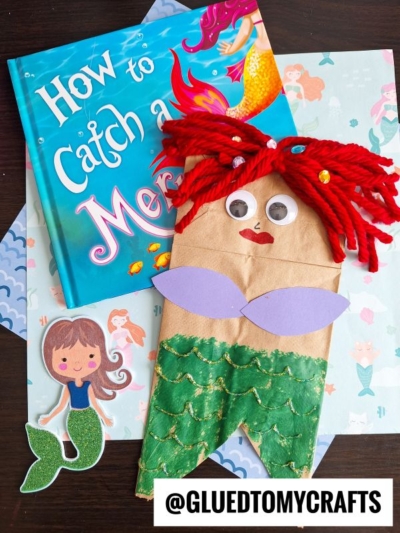
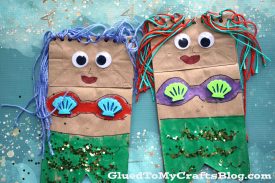
Today’s pretend mermaid play kid art project is full of mermaid whimsy! With just some inexpensive brown paper bags, tons of craft paint and colorful craft yarn hair – you too can create some one-of-a-kind and shimmery mermaids with your child today. Don’t you just love the yarn hair element?!

Not only is this Paper Mermaid art project idea simply adorable but it’s also completely customizable and perfect for some beach-themed puppet play at home!

On a budget? No problem! We are talking only a few dollars {maybe even cents} for this DIY craft! I personally love hitting up my local dollar store for materials to use in crafts like today.

So this upcoming summer season let your child’s creativity shine by kicking it off this awesome ocean themed mermaid craft today! Find everything you need to know in the full tutorial below! Happy crafting, my friends!

RELATED: Unicorn Puppet and Mermaid Tails

Two handmade mermaid paper bag puppets with yarn hair, googly eyes, shell bras, painted tails, and glitter details shine on a star-patterned background.

You don’t need expensive materials to make something beautiful – just some imagination and creativity!

Craft Supplies:

  • Craft Paint, Crayons, Markers etc.
  • Brown Paper Bag – 1 per craft
  • Craft Yarn
  • Craft Scissors
  • Single Hole Punch
  • Large Wiggle Eyes
  • School Glue or Glitter Glue

Directions:

  • First things first for our paper bag puppet – we are going to make the fins for your mermaid. Lay your paper bag on a flat surface with the opening of the bag facing you.
  • Take your scissors and cut out a small triangle to make TWO fins for the mermaid tail {see our images for an example.} Just don’t cut TOO much off.
  • Next up, decorate your paper bag however you like with craft paint, markers, crayons etc. Really let those creative juices fly! I would definitely start from the bottom by coloring in the fins, then working towards her bralette and then finishing with her face.
  • When done decorating, take your single hole punch and punch a few holes along the bottom of the paper bag {where you made her face.}
  • Set aside the bag.
  • Cut several long pieces of yarn.
  • Tie/secure the yarn pieces in place, in the hole punch holes, to make the mermaid hair. Add as much or as little yarn as you like.
  • Finally – we are going to glue the wiggle eyes in place so your mermaid friend can see.
  • Then display the finished paper bag mermaid piece proudly or play with it like a puppet.

RELATED —> Clothespin Mermaids

A paper bag mermaid puppet decorated with googly eyes, red lips, a hand-drawn shell top, and red, green, and blue yarn hair. The background features extra yarn and a blue surface—perfect inspiration for mermaid paper party bags.

If you are looking for even MORE beach themed and/or mermaid craft ideas, from Glued To My Crafts, please stick around on our website and check out our Mermaid House and Wooden Spoon Mermaid craft posts!

Both of which would pair nicely with today’s paper bag puppet idea – hint hint!

stacey-signature-2023

Two handmade mermaid paper bag puppets with yarn hair, googly eyes, shell bras, painted tails, and glitter details shine on a star-patterned background. Text reads MERMAIDS PUPPETS—perfect for your next mermaid paper party bags craft!.
PRINT

Paper Bag Mermaid Puppet Craft Idea

Not only is this mermaid craft idea simply adorable but it's also completely customizable & perfect for some puppet play

Here’s your checklist of supplies to bring this craft to life:

  • 1 Brown Paper Bag
  • 2 Large Wiggle Eyes
  • Craft Yarn
  • Crayons, Markers or Coloring Pencils
  • Scissors
  • Single Hole Paper Punch
  • School Glue
  • Glitter Glue

Prepare your creative haven by laying down a protective cover before the crafting magic begins!

Directions:

  • First things first for our paper bag puppet - we are going to make the fins for your mermaid. Lay your paper bag on a flat surface with the opening of the bag facing you.
  • Take your scissors and cut out a small triangle to make TWO fins for the mermaid tail {see our images for an example.} Just don't cut TOO much off.
  • Next up, decorate your paper bag however you like with craft paint, markers, crayons etc. Really let those creative juices fly! I would definitely start from the bottom by coloring in the fins, then working towards her bralette and then finishing with her face.
  • When done decorating, take your single hole punch and punch a few holes along the bottom of the paper bag {where you made her face.}
  • Set aside the bag.
  • Cut several long pieces of yarn.
  • Tie/secure the yarn pieces in place, in the hole punch holes, to make the mermaid hair. Add as much or as little yarn as you like.
  • Finally - we are going to glue the wiggle eyes in place so your mermaid friend can see.
  • Then display the finished paper bag mermaid piece proudly or play with it like a puppet.
    Paper Bag Mermaid Puppet - Kid Craft
MINI-HEARTS-page-separator-logo-gluedtomycrafts

CLICK HERE TO PRINT THE DIRECTIONS FOR THIS CRAFT

If you've enjoyed our content or have any thoughts to share, we'd love to hear from you! Mention @gluedtomycrafts or tag #gluedtomycrafts on Instagram!

Craft Activity Safety Guidelines:

Always Ensure Adult Supervision - Young children should be supervised at all times when engaging in craft activities. This is essential to keep them safe and ensure materials are used correctly. Use Age-Appropriate Supplies - Choose craft supplies that are suitable for your child’s age. Check labels for recommendations and avoid items with small parts or sharp edges for younger children. Modify as Needed - Feel free to adapt materials or steps to meet your child's abilities and safety needs. For example, substitute scissors with safety scissors if necessary. Keep an Eye on Allergies - Be mindful of potential allergens in craft materials like glue, paint, or certain fabrics. Opt for non-toxic and hypoallergenic options whenever possible. Organize and Secure Supplies - Keep all craft tools and materials organized. Store sharp objects, small parts, and potentially hazardous items out of reach when not in use. Following these guidelines will ensure that crafts remain fun, creative, and, most importantly, safe for everyone involved!


OUR PRIVACY POLICY

OUR COPYRIGHT POLICY

  • Email
  • Facebook
  • Instagram
  • Pinterest
  • Twitter
  • YouTube

LOOKING FOR SOMETHING?

EXPLORE OUR SITE:

TRENDING TODAY:

  • A pink hand-shaped bookmark with red heart stickers and star confetti surrounds a round note that reads a heartfelt message about love and reading. The image is from GluedToMyCraftsBlog.com. Handprint Bookmark Keepsake: A Gift That Holds Your Spot
  • A colorful craft project featuring a yellow felt moon, sparkly stars, and heart shapes, with glue and a heartfelt message. Torn Paper Love You To The Moon and Back Card Craft Idea For Kids
  • A handmade card with a rocket drawing, hearts, and messages of love. Felt hearts and an envelope are around it. Handprint Rocket Keepsake - I Love You Because
  • A vibrant Valentine's Day craft showcasing a torn-paper bumblebee with googly eyes on a white sheet, accompanied by the text "MY VALENTINE!" The scene is decorated with felt hearts, heart-shaped gems, and patterned papers, with a glue bottle and crafting supplies adding to the creative atmosphere. Torn Paper Bee My Valentine Card Craft Idea For Valentine's Day
  • A flat lay of handmade Valentine’s Day cards and decorations, including paper flowers, felt hearts, an envelope, and printed cards with romantic poems, arranged on a gray and pink background. Capture Memories With These 6 Handprint Flower Poems
  • Flat lay of a torn paper dandelion craft featuring a white sheet with a black dandelion outline. Torn yellow, pink, and purple paper pieces are glued to the dandelion head, simulating seeds. Surrounding the craft are Elmer's glue, felt hearts, paper flowers, and patterned scrapbook paper. The text 'MAKING WISHES, ONE PIECE OF PAPER AT A TIME.' and 'GluedToMyCraftsBlog.com' are printed on the white sheet. Torn Paper Dandelion Craft: Making Wishes, One Piece at a Time
  • A playful torn paper cactus craft with hearts and flowers. Includes glue and felt hearts. Torn Paper Cactus Card: A Sweet Mother's Day Craft
  • A colorful handprint craft made from purple paper with glitter edges sits on a multicolored polka dot background. A round tag with a poem is attached below, tied with red and white string. Flowers are visible in the corner. Easy Handprint Flower Craft with Poem – Perfect Spring DIY for Kids
  • A purple paper butterfly made from handprint cutouts is decorated with glitter and a smiling face. A round poem about sending love is in the center. The background is colorful and the GluedToMyCraftsBlog.com watermark is visible. Handprint & Popsicle Stick Butterfly Poem Keepsake
  • A craft project with yellow crepe paper fries in a red-striped paper container, a label reading Youre UN-FRY-GETTABLE!, red heart decorations, Elmers glue, and a roll of yellow crepe paper on a purple background. Torn Crepe Paper Fries Craft Idea For Kids

© 2012–2026 Glued To My Crafts
All activities should be supervised by an adult at all times. Please refer to our safety guidelines for more information.


Please note that all the content of the website, including printables, are for classroom and personal use only. This means that any digital item you download from our site can be used for non-commercial use only. We kindly request that you do not reproduce or sell our creations. We appreciate your understanding and cooperation in respecting our content and intellectual property rights.

Accessibility Adjustments

Powered by OneTap

How long do you want to hide the toolbar?
Hide Toolbar Duration
Select your accessibility profile
Vision Impaired Mode
Enhances website's visuals
Seizure Safe Profile
Clear flashes & reduces color
ADHD Friendly Mode
Focused browsing, distraction-free
Blindness Mode
Reduces distractions, improves focus
Epilepsy Safe Mode
Dims colors and stops blinking
Content Modules
Font Size

Default

Line Height

Default

Color Modules
Orientation Modules