
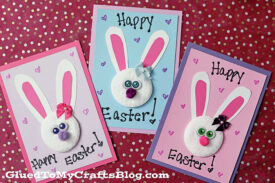
Our Cotton Pad Bunny Easter Card idea is completely customizable and kids will LOVE making & sharing them too!

Bunny Cards Made With Cotton Ball
Hi my crafty friends – our latest Easter themed tutorial is inspired by the beautiful spring weather we are currently having and the upcoming holiday, as well.
Today I’m sharing these DIY Easter Bunny Cards that include super cute Easter bunnies that are made out of cotton pads. It’s completely customizable {no two bunnies should be alike!} and kids will LOVE making & sharing them too!
These are perfect to send to far-away family members this upcoming Easter holiday or ANY day of the year – honestly! Think birthdays, thank you cards, just because notes….whatever your heart desires!
So gather these simple craft supplies, follow the full cotton pad bunny card tutorial I’ve included below and have a great time making some one-of-a-kind DIY Easter cards with your child today!
Happy crafting, my friends!!! Don’t forget to share pictures of your creative Easter bunny cards made from cotton pads, by tagging our page on Instagram! I can’t wait to see what you design for your spring cards! #gluedtomycrafts
RELATED —> Cotton Pad Cupcakes

Whether you’re a mom, teacher, crafter or just someone with lots of creativity and imagination, this easy-to-make project can be great for all skill levels!
Card Supplies:
- Cardstock Cards
- Large, White Cotton Pads
- Craft Scissors
- White Cardstock Paper
- Pink Cardstock Paper
- Small Wiggle Eyes
- Thick Tacky Glue
- Small Pom Poms
- Colored Markers
Directions:
- First things first – if you need to make your cardstock paper card, go ahead and do that. Simply fold a single sheet of colored cardstock in half to make a card. Trim down the sides with scissors if need be for a desired card size. Set aside. Repeat for each bunny card you want to make today.
- Now grab your white and pink colored cardstock paper.
- Cut out TWO white bunny ears per cards and TWO smaller pink inside pieces per card.
- Glue them together to complete the bunny ears.
- Next grab ONE white circle cotton pad and glue it to the center of your cardstock card front.
- Go ahead and also glue on the cardstock bunny ear cutouts you just made, right above the cotton pad piece {see our picture for an example} This will be the bunny’s head and the star of your cards!
- To finish off your DIY Easter Bunny cards, go ahead and glue on a pom pom nose, as well as wiggle eyes for your bunny to see with {this really gives them life!}
- Then add other embellishments you see fit and for a custom look, like some pretty bows or glitter.
- If desired, write the punny “Hoppy Easter” saying on the front of your finished cards with markers {as well as in the inside} and gift it away to the lucky receiver.
Card Example Sayings:
- HOPPY Easter!
- You make my heart HOP!
- Sending BUNNY kisses your way!
- Some BUNNY loves you!
- Hippity Hoppity, stopping by to say…
RELATED —> Cotton Ball Bunny Cupcake

Our kid craft tutorials are so easy to recreate!
If you loved today’s cotton pad bunny card idea, be sure to also check out our Footprint Carrot, Potato Stamped Bunny and Cotton Pad Chick Card craft tutorials for even more crafty ideas! ALL of which would pair nicely with an Easter party theme – hint hint!

Cotton Pad Bunny Card Craft Idea
Here’s your checklist of supplies to bring this craft to life:
Prepare your creative haven by laying down a protective cover before the crafting magic begins!
Directions:
- First things first - if you need to make your cardstock paper card, go ahead and do that. Simply fold a single sheet of colored cardstock in half to make a card. Trim down the sides with scissors if need be for a desired card size. Set aside. Repeat for each bunny card you want to make today.Cardstock Paper
- Now grab your white and pink colored cardstock paper.
- Cut out TWO white bunny ears per cards and TWO smaller pink inside pieces per card.
- Glue them together to complete the bunny ears.
- Next grab ONE white circle cotton pad and glue it to the center of your cardstock card front.1 Cotton Pads
- Go ahead and also glue on the cardstock bunny ear cutouts you just made, right above the cotton pad piece {see our picture for an example} This will be the bunny’s head and the star of your cards!
- To finish off your DIY Easter Bunny cards, go ahead and glue on a pom pom nose, as well as wiggle eyes for your bunny to see with {this really gives them life!}2 Wiggle Eyes, 1 Small Pom Poms
- Then add other embellishments you see fit and for a custom look, like some pretty bows or glitter.
- If desired, write the punny “Hoppy Easter” saying on the front of your finished cards with markers {as well as in the inside} and gift it away to the lucky receiver.

CLICK HERE TO PRINT THE DIRECTIONS FOR THIS CRAFT