
Looking for a fun and easy kids craft idea? This popsicle stick groovy buttons craft is perfect for toddlers and preschoolers!

Pete The Cat Craft Idea
Inspired by one of our favorite books in our collection {Pete the Cat and His Four Groovy Buttons by James Dean} today I present to YOU our Popsicle Stick Groovy Buttons kids craft idea!!!
Pete the Cat is wearing his favorite shirt—the one with the four totally groovy buttons. But when one falls off, does Pete cry? Goodness, no! He just keeps on singing his song—after all, what could be groovier than three groovy buttons? Count down with Pete in this rocking new story from the creators of the bestselling Pete the Cat books
So what are you waiting for? You can find ALL the details you need to know, in the full tutorial below. Then let’s get together and make our own GROOVY button pieces today, while reading the Pete The Cat book in honor afterwards! It’s going to be so much fun – I promise! Happy crafting my friends!!!
RELATED —> Paper Plate Button

Unleash your creativity and make the coolest groovy buttons story time activity with just popsicle sticks and some paint!
Craft Supplies:
- Jumbo Popsicle Sticks – 3 per craft
- Mini Popsicle Sticks – 2 per craft
- School Glue
- Yellow Craft Paint
- Large Foam Paint Brush
- Small Paper Plate
- Basic Scissors
- Cardstock Paper {dark blue, yellow, white}
- Dark Blue Pipe Cleaner
- Large Craft Buttons {red, green, blue}
Directions:
- First glue your popsicle sticks together to look like a fence {3 jumbo next to each other with two mini across}
- Set aside to let it dry completely. Repeat.
- Now you are ready for paint! Squirt some yellow paint on your paper plate and paint your popsicle sticks completely yellow. This will be Pete’s body!
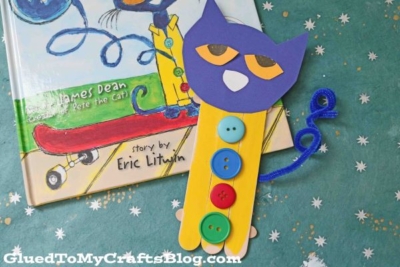
- Next grab your cardstock. Cut out a head for Pete, as well as eyes and a nose for his face.
- To finish off your Pete The Cat Groovy Buttons craft – have children glue on their cardstock pieces, as well as some “colorful” buttons along the middle of the craft.
- Then add your curled pipe cleaner “tail” to the back of your finished piece.
- Set aside to let it dry completely before displaying proudly!!!
RELATED —> Pete Character Costume Idea

Love our popsicle stick Groovy Buttons craft? Then you might also enjoy our Potato Masher Stamped Buttons craft idea as well! It would pair nicely with today’s idea! Happy crafting, my friends!

Popsicle Stick Pete The Cat Groovy Buttons Craft Idea
Here’s your checklist of supplies to bring this craft to life:
- 3 Jumbo Popsicle Sticks
- 2 Mini Popsicle Sticks
- Craft Paint blue
- Craft Buttons
- 1 Pipe Cleaners blue
- Cardstock Paper blue, white and yellow
Prepare your creative haven by laying down a protective cover before the crafting magic begins!
Directions:
- First glue your popsicle sticks together to look like a fence {3 jumbo next to each other with two mini across}
- Set aside to let it dry completely. Repeat.
- Now you are ready for paint! Squirt some yellow paint on your paper plate and paint your popsicle sticks completely yellow. This will be Pete's body!
- Next grab your cardstock. Cut out a head for Pete, as well as eyes and a nose for his face.
- To finish off your Popsicle Stick Pete The Cat Groovy Buttons craft – have children glue on their cardstock pieces, as well as some "colorful" buttons along the middle of the craft.
- Then add your curled pipe cleaner "tail" to the back of your finished piece.
- Set aside to let it dry completely before displaying proudly!!!

CLICK HERE TO PRINT THE DIRECTIONS FOR THIS CRAFT