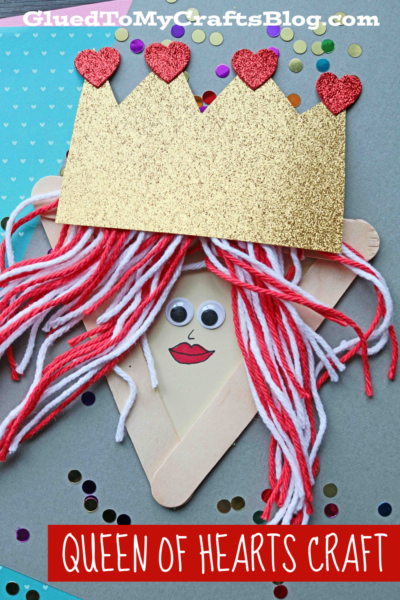
Made with a few inexpensive supplies, you too can bring this Popsicle Stick Queen of Hearts craft idea to life today!

Are you looking for a creative, fun, and engaging activity for your kids? Enter the world of popsicle stick crafts!
Whether you’re planning a lazy afternoon project or a classroom activity, our Popsicle Stick and Craft Yarn Queen activity is the perfect way to entertain children while fostering creativity. Not only is it easy and budget-friendly, but it also encourages kids to think imaginatively as they craft their very own royal masterpiece.
This blog will guide you through everything you need to know to create a charming popsicle stick queen craft with your kids, from materials to step-by-step instructions!

Create a popsicle stick queen craft with this easy step-by-step guide—perfect for kids to spark creativity and have fun!
Craft Supplies:
Before gathering the kids around, make sure you have all the materials ready. Here’s what you’ll need for crafting the popsicle stick queen:
- Jumbo Popsicle Sticks – 3 per craft
- Hot Glue Gun {adult supervision}
- Craft Yarn
- Cardstock Paper
- Scissors
- Small Wiggle Eyes – 2 per craft
- Markers
- Embellishments
Directions:
Now that you’ve got your materials in place, it’s time to start crafting! These simple steps will help your kids bring their royal queen to life.
- Start by taking three popsicle sticks per queen and gluing them together to form a triangle.
- Set the triangles aside to dry completely and repeat the process for each queen.
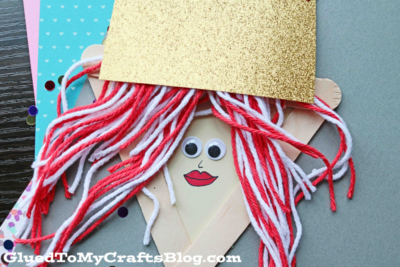
- While the glue dries, cut a triangular shape from cardstock to fit inside the popsicle stick frame. This will serve as the queen’s face.
- Use the remaining cardstock to cut out a crown for your queen.
- Next, cut several strands of craft yarn to create the queen’s hair.
- To assemble your have the kids glue the yarn hair, triangular face, and crown onto the popsicle stick frame. Attach two googly eyes to bring the queen to life. Popsicle Stick Queens,
- Use markers to draw a face, then decorate the crown with heart stickers. Feel free to add any other embellishments to personalize the design.
- Once finished, set the popsicle stick queens aside to dry completely before proudly displaying them!
RELATED —> Craft Foam Heart Unicorn

There you have it—a fun, easy, and rewarding craft activity for kids of all ages. Whether you’re planning a birthday activity, a lazy Sunday project, or just looking for ways to spend quality time with your kids, the Popsicle Stick Queen Craft is a fantastic choice.
With just a few basic materials and endless room for creativity, it’s a project that kids will cherish long after the glue dries.
What are you waiting for? Gather your supplies, place your popsicle sticks in line, and get ready to help your kids become master crafters. A kingdom of royal popsicle stick characters awaits!

Popsicle Stick Queen Craft Idea For Kids
Made with a few inexpensive supplies, you too can bring this Popsicle Stick Queen of Hearts craft idea to life today!
Here’s your checklist of supplies to bring this craft to life:
Prepare your creative haven by laying down a protective cover before the crafting magic begins!
Directions:
- Start by taking three popsicle sticks per queen and gluing them together to form a triangle.
- Set the triangles aside to dry completely and repeat the process for each queen.
- While the glue dries, cut a triangular shape from cardstock to fit inside the popsicle stick frame. This will serve as the queen's face.
- Use the remaining cardstock to cut out a crown for your queen.
- Next, cut several strands of craft yarn to create the queen's hair.
- To assemble your have the kids glue the yarn hair, triangular face, and crown onto the popsicle stick frame. Attach two googly eyes to bring the queen to life. Popsicle Stick Queens,
- Use markers to draw a face, then decorate the crown with heart stickers. Feel free to add any other embellishments to personalize the design.
- Once finished, set the popsicle stick queens aside to dry completely before proudly displaying them!

Grab our favorite books via our Amazon affiliate link! In our Amazon storefront you will find books, toys and craft supplies we absolutely love using for our Glued To My Crafts tutorials!
If you've enjoyed our content or have any thoughts to share, we'd love to hear from you! Mention @gluedtomycrafts or tag #gluedtomycrafts on Instagram!