Create a cute paper bag snowman with simple materials. No fancy supplies needed - just a brown paper bag, shredded paper, glue, and more!


Winter is here, and with it comes the perfect opportunity for fun indoor activities that spark creativity and laughter while keeping your kids entertained. What better way to engage little hands and imaginations than with a simple, charming winter craft project? This paper bag snowman craft is easy to make, kid-friendly, and uses materials you likely already have at home.
In this step-by-step guide, we’ll show you how to create an adorable snowman using nothing more than a paper bag and some decorations. You’ll learn how to transform basic supplies into a winter wonderland craft that’s perfect for family bonding, decoration, or even a quick puppet show!
Gather your little ones and bring their creativity to life as you follow this delightful tutorial.

Make winter magical with this paper bag snowman craft! A step-by-step guide for a fun and easy activity your kids will love. Perfect for indoor entertainment.
Craft Supplies:
Before starting, gather these items for your paper bag snowman. Most are easy to find at home or at your local craft store:
- Snowman Printable – on our landing page
- White Cardstock Paper
- Gray Cardstock Paper
- Crayons/Coloring Pencils
- Black Coding Labels
- Scissors
- Large, Brown Paper Bag
- White Craft Paint
- Paint Brush
- Shredded Paper
- Stapler
- School Glue
- Embellishments
Feel free to improvise with what you have—crafting is all about creativity!
Directions:
Follow these simple steps to create your very own snowman.
- First things first – paint one side of your paper bag completely white. Just squirt a small amount of craft paint on the bag and move it around with the paint brush.
- When done, set it aside to allow it to dry completely while you work on the remaining steps.
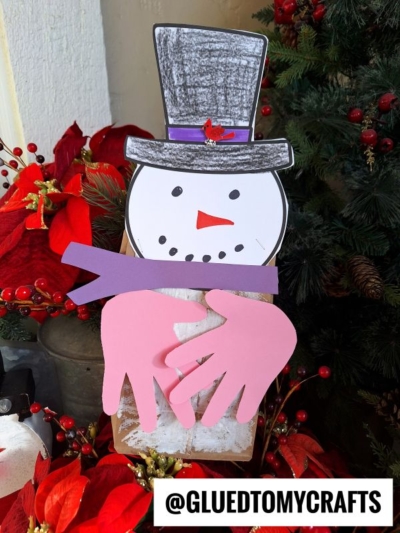
- Next up, if you haven’t already, go ahead and print out the “snowman head” printable that is listed above.
- Once you have the printable printed, decorate/trim out the design. I suggest using black coding labels for the eyes and mouth.
- At this point in time you should go ahead and trace/cut out two handprints from the gray cardstock paper, for the “mittens” of your snowman.
- Now gather up all your paper pieces and the white painted paper bag.
- Open it up and stuff your bag with a handful of shredded paper, until it stands up nicely and looks really full.
- Take your stapler, along with the snowman head cutout and staple it to the stuffed paper bag to close it up.
- Finally, go ahead and glue the two handprint cutouts, one on each side, to the bag.
- To finish off the lunch sack snowman craft – add some coding label “buttons” to the bag, as well as any other embellishments you see fit.
- Then display your finished snowman paper bag piece proudly for ALL to see!
RELATED —> Handprint Snowman Gnome

Making a paper bag snowman is more than just a fun activity—it’s a memory in the making. This easy, engaging craft brings the family together and lets everyone’s creativity shine.
Gather your supplies, warm up with some hot cocoa, and get crafting. Your kids will love creating their own unique snowman, and you’ll cherish the quality time spent together! Happy crafting, my friends!

Paper Bag Snowman Craft Idea
Create a cute paper bag snowman with simple materials. No fancy supplies needed - just a brown paper bag, shredded paper, glue, and more!
Here’s your checklist of supplies to bring this craft to life:
- Cardstock Paper
- Snowman Printable - landing page
- Craft Paint
- Coding Dots
- 1 Large Brown Paper Bag
- Shredded Paper
- Embellishments
Prepare your creative haven by laying down a protective cover before the crafting magic begins!
Directions:
- First things first - paint one side of your paper bag completely white. Just squirt a small amount of craft paint on the bag and move it around with the paint brush.
- When done, set it aside to allow it to dry completely while you work on the remaining steps.
- Next up, if you haven't already, go ahead and print out the "snowman head" printable that is listed above.
- Once you have the printable printed, decorate/trim out the design. I suggest using black coding labels for the eyes and mouth.
- At this point in time you should go ahead and trace/cut out two handprints from the gray cardstock paper, for the "mittens" of your snowman.
- Now gather up all your paper pieces and the white painted paper bag.
- Open it up and stuff your bag with a handful of shredded paper, until it stands up nicely and looks really full.
- Take your stapler, along with the snowman head cutout and staple it to the stuffed paper bag to close it up.
- Finally, go ahead and glue the two handprint cutouts, one on each side, to the bag.
- To finish off the lunch sack snowman craft - add some coding label "buttons" to the bag, as well as any other embellishments you see fit.
- Then display your finished snowman paper bag piece proudly for ALL to see!


NEED MORE HELP DOWNLOADING OUR FREE PRINTABLES? PLEASE REFER TO OUR FAQ PAGE
If you've enjoyed our content or have any thoughts to share, we'd love to hear from you! Mention @gluedtomycrafts or tag #gluedtomycrafts on Instagram!