
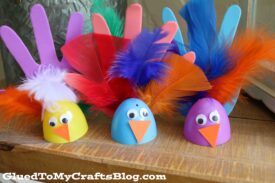
Check out our crafty Plastic Easter Egg Birds tutorial to see how we “recycled” & made some one-of-a-kind friends!

Plastic Egg Bird Craft
Easter is far from our minds by now BUT you still might have some plastic eggs from your egg hunt adventures laying around. Am I right?!
Well before you throw them away – why not check out today’s crafty Plastic Easter Egg Birds tutorial to see how we “recycled” these inexpensive containers and made them into some one-of-a-kind birds that were perfect as keepsakes AND spring decor?!
With just simple supplies, a little imagination and a crafty touch – you too can pull this together with your child within minutes! All it takes is ONE plastic egg half, cardstock paper, craft feathers and a few other embellishments. I bet you have ALL the materials on hand right now!
So lets grab those craft supplies and get to work! You can find the simple, straight to the point tutorial below! Happy crafting my “chirping” friends!!!
RELATED: Easter Egg Keepsake and Easter Egg Basket


These adorable recycled plastic Easter egg birds are perfect for kids to recreate this spring!
Craft Supplies:
- Plastic Eggs
- Hot Glue Gun
- Craft Foam Sheet
- Orange Cardstock Paper
- Marker or Pencil
- Craft Scissors
- Colorful Feathers
- Small Wiggle Eyes
Directions:
- First separate your eggs. Each plastic egg half will be a “bird.” Set them all aside.
- Next grab your craft foam sheet and marker.
- Carefully trace around your child’s hand {one handprint per bird.}
- Grab your scissors and cut out the handprint. Repeat for each bird you want to make.
- Now get your glue gun hot and ready. With help, have children decorate their handprint cut-out with some colorful feathers and any other embellishments they see fit.
- Once that piece is decorated and it’s dry enough, it’s time for the final steps!
- Go ahead and hot glue your handprint piece to your egg half to give the look of wings.
- At this time you should also hot glue the wiggle eyes and a small triangle beak onto the plastic egg {psst- don’t forget to add any other embellishments you see fit!}
- Then once done decorating, let the hot glue dry completely and display your Plastic Egg Bird proudly!!!
RELATED —> Love Bird Keepsake

AFFILIATE LINK – PAIR OUR CRAFT IDEA WITH THIS BOOK RECOMMENDATION
Are you by chance looking for even more easy and super fun kids craft tutorials on Glued To My Crafts? Say no more!
Here are a few other kid friendly ideas you can find on my blog right now, that would pair nicely with today’s plastic egg birds tutorial!
- Pom Pom Matching Game – great for toddlers!
- Egg Carton Bells – perfect for Christmas!
- Egg Carton Caterpillar – a story book themed character
- Water Bottle Rocket – play with it afterwards!
- Egg Carton Tree Canvas – an awesome decor piece!
- Wooden Spoon Bird Puppet – a great pretend piece item
- Handprint Birds On A Branch Canvas – a keepsake idea

Plastic Easter Egg Bird Craft Idea
Here’s your checklist of supplies to bring this craft to life:
Prepare your creative haven by laying down a protective cover before the crafting magic begins!
Directions:
- First separate your eggs. Each plastic egg half will be a "bird." Set them all aside.
- Next grab your paper and marker. Carefully trace around your child's hand {one handprint per bird.}
- Grab your scissors and cut out the handprint. Repeat for each bird you want to make.
- Now get your glue gun hot and ready. With help, have children decorate their handprint cut-out with some colorful feathers and any other embellishments they see fit.
- Once that piece is decorated and it's dry enough, it's time for the final steps!
- Go ahead and hot glue your handprint piece to your egg half to give the look of wings.
- At this time you should also hot glue the wiggle eyes and a small triangle beak onto the plastic egg {psst- don't forget to add any other embellishments you see fit!}
- Then once done decorating, let the hot glue dry completely and display your Plastic Egg Bird proudly!!!

CLICK HERE TO PRINT THE DIRECTIONS FOR THIS CRAFT