
Spread some Christmas cheer with this fun and easy craft! Get your kids involved for a memorable afternoon of fun! All you need is popsicles sticks, felt, glue and creativity.

Santa and Elf Hat Craft
When the weather is starting to chilly outside and the festive holiday mood starts to take you over, a good art project indoors on the kitchen table, is a brilliant way to keep little ones busy while YOU get ready for the season!
With today’s Popsicle Stick Santa and Elf Hats craft tutorial, the kids are sure to get in the holiday spirit and parents will love displaying the end results, as well! Not to mention it only takes a few simple supplies to make these impressive holiday hat craft pieces happen in FIVE MINUTES!
Whether you turn them into Christmas tree ornaments, gift tag present toppers or just display as is – this Santa hat and elf cap craft tutorial is a must-do this holiday season! You can find ALL the details below in the full step-by-step directions below!
Now get ready to “ho ho ho” with your Santa’s little crafty helpers by scrolling to all the details below!
Happy crafting, my dear friends! Don’t forget to share pictures of your child’s finished Santa and elf hats made from popsicle sticks on our Facebook page, to admire right along side you! #gluedtomycrafts
RELATED: Christmas Friends and Snowman House

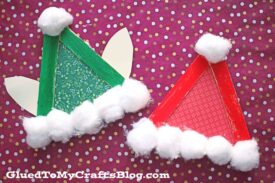
Popsicle Stick Santa & Elf Hats
These adorable Popsicle Stick Santa and Elf Hats are perfect for the holidays! They’re easy to make and kids will love them.
Craft Supplies:
- Jumbo Popsicle Sticks – 3 per hat craft
- School Glue
- Red/Green Craft Paint
- Foam Paint Brush
- Small Paper Plate
- Red/Green Scrapbook Paper
- Skin Tone Cardstock
- Kid Friendly Scissors
- White Cotton Balls
Directions:
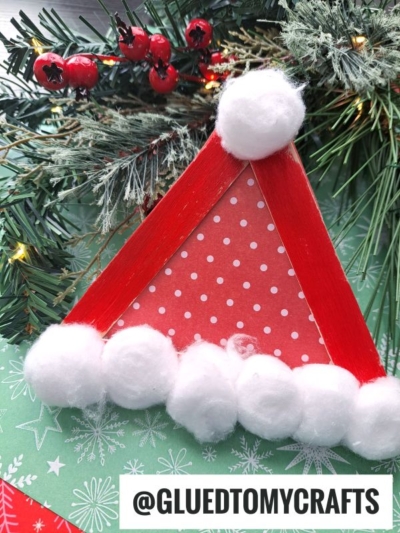
- First things first – grab your three jumbo popsicle sticks and glue them together to look like a triangle.
- Set aside to let it dry completely.
- Repeat for each popsicle stick Santa hat or elf hat you want to make today.
- Now grab your small paper plate, craft paint and foam paint brushes.
- Squirt the paint on the paper plate.
- Paint your popsicle stick triangle shape completely red for a Santa hat or green for an elf hat.
- Set it aside again, to allow the paint to dry completely.
- While that is drying, grab your choice of color in scrapbook paper and scissors.
- Cut out a simple triangle shape, to make the inner part of the hat {trim it down slightly to be a smaller triangle than your popsicle sticks}
- If you are making an elf hat, don’t forget to cut out some large, pointy ears from the skin tone paper.
- Once the paint is dry enough on the popsicle stick shape, grab the scrapbook paper cutout {and elf ears} and glue it onto the back of the painted popsicle stick triangle.
- To finish off the Popsicle Stick Santa and Elf Hats – have children decorate their hats however they like but most importantly add a rim of cotton balls, as well as one on top to finish it off.
- You can also get the glitter out, rhinestones and even some feathers for a festive holiday party look!
- Once everything is glued down, set aside to let it ALL dry completely before displaying proudly!
- Don’t forget to share pictures of your finished creations, on your various social media sites! #gluedtomycrafts
RELATED —> Popsicle Stick Elf Friends

Pile on the smiles this Christmas season! At Glued To My Crafts we are BURSTING at the seams with new & creative tutorials for you to give a try this year!
Come check out our popular Snowman Ballerina, Christmas Camper Cards and Paper Bag Santa craft posts to see what I’m talking about!
All three are unique to us so you are sure to stand out from the crowd if you DO choose to recreate them!

Popsicle Stick Santa and Elf Hat Craft Idea
Here’s your checklist of supplies to bring this craft to life:
- School Glue
- 1 Scissors
Prepare your creative haven by laying down a protective cover before the crafting magic begins!
Directions:
- First things first - grab your three jumbo popsicle sticks and glue them together to look like a triangle.
- Set aside to let it dry completely.
- Repeat for each popsicle stick Santa hat or elf hat you want to make today.
- Now grab your small paper plate, craft paint and foam paint brushes.
- Squirt the paint on the paper plate.
- Paint your popsicle stick triangle shape completely red for a Santa hat or green for an elf hat.
- Set it aside again, to allow the paint to dry completely.
- While that is drying, grab your choice of color in scrapbook paper and scissors.
- Cut out a simple triangle shape, to make the inner part of the hat {trim it down slightly to be a smaller triangle than your popsicle sticks}
- If you are making an elf hat, don't forget to cut out some large, pointy ears from the skin tone paper.
- Once the paint is dry enough on the popsicle stick shape, grab the scrapbook paper cutout {and elf ears} and glue it onto the back of the painted popsicle stick triangle.
- To finish off the Popsicle Stick Santa and Elf Hats – have children decorate their hats however they like but most importantly add a rim of cotton balls, as well as one on top to finish it off. You can also get the glitter out, rhinestones and even some feathers for a festive holiday party look!
- Once everything is glued down, set aside to let it ALL dry completely before displaying proudly!

Grab our favorite books via our Amazon affiliate link! In our Amazon storefront you will find books, toys and craft supplies we absolutely love using for our Glued To My Crafts tutorials!