Glued To My Crafts

Join thousands of others who have gotten GLUED to our craft tutorials!

  • Home
  • Safety Guidelines
  • Seasonal Themes
    • New Years
    • Valentine’s Day
    • St. Patrick’s Day
    • Spring
    • Easter
    • Mother’s Day
    • Summer
    • Father’s Day
    • Patriotic
    • Halloween
    • Thanksgiving
    • Fall
    • Winter
    • Christmas
    • Snowmen
    • Story Time
  • About Us
  • Amazon Storefront
  • Monthly Themes
    • January Craft Ideas
    • February Craft Ideas
    • March Craft Ideas
    • April Craft Ideas
    • May Craft Ideas
    • June Craft Ideas
    • July Craft Ideas
    • August Craft Ideas
    • September Crafts
    • October Crafts
    • November Crafts
    • December Crafts
  • Collection Posts
    • 20+ Creative Paper Bag Craft Ideas for Kids to Enjoy Today
    • 20+ Plastic Egg Stamp Crafts for Spring Fun
    • 30+ Creative Thumbprint Craft Ideas for Spring Fun
    • Craft Ideas for Kids Using Egg Stickers
    • Thumbs Up! 50+ Creative Thumbprint Crafts for Kids
    • 40+ Insect Craft Ideas For Kids
    • 50+ Craft Ideas For Kids Using A Plastic Fork As A Paint Brush
    • 30+ Puffy Paint Craft Ideas For Kids To Try Today!
    • 20+ Fun and Easy Paper Bowl Crafts for Kids
    • Pete The Cat Craft Ideas: Fun & Easy Projects for Kids
    • Transform Coffee Filters into 40+ Stunning DIY Projects
    • Transform Crepe Paper Streamers into 60+ Stunning Crafts
    • Pie Server Stamped Craft Ideas Kids Will Adore
    • Paint Splat Pie Craft Idea For Kids

Popsicle Stick Elf Craft Idea for Christmas

When engaging in craft activities, it is important for young children to have adult supervision at ALL times. It is also recommended to use supplies that are suitable for your child's age. Feel free to modify materials or steps to meet your specific requirements. Please refer to our safety guidelines for more information.

As an Amazon Associate I earn from qualifying purchases. This post may contain affiliate links. For more information, please see our disclosure policy.

UPDATE FOR 2026 - To reduce storage costs and download fees, we recently made some changes to our website. The password for all our files this year is GLUEDTOMYCRAFTS2026. No sign-up is required to download our free printables! You can enjoy our printables without creating an account or paying for Box.com. Simply follow the download instructions on our FAQ PAGE.

This easy Christmas kids craft project is perfect for adding some personal flair to the holiday season. These elf friends are also great for pretend play all year round!
SKIP THE FLUFF AND PRINT THE DIRECTIONS
A popsicle stick elf craft featuring a red and green outfit, holding a small present. The smiling elf has googly eyes, a red plaid hat and boots, all set against a blue background with gold star decorations.

Three popsicle stick elf crafts with colorful hats, painted faces, and paper outfits are arranged on a blue background decorated with gold stars and white dots. Text reads “Popsicle Stick Elf Friends.” Perfect for festive popsicle stick elf fun!.

Crafting during the holiday season is one of the best ways to create lasting memories with your family. Whether you’re decorating your home or looking for fun activities to entertain the kids, holiday crafts are a perfect way to bring some festive cheer.

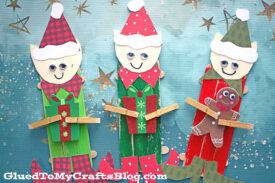
One of our favorite ideas? Making popsicle stick elves! They’re easy to make, affordable, and downright adorable.

Two popsicle stick elf crafts made from painted sticks, felt, and googly eyes, each holding a small wooden clothespin—one clutching a present, the other a gingerbread man. The teal background is accented with white paint splatters.

Today’s easy elf craft project is perfect for kids of all ages and adds personal flair to the Christmas season!

Craft Supplies:

Before starting any craft, it’s important to gather all the necessary materials. Here’s what you’ll need to create popsicle stick elves:

  • Jumbo Popsicle Sticks – 3 per craft
  • Mini Popsicle Sticks – 2 per craft
  • Mini Clothespins – 2 per craft
  • Low Temp Glue Gun
  • Craft Paint
  • Small Paint Brushes
  • Christmas Stickers
  • Cardstock Paper
  • Scissors
  • Black Sharpie Marker
  • Small Wiggle Eyes
  • optional materials – stickers, glitter, rhinestones etc.

Directions:

Now that you have your supplies ready, it’s time to create your adorable elf! Follow these six easy steps:

  • Start by heating up your glue gun so it’s ready to go!
  • Create the base for your elf by gluing three jumbo popsicle sticks side by side. Then, secure two mini popsicle sticks across them horizontally to form a fence-like structure.
  • Set the assembled base aside to dry completely. Repeat this process for every elf you plan to make.
  • Once dry, paint the popsicle stick base (your elf’s body) in festive holiday colors using craft paint. Be as creative as you like!
  • Next, paint two mini clothespins in matching or complementary colors, then set everything aside to dry.
  • While the painted pieces are drying, grab your craft paper, scissors, and creativity.
  • Using the skin-tone colored paper, cut out a simple circle for the elf’s head and two pointy ears to attach later.
  • With a black Sharpie, draw on a cheerful face for your elf. Don’t forget to glue on the wiggle eyes so your elf can “see”!
  • From the holiday-colored paper, cut out a festive hat, a shirt collar, and a pair of pointy boots for your elf.
  • Once all your paper pieces are cut out, it’s time to start assembling!
  • Glue the paper pieces—head, ears, hat, collar, and boots—onto the painted popsicle stick base.
  • For the next step, take your two painted mini clothespins and clip them onto a decorative Christmas sticker or small ornament. These will act as your elf’s “hands” holding the item.
  • Secure the clothespin-and-sticker combo to the center of your painted popsicle stick base using hot glue.
  • Add the finishing touches! Use glitter, stickers, or any embellishments you like to give your elf a festive flair.
  • Let everything dry completely before showing off your adorable Popsicle Stick Present-Holding Elf creation.
  • Don’t forget to share your masterpiece with us on social media using #gluedtomycrafts – we’d love to see your creativity in action!

RELATED —> Paper Plate Elf

A popsicle stick elf craft featuring a red and green outfit, holding a small present. The smiling elf has googly eyes, a red plaid hat and boots, all set against a blue background with gold star decorations.

Love this creative popsicle stick elf friend craft idea? Be sure to also check out our Paper Plate Santa & Elf Hat craft idea as well, for another fun DIY to recreate this Christmas!

It would pair nicely with an Elf On The Shelf theme – hint hint! #gluedtomycrafts

stacey-signature-2023

A popsicle stick elf craft featuring a red and green outfit, holding a small present. The smiling elf has googly eyes, a red plaid hat and boots, all set against a blue background with gold star decorations.
PRINT

Popsicle Stick Elf Craft Idea For Christmas

This easy Christmas kids craft project is perfect for adding some personal flair to the holiday season. These elf friends are also great for pretend play all year round!

Here’s your checklist of supplies to bring this craft to life:

  • 3 Jumbo Popsicle Sticks
  • 2 Mini Popsicle Sticks
  • 2 Mini Clothespins
  • Craft Paint
  • Cardstock Paper
  • 2 Small Wiggle Eyes
  • Embellishments
  • 1 Hot Glue Gun - adult supervision required
  • Small Paint Brushes
  • 1 Craft Scissors
  • Sharpie Markers
  • Christmas Book Recommendations - link to our Amazon shop

Prepare your creative haven by laying down a protective cover before the crafting magic begins!

Directions:

  • Start by heating up your glue gun so it’s ready to go!
  • Create the base for your elf by gluing three jumbo popsicle sticks side by side. Then, secure two mini popsicle sticks across them horizontally to form a fence-like structure.
  • Set the assembled base aside to dry completely. Repeat this process for every elf you plan to make.
  • Once dry, paint the popsicle stick base (your elf's body) in festive holiday colors using craft paint. Be as creative as you like!
  • Next, paint two mini clothespins in matching or complementary colors, then set everything aside to dry.
  • While the painted pieces are drying, grab your craft paper, scissors, and creativity.
  • Using the skin-tone colored paper, cut out a simple circle for the elf’s head and two pointy ears to attach later.
  • With a black Sharpie, draw on a cheerful face for your elf. Don’t forget to glue on the wiggle eyes so your elf can "see"!
  • From the holiday-colored paper, cut out a festive hat, a shirt collar, and a pair of pointy boots for your elf.
  • Once all your paper pieces are cut out, it’s time to start assembling!
  • Glue the paper pieces—head, ears, hat, collar, and boots—onto the painted popsicle stick base.
  • For the next step, take your two painted mini clothespins and clip them onto a decorative Christmas sticker or small ornament. These will act as your elf's "hands" holding the item.
  • Secure the clothespin-and-sticker combo to the center of your painted popsicle stick base using hot glue.
  • Add the finishing touches! Use glitter, stickers, or any embellishments you like to give your elf a festive flair.
  • Let everything dry completely before showing off your adorable Popsicle Stick Present-Holding Elf creation.
  • Don’t forget to share your masterpiece with us on social media using #gluedtomycrafts - we’d love to see your creativity in action!
    Three popsicle stick elf crafts with colorful hats, painted faces, and paper outfits are arranged on a blue background decorated with gold stars and white dots.
MINI-HEARTS-page-separator-logo-gluedtomycrafts

CLICK HERE TO PRINT THE DIRECTIONS FOR THIS CRAFT

If you've enjoyed our content or have any thoughts to share, we'd love to hear from you! Mention @gluedtomycrafts or tag #gluedtomycrafts on Instagram!

Craft Activity Safety Guidelines:

Always Ensure Adult Supervision - Young children should be supervised at all times when engaging in craft activities. This is essential to keep them safe and ensure materials are used correctly. Use Age-Appropriate Supplies - Choose craft supplies that are suitable for your child’s age. Check labels for recommendations and avoid items with small parts or sharp edges for younger children. Modify as Needed - Feel free to adapt materials or steps to meet your child's abilities and safety needs. For example, substitute scissors with safety scissors if necessary. Keep an Eye on Allergies - Be mindful of potential allergens in craft materials like glue, paint, or certain fabrics. Opt for non-toxic and hypoallergenic options whenever possible. Organize and Secure Supplies - Keep all craft tools and materials organized. Store sharp objects, small parts, and potentially hazardous items out of reach when not in use. Following these guidelines will ensure that crafts remain fun, creative, and, most importantly, safe for everyone involved!


OUR PRIVACY POLICY

OUR COPYRIGHT POLICY

  • Email
  • Facebook
  • Instagram
  • Pinterest
  • Twitter
  • YouTube

LOOKING FOR SOMETHING?

EXPLORE OUR SITE:

TRENDING TODAY:

  • A pink hand-shaped bookmark with red heart stickers and star confetti surrounds a round note that reads a heartfelt message about love and reading. The image is from GluedToMyCraftsBlog.com. Handprint Bookmark Keepsake: A Gift That Holds Your Spot
  • A colorful craft project featuring a yellow felt moon, sparkly stars, and heart shapes, with glue and a heartfelt message. Torn Paper Love You To The Moon and Back Card Craft Idea For Kids
  • A handmade card with a rocket drawing, hearts, and messages of love. Felt hearts and an envelope are around it. Handprint Rocket Keepsake - I Love You Because
  • A vibrant Valentine's Day craft showcasing a torn-paper bumblebee with googly eyes on a white sheet, accompanied by the text "MY VALENTINE!" The scene is decorated with felt hearts, heart-shaped gems, and patterned papers, with a glue bottle and crafting supplies adding to the creative atmosphere. Torn Paper Bee My Valentine Card Craft Idea For Valentine's Day
  • Flat lay of a torn paper dandelion craft featuring a white sheet with a black dandelion outline. Torn yellow, pink, and purple paper pieces are glued to the dandelion head, simulating seeds. Surrounding the craft are Elmer's glue, felt hearts, paper flowers, and patterned scrapbook paper. The text 'MAKING WISHES, ONE PIECE OF PAPER AT A TIME.' and 'GluedToMyCraftsBlog.com' are printed on the white sheet. Torn Paper Dandelion Craft: Making Wishes, One Piece at a Time
  • A flat lay of handmade Valentine’s Day cards and decorations, including paper flowers, felt hearts, an envelope, and printed cards with romantic poems, arranged on a gray and pink background. Capture Memories With These 6 Handprint Flower Poems
  • A colorful handprint craft made from purple paper with glitter edges sits on a multicolored polka dot background. A round tag with a poem is attached below, tied with red and white string. Flowers are visible in the corner. Easy Handprint Flower Craft with Poem – Perfect Spring DIY for Kids
  • A purple paper butterfly made from handprint cutouts is decorated with glitter and a smiling face. A round poem about sending love is in the center. The background is colorful and the GluedToMyCraftsBlog.com watermark is visible. Handprint & Popsicle Stick Butterfly Poem Keepsake
  • A craft project with yellow crepe paper fries in a red-striped paper container, a label reading Youre UN-FRY-GETTABLE!, red heart decorations, Elmers glue, and a roll of yellow crepe paper on a purple background. Torn Crepe Paper Fries Craft Idea For Kids
  • A spring-themed craft featuring pink and purple paper flowers, small decorative bees, and a “Spring has sprung, so let’s get our creativity blooming!” sign on a blue background—perfect for pairing with Spring Printables. Crepe Paper & Fingerprint Daisy Spring Paint Brush Craft

© 2012–2026 Glued To My Crafts
All activities should be supervised by an adult at all times. Please refer to our safety guidelines for more information.


Please note that all the content of the website, including printables, are for classroom and personal use only. This means that any digital item you download from our site can be used for non-commercial use only. We kindly request that you do not reproduce or sell our creations. We appreciate your understanding and cooperation in respecting our content and intellectual property rights.

Accessibility Adjustments

Powered by OneTap

How long do you want to hide the toolbar?
Hide Toolbar Duration
Select your accessibility profile
Vision Impaired Mode
Enhances website's visuals
Seizure Safe Profile
Clear flashes & reduces color
ADHD Friendly Mode
Focused browsing, distraction-free
Blindness Mode
Reduces distractions, improves focus
Epilepsy Safe Mode
Dims colors and stops blinking
Content Modules
Font Size

Default

Line Height

Default

Color Modules
Orientation Modules