Craft a festive Paper Plate Santa and Elf Hat with ease! A fun and creative activity for kids - perfect for holiday crafting using simple materials.


To recreate it this holiday hat art project idea, all you need is a large paper plate, red or green craft paint and a little white cotton ball to tie it all together. That’s it!
From there – you can make your paper holiday hats as elaborate or as simple as you like, when it comes to the embellishments. I threw some loose craft glitter on mine for extra sparkle but you can of course dig out the stickers, rhinestones, craft feathers – whatever you like!
Well enough chit chat from me – I’m let you get to the strikingly easy Santa and elf hat craft tutorial below! So come one, come all! Let’s make some paper plate holiday hat creations to show off this Christmas season! Find all the crafty details below!
Don’t forget to share pictures of the hats you design, on our Facebook page! I can’t wait to see how you give it your own sign! #gluedtomycrafts


Are you looking for a last minute craft idea to make this holiday season? Check out our paper plate Santa and elf hat tutorial! These crafts are perfect for kids of all ages.
Craft Supplies:
- Large Paper Plate – 1 per craft
- Scissors
- Red or Green Craft Paint
- Paint Brushes
- School Glue
- White Cotton Balls
- Embellishments
Directions:
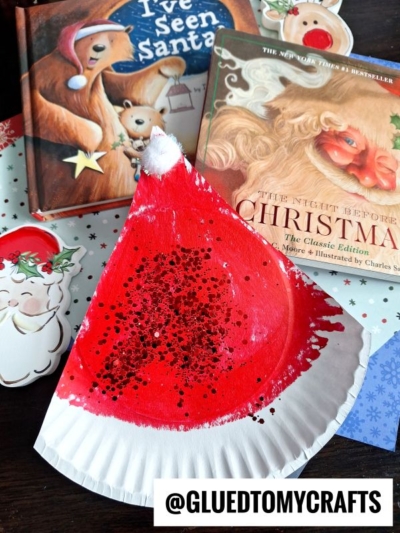
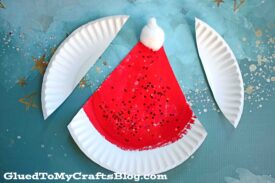
- First things first – take your paper plate and cut the sides off to make a triangle/hat shape.
- Now that you have your paper plate hat piece, squirt your choice of color of craft paint in the center of it. The red paint is for a paper plate Santa hat, while the green is for an elf.
- Now carefully, use the foam paint brush to paint ONLY the top, triangle part of the paper plate piece. You want to leave the rim of the paper plate BLANK so it looks like the white cotton part of a hat.
- Now this next step is completely optional but I threw some loose craft glitter on top of the wet paint for some added sparkle and cheer. You can of course skip this if you like!
- To finish off the Paper Plate Santa or Elf Hat craft, simple glue ONE white cotton ball onto the tip of the painted paper plate.
- Add any other embellishments you like {maybe some stickers or sparkly rhinestones!}
- Then allow it to dry completely before you display it proudly for ALL to see!
- Don’t forget to share pictures of your paper Santa and elf hats with us on your various social media sites! #gluedtomycrafts
RELATED —> Handprint Santa & Elf Cards
At Glued To My Crafts we STRIVE to make you holiday craft plans fun on a budget! So before you go, please be sure to check out our Joy Keepsake Craft and Christmas Tractor craft posts for a few more inexpensive ideas you can recreate with your preschooler or school-aged child today!

Paper Plate Santa and Elf Hat Craft Idea For Christmas
Craft a festive Paper Plate Santa and Elf Hat with ease! A fun and creative activity for kids - perfect for holiday crafting using simple materials.
Here’s your checklist of supplies to bring this craft to life:
- Large Paper Plate
- Craft Paint green or red
- Loose Craft Glitter
- White Cotton Balls
- Embellishments
Prepare your creative haven by laying down a protective cover before the crafting magic begins!
Directions:
- First things first - take your paper plate and cut the sides off to make a triangle/hat shape.
- Now that you have your paper plate hat piece, squirt your choice of color of craft paint in the center of it. The red paint is for a paper plate Santa hat, while the green is for an elf.
- Now carefully, use the foam paint brush to paint ONLY the top, triangle part of the paper plate piece. You want to leave the rim of the paper plate BLANK so it looks like the white cotton part of a hat.
- Now this next step is completely optional but I threw some loose craft glitter on top of the wet paint for some added sparkle and cheer. You can of course skip this if you like!
- To finish off the Paper Plate Santa or Elf Hat craft, simple glue ONE white cotton ball onto the tip of the painted paper plate.
- Add any other embellishments you like {maybe some stickers or sparkly rhinestones!}
- Then allow it to dry completely before you display it proudly for ALL to see!

Grab our favorite books via our Amazon affiliate link! In our Amazon storefront you will find books, toys and craft supplies we absolutely love using for our Glued To My Crafts tutorials!
If you've enjoyed our content or have any thoughts to share, we'd love to hear from you! Mention @gluedtomycrafts or tag #gluedtomycrafts on Instagram!