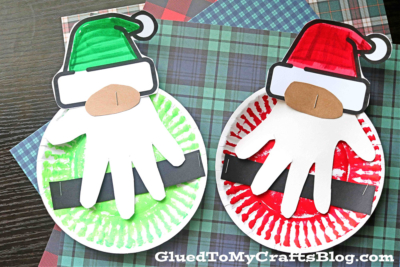
Your little ones will love making these adorable paper plate Christmas gnomes to decorate their homes for the holidays!
Paper Plate Santa Gnome & His Elves
Roll up your crafty sleeves and join us in the fun as we make Santa & his trusty elves from a simple paper plate!
Christmas time is such a magical time of year and what better way to spread the holiday cheer than by making your own paper plate Santa gnome and his elves with your child this season!
This Christmas kid craft is super easy and only requires a few materials that you likely already have at home. Once you’ve gathered your supplies, simply follow the step-by-step instructions to create your very own Christmas gnomes within minutes. Don’t forget to add a simple white handprint beard for extra festive flair!
When you’re finished, display your Christmas red and green gnomes prominently for all to see. They’re sure to bring a smile to everyone’s face, young and old alike. So what are you waiting for? Get crafting and spread some holiday cheer! Find everything you need to know {and the free Santa hat printable from us!} below in the full tutorial!
Happy crafting, my friends! Please don’t forget to share pictures of your finished paper plate Christmas friends, on our Facebook page to admire from afar this season! We can’t wait to see how awesome your Santa and Elf creations turn out! #gluedtomycrafts
RELATED: Santa & Elf Hats and Handprint Santa Card
They’re a quick and easy kids craft that doubles as a cute ornament too! Try making a few in different colors for a festive touch!
Craft Supplies:
- SMALL Paper Plate
- Craft Paint
- Paint Brush
- White School Glue/Glitter Glue
- Loose Craft Glitter
- White Cardstock Paper
- Hat Printable – on our landing page
- Brown Cardstock Paper
- Black Cardstock Paper
- Crayons, Coloring Pencils or Markers
- Scissors
- Stapler
Directions:
- First things first – decorate your small paper plate however you like. Start off by covering it with red or green craft paint and then adding some glitter/glitter glue on top.
- When done decorating the paper plate, set it aside to let it dry completely.
- Next up – the paper elements that will bring the gnome to life. Go ahead and grab your paper pieces, pencil & the scissors.
- Out of the white cardstock paper, trace your child’s hand for the beard. Trim it out.
- Out of the kraft cardstock paper, cut out a large oval nose.
- Out of the black cardstock paper, cut out a rectangle belt shape.
- Lastly, out of the printed printable, cut out one of the colored in hats.
- Now we are heading to the final steps! Once the decorated paper plate is completely dry, go ahead and staple the handprint cutout to it.
- Follow that up with the nose, belt and hat piece on top.
- Go ahead and add any other embellishments you see fit and display your gnome paper plate craft proudly for all to see!
If you like – your child can add other personalized embellishments like stickers, sequins, buttons etc. Really have them make it into their own craft!
RELATED —> Plastic Ornament Crafts
Love this paper plate Christmas gnome friends craft idea? Be sure to also check out our Popsicle Stick Elf Friends tutorial for another fun craftivity idea to pair along and make this month!! #gluedtomycrafts
Paper Plate Christmas Gnome Craft Idea
Here’s your checklist of supplies to bring this craft to life:
Prepare your creative haven by laying down a protective cover before the crafting magic begins!
Directions:
- First things first - decorate your small paper plate however you like. Start off by covering it with red or green craft paint and then adding some glitter/glitter glue on top.1 Small Paper Plate, Craft Paint, Loose Craft Glitter
- When done decorating the paper plate, set it aside to let it dry completely.
- Next up - the paper elements that will bring the gnome to life. Go ahead and grab your paper pieces, pencil & the scissors.
- Out of the white cardstock paper, trace your child's hand for the beard. Trim it out.
- Out of the kraft cardstock paper, cut out a large oval nose.
- Out of the black cardstock paper, cut out a rectangle belt shape.Cardstock Paper
- Lastly, out of the printed printable, cut out one of the colored in hats.
- Now we are heading to the final steps! Once the decorated paper plate is completely dry, go ahead and staple the handprint cutout to it.
- Follow that up with the nose, belt and hat piece on top.
- Go ahead and add any other embellishments you see fit and display your gnome paper plate craft proudly for all to see!


NEED HELP DOWNLOADING OUR FREE PRINTABLES? PLEASE REFER TO OUR FAQ PAGE


