Show your favorite teacher some love with these sweet DIY Apple Stamped Teacher Appreciation Cards! Let’s spread the appreciation and make our teachers feel special!
Teacher Appreciation Apple Cards For Kids To Make
Calling ALL my crafty friends {adults AND kids all around!!} Let’s roll our sleeves because today I’m sharing this Apple Stamped Card idea that is super simple for ANYONE to recreate and show their appreciation for their teachers!
With that in mind, you can also send sweet “apple” sentiments to friends and family with a handmade gesture that is sure to bring BIG smiles to everyone!
Perfect for the fall season or honestly – anytime of year {think teacher appreciation week in the spring as well!} So what are you waiting for? Gather those craft supplies and make your own one-of-a-kind “Love You To The Core” stationary to mail today!!
Happy crafting my friends! I sure hope you enjoy recreating this tutorial with your little one today!
RELATED —> Paper Plate Apple Core

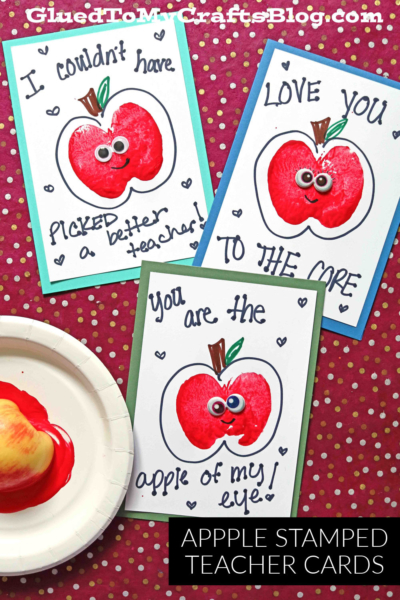
Get your kids excited about thanking their teachers this school year with these fun and easy apple stamped teacher appreciation cards!
Craft Supplies:
- 1 – Small/Medium sized Apple
- Small Paper Plate
- Red Craft Paint
- Black/Green Markers
- Cardstock Paper
- Glue Stick
- Scissors
- optional materials – wiggle eyes
Directions:
- First grab your apple and cut it in half. Reserve one half for today’s craft and enjoy the other 🙂
- Squirt your red paint on the paper plate.
- Have children dip the apple half into the red paint {smear it around} then stamp it in the center of some white cardstock. This will be the staple of your craft. Set aside to let it dry completely. Repeat for each card you want to make.
- Once dry, grab your markers and draw around the stamped design, to give the “apple” more definition. Don’t forget the stem and apple seeds inside!
- Next grab your scissors and trim around your finished piece to add to a cardstock card front.
- To finish off the Apple Stamped Card, have children glue their stamped piece to a cardstock card front and write phrases like “I Love You To The Core…” or “Couldn’t have picked a better teacher” on the outside.
- Then finish off with any other creative embellishments you have in mind {maybe a smiling face and wiggle eyes} before you write a sweet message in the inside and mail away to the lucky receiver!!!
RELATED —> Torn Paper Lemon Craft

If you are looking for even MORE crafts to do this fall, be sure to check out these past blog posts listed below!
- Popsicle Stick Owls
- Tissue Paper Apple
- Paper Plate Raccoon
- Indian Corn Painting
- Pumpkin Gift Bags
- Handprint Tree Canvas
- Popsicle Stick Apple Core
- Cupcake Liner Apple
- Footprint Apple Keepsake
