Teachers nurture growth, inspire discovery, and support our kids through each school year. It’s important to show our gratitude for their unwavering dedication, and what better way for kids to express their thanks than with a personal handmade gift?
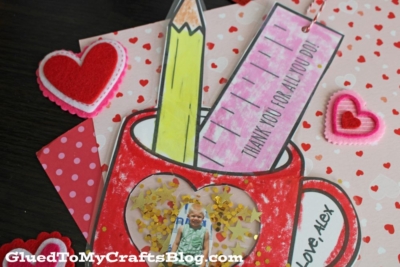
This Teacher Appreciation Photo Ornament Gift Tag is not only a fun craft project for children to make but also a heartfelt token of appreciation that teachers will cherish!
As another school year approaches its close, students and parents begin thinking about how to thank the wonderful educators for their hard work and effort.
A thoughtful, personalized gift, made by the hands of those they’ve taught, is the perfect way to say “Thank you.” This blog post will guide you through creating a unique photo ornament gift tag that will surely bring a smile to any teacher’s face!
Craft Supplies:
- Free Printable – on our landing page
- White Cardstock Paper
- Crayons, Markers or Coloring Pencils
- Scissors
- Clear Contact Paper
- Loose Craft Glitter
- Single Hole Punch
- Ribbon or String
- Printed Picture
- Embellishments
Directions:
- First things first – download the free teacher mug printable listed above in the supply list.
- Print out the provided file on a single sheet of white cardstock paper {or any colored paper instead!}
- Go ahead and color in the mug, pencil and ruler design however you like. Use the blank area in the mug handle design to write your child’s name if you choose.
- Now use scissors to trim it out. Go ahead and also cut out the heart design in the middle as well.
- Next up – cut two equal sized piece of contact paper.
- Peel the backing off of one piece of contact paper and lay it down, sticky side up, on your work surface.
- Lay the present cutout on top of the contact paper, facing towards you.
- Trim down your picture so it fits inside the ornament. Lay it inside the design.
- If desired, sprinkle some loose craft glitter now on top, to fill in blank spots and add some sparkle.
- Now peel the backing off the second piece of contact paper and lay it on top of the first.
- Use your hand to make sure everything is sealed together and that no bubbles exist.
- When ready, use scissors to trim off the excess contact paper from around the edges.
- For the final touch, add embellishments for a customized look.
- Then hold punch a hole on top and string some string through it for easy hanging.
- Then display/gift away proudly your child’s beautiful teacher appreciation photo ornament piece!
RELATED —> Teachers Plant The Seeds Gift Idea
Celebrate your teachers by encouraging your children to create and express their gratitude. Not only are they producing a tangible representation of their appreciation, but they’re also engaging in a process that teaches them about kindness, creativity, and the joy of giving.
Let’s help nurture our children’s capacity to recognize and celebrate the remarkable individuals who shape their lives.
BTW – don’t forget to share pictures of your child’s handmade creations with us on social media using #gluedtomycrafts on Facebook and Instagram. Happy crafting!
Teacher Appreciation Photo Mug Craft
Here’s your checklist of supplies to bring this craft to life:
- Cardstock Paper
- Clear Contact Paper
- Loose Craft Glitter
- Ribbon or String
- Printed Picture
- Embellishments
Prepare your creative haven by laying down a protective cover before the crafting magic begins!
Directions:
- First things first - download the free teacher mug printable listed above in the supply list.
- Print out the provided file on a single sheet of white cardstock paper {or any colored paper instead!}
- Go ahead and color in the mug, pencil and ruler design however you like. Use the blank area in the mug handle design to write your child's name if you choose.
- Now use scissors to trim it out. Go ahead and also cut out the heart design in the middle as well.
- Next up - cut two equal sized piece of contact paper.
- Peel the backing off of one piece of contact paper and lay it down, sticky side up, on your work surface.
- Lay the present cutout on top of the contact paper, facing towards you.
- Trim down your picture so it fits inside the ornament. Lay it inside the design.
- If desired, sprinkle some loose craft glitter now on top, to fill in blank spots and add some sparkle.
- Now peel the backing off the second piece of contact paper and lay it on top of the first.
- Use your hand to make sure everything is sealed together and that no bubbles exist.
- When ready, use scissors to trim off the excess contact paper from around the edges.
- For the final touch, add embellishments for a customized look.
- Then hold punch a hole on top and string some string through it for easy hanging.
- Then display/gift away proudly your child's beautiful teacher appreciation photo ornament piece!


NEED MORE HELP DOWNLOADING OUR FREE PRINTABLES? PLEASE REFER TO OUR FAQ PAGE


