Get creative with a pom pom stamped winter hat. Gather supplies and learn how to craft a fun and festive hat easily.
Get ready to add a splash of color and a whole lot of fun to your winter days! As the chilly weather sets in, it’s the perfect time to gather indoors for some creative crafting.
This pom pom stamped winter hat project is a fantastic activity for kids and adults alike, transforming simple materials into a vibrant piece of art that celebrates the cozy season.
It’s easy, requires minimal supplies, and the results are wonderfully unique every time.

This tutorial will guide you through creating your very own masterpiece. We’ll cover everything from the materials you need to the step-by-step stamping process. Plus, we’ve included a free printable hat template to make getting started even easier. You’ll soon have a colorful collection of winter hats to display, give as gifts, or use for festive classroom decorations!
Craft Supplies:
Gathering your supplies is the first step to crafting fun. The great news is you probably have most of these items around your home or classroom already.
- WINTER HAT Template – from our landing page
- White Cardstock Paper
- Craft Paint
- Small Paper Plate
- Wooden Clothespin
- Large Sized Pom Pom
- School Glue
- White Cotton Balls
- Embellishments
Directions:
Preparation is key to a smooth and enjoyable crafting session. A little setup beforehand means you can dive right into the creative part without any interruptions.
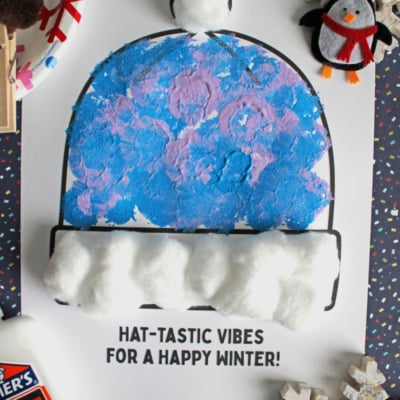
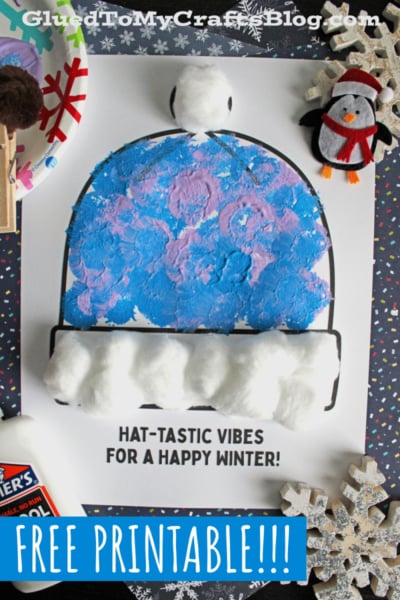
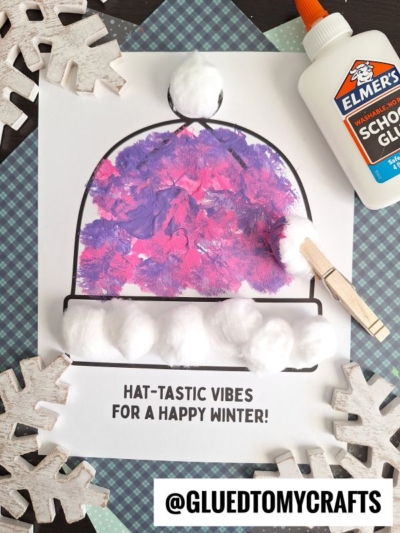
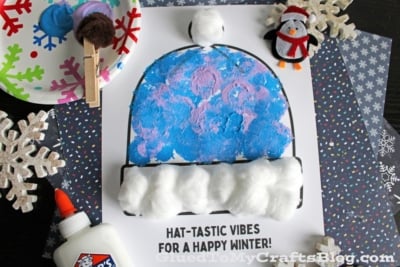
- First, download and print our free “hat-tastic vibes for a happy winter” template onto a sheet of white cardstock. The sturdier paper will prevent the paint from soaking through and keep your hat’s shape nice and crisp.
- This is where the magic begins! Create your pom pom stamp by clipping a pom pom into the end of a clothespin. The clothespin acts as a handle, keeping little fingers clean while stamping.
- Squeeze a small amount of each paint color onto your paper plate or paint tray.
- Now that everything is prepped, it’s time for the main event. This process is all about having fun and letting your creativity shine. Dip a pom pom stamp into one of the paint colors. Gently dab it onto the hat template. You can create patterns, make random splotches, or even try to blend colors. Encourage kids to experiment with different pom pom sizes to see the various textures they can create. Continue stamping until you’ve covered the hat with as much color as you like. There is no right or wrong way to do it!
- No winter hat is complete without a little fluff! Glue a line of cotton balls to the top and bottom of your painted hat. Press it down gently for a few seconds to make sure it sticks. This simple touch adds a wonderful 3D effect and makes your hat look extra cozy.
- Once your hat is fully decorated, set it aside to dry completely. Depending on how much paint you used, this might take anywhere from 30 minutes to an hour.
- Finally, gift and/or display your winter hat piece proudly for all to see!
RELATED —> Pom Pom Stamped Mitten Craft
This pom pom stamped winter hat craft is more than just an activity; it’s a way to create happy memories and beautiful art during the colder months. So, grab your paints, print your template, and get ready to stamp your way to a happy winter. Happy crafting, my friends!

Pom Pom Stamped Winter Hat Craft Idea
Get creative with a pom pom stamped winter hat. Gather supplies and learn how to craft a fun and festive hat easily.
Here’s your checklist of supplies to bring this craft to life:
Prepare your creative haven by laying down a protective cover before the crafting magic begins!
Directions:
- First, download and print our free "hat-tastic vibes for a happy winter" template onto a sheet of white cardstock. The sturdier paper will prevent the paint from soaking through and keep your hat's shape nice and crisp.
- This is where the magic begins! Create your pom pom stamp by clipping a pom pom into the end of a clothespin. The clothespin acts as a handle, keeping little fingers clean while stamping.
- Squeeze a small amount of each paint color onto your paper plate or paint tray.
- Now that everything is prepped, it's time for the main event. This process is all about having fun and letting your creativity shine. Dip a pom pom stamp into one of the paint colors. Gently dab it onto the hat template. You can create patterns, make random splotches, or even try to blend colors. Encourage kids to experiment with different pom pom sizes to see the various textures they can create. Continue stamping until you’ve covered the hat with as much color as you like. There is no right or wrong way to do it!
- No winter hat is complete without a little fluff! Glue a line of cotton balls to the top and bottom of your painted hat. Press it down gently for a few seconds to make sure it sticks. This simple touch adds a wonderful 3D effect and makes your hat look extra cozy.
- Once your hat is fully decorated, set it aside to dry completely. Depending on how much paint you used, this might take anywhere from 30 minutes to an hour.
- Finally, gift and/or display your winter hat piece proudly for all to see!


NEED HELP DOWNLOADING OUR FREE PRINTABLES? PLEASE REFER TO OUR FAQ PAGE
If you've enjoyed our content or have any thoughts to share, we'd love to hear from you! Mention @gluedtomycrafts or tag #gluedtomycrafts on Instagram!