Make an adorable spring-themed paper bag mushroom house with your kids! Fun, easy, affordable craft idea. Perfect for creative play and family bonding!


Spring is the perfect time to celebrate blooming flowers, bright sunshine, and colorful crafts. If you’re looking for a fun and easy project to keep the little ones engaged, we’ve got you covered. This Paper Bag Mushroom House craft will spark their creativity and bring a whimsical spring vibe right into your home!
Imagine crafting tiny homes for fairies or forest creatures—it’s all about creativity, color, and fun. Follow along as we guide you step by step, share essential materials, and toss in a few handy tips to ensure your mushroom house masterpiece turns out picture-perfect.
Read on for everything you and your kids need to make adorable spring-inspired crafts together in no time!


Crafting paper bag mushroom houses is the perfect way to celebrate the season and keep your little ones entertained. With just a few simple materials, your kids can tap into their creativity and bring a touch of nature indoors, minus the mess.
Craft Supplies:
Before starting, gather these items for your paper bag mushroom fairy house. Most are easy to find at home or at your local craft store:
- Mushroom Cap Roof Printable – from our landing page
- White Cardstock Paper
- Colored Cardstock Paper
- Crayons/Coloring Pencils
- Scissors
- Large, Brown Paper Bag
- White Craft Paint
- Paint Brush
- Shredded Paper
- Stapler
- School Glue
- Embellishments
Feel free to improvise with what you have—crafting is all about creativity!
Directions:
Follow these simple steps to create your very own fairy house from a paper bag:
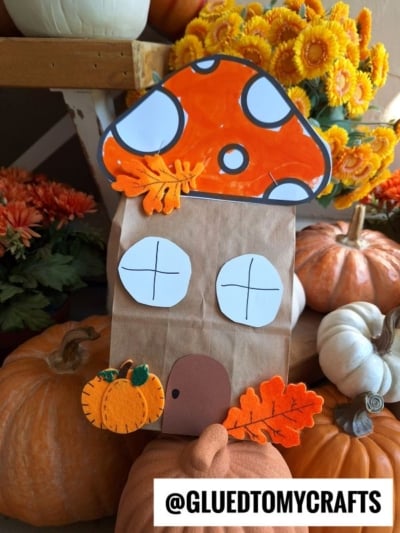
- First things first – paint one side of your paper bag completely white. Just squirt a small amount of craft paint on the bag and move it around with the paint brush.
- When done, set it aside to allow it to dry completely while you work on the remaining steps.
- Next up, if you haven’t already, go ahead and print out the “mushroom cap roof” printable that is listed above.
- Once you have the printable printed, decorate one of the designs and trim it out.
- At this point in time you should go ahead and cut out a chimney, door, windows etc. for your house, from the remaining pieces of cardstock paper.
- Now gather up all your paper pieces and the white painted paper bag.
- Open it up and stuff your bag with a handful of shredded paper, until it stands up nicely and looks really full.
- Take your stapler, along with the mushroom cutout and staple it to the stuffed paper bag to close it up.
- To finish off the lunch sack mushroom craft – glue on your remaining paper pieces, as well as any other embellishments you see fit.
- Then display your finished mushroom house paper bag piece proudly for ALL to see!
RELATED —> Paper Plate Mushrooms
Today’s paper bag mushroom house tutorial isn’t just a craft—it’s an opportunity for kids to express themselves, learn new skills, and have a whole lot of fun in the process! Simple, affordable, and endlessly customizable, this project is bound to be a hit with children of all ages.
If you and your little ones create your own mushroom masterpiece, we’d love to see it! Share your creations with us on social media by tagging #gluedtomycrafts in the caption. We can’t wait to hear from YOU!
Now it’s time for you to gather your supplies, roll up your sleeves, and start crafting delightful spring!

Paper Bag Mushroom Fairy House Craft Idea
Make an adorable spring-themed paper bag mushroom house with your kids! Fun, easy, affordable craft idea. Perfect for creative play and family bonding!
Here’s your checklist of supplies to bring this craft to life:
- Cardstock Paper
- Large Brown Paper Bag
- Shredded Paper
- SPRING PRINTABLE - LANDING PAGE
- Embellishments
- School Glue
Prepare your creative haven by laying down a protective cover before the crafting magic begins!
Directions:
- First things first - paint one side of your paper bag completely white. Just squirt a small amount of craft paint on the bag and move it around with the paint brush.
- When done, set it aside to allow it to dry completely while you work on the remaining steps.
- Next up, if you haven't already, go ahead and print out the "mushroom cap roof" printable that is listed above.
- Once you have the printable printed, decorate one of the designs and trim it out.
- At this point in time you should go ahead and cut out a chimney, door, windows etc. for your house, from the remaining pieces of cardstock paper.
- Now gather up all your paper pieces and the white painted paper bag.
- Open it up and stuff your bag with a handful of shredded paper, until it stands up nicely and looks really full.
- Take your stapler, along with the mushroom cutout and staple it to the stuffed paper bag to close it up.
- To finish off the lunch sack mushroom craft - glue on your remaining paper pieces, as well as any other embellishments you see fit.
- Then display your finished mushroom house paper bag piece proudly for ALL to see!


NEED MORE HELP DOWNLOADING OUR FREE PRINTABLES? PLEASE REFER TO OUR FAQ PAGE
If you've enjoyed our content or have any thoughts to share, we'd love to hear from you! Mention @gluedtomycrafts or tag #gluedtomycrafts on Instagram!