
This easy kids craft is perfect for pretend play, spring decor or even to be placed in your very own fairy garden!
All you need are popsicle sticks, some glue and paint. Follow the simple instructions to make this adorable mushroom fairy house. Your kids will love creating AND playing with it!

Mushroom House Craft Idea
Are you and your kids looking for a fun and creative craft project to do together? Look no further than making this adorable Popsicle Stick Mushroom Fairy House tutorial!
Whether you’re a mom, teacher, or crafter looking for something new to add into your repertoire of projects, this easy fairy house art project idea will have you smiling in no time.
Kids of all ages can join in on the crafting fun as they decorate their own little abode with colorful paints and decorations. Plus, it helps develop important motor skills like hand-eye coordination while providing an outlet for creativity.
Get ready to get inspired with this latest kids craft idea from us, on how to make your own whimsical mushroom fairy house out of popsicles sticks and cardstock paper! Happy crafting, my friends!
RELATED —> Mushroom Fairy House

Make some magic with your kids today with this easy and fun popsicle stick fairy house craft idea!
Craft Supplies:
- Jumbo Popsicle Sticks – 4 per craft
- Mini Popsicle Sticks -2 per craft
- School Glue
- Craft Scissors
- Small Paper Plate
- White Craft Paint
- Red Craft Paint
- Paint Brushes
- White Cardstock Paper
- Black Cardstock Paper
- Gray Cardstock Paper
- Black Sharpie Marker
Directions:
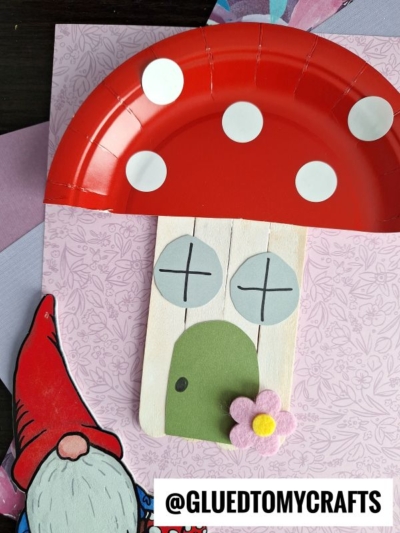
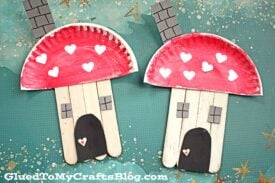
- First assemble the base of your mushroom house. This step is done by laying four jumbo popsicle sticks next to each other, then gluing the two remaining mini popsicle sticks the opposite direction, to create a fence shape.
- Set aside your popsicle stick shape to allow it to dry completely.
- While that is drying – grab your small paper plate and scissors.
- Cut the paper plate straight up the center to make two equal halves.
- Grab one half for your mushroom house and save the other for a rainy day {or to repeat this craft later!}
- Now grab your red craft paint and foam paint brush.
- Squirt some paint on the paper plate half.
- Use one of your paint brushes to paint the paper plate piece completely red.
- While the paint is still wet, go ahead and either punch out or cut out a few small hearts from the white cardstock.
- Lay those pieces on the wet paper plate, to give the mushroom some dimension. If they don’t stick, use some school glue.
- Now set aside the paper plate piece till the last step.
- Go ahead and now grab your popsicle stick shape from earlier, along with the white craft paint & another paint brush.
- Squirt some white craft paint directly onto the assembled wood piece.
- Use the paint brush to paint it completely white.
- Again, set it aside to allow the paint to dry completely.
- On to the last few steps – grab the remaining cardstock sheets, your scissors again and your black Sharpie marker.
- Cut out a small door, some windows, chimney etc. for your fairy house.
- Use the marker to draw on dimension on each piece {like window panes, door knob, chimney bricks etc.}
- To finish off the Popsicle Stick Mushroom House – glue the “roof” which is the paper plate piece, to the top of the painted popsicle stick shape.
- Follow that up by gluing the remaining paper pieces in place {FYI – the chimney goes on the back of the paper plate roof half!}
- Then set aside again to let it dry completely before displaying proudly!
RELATED —> Cupcake Liner Mushrooms


Don’t let the crafty fun stop here with this wood stick fairy house tutorial! Come check out our Pumpkin Fairy House and Mushroom Fairy House posts!
Then pair them all together and have a magical time making memories at the kitchen table with your child this spring!

Popsicle Stick Mushroom Fairy House Craft Idea
Here’s your checklist of supplies to bring this craft to life:
- School Glue
- 1 Scissors
Prepare your creative haven by laying down a protective cover before the crafting magic begins!
Directions:
- First assemble the base of your mushroom house. This step is done by laying four jumbo popsicle sticks next to each other, then gluing the two remaining mini popsicle sticks the opposite direction, to create a fence shape.
- Set aside your popsicle stick shape to allow it to dry completely.
- While that is drying - grab your small paper plate and scissors.
- Cut the paper plate straight up the center to make two equal halves.
- Grab one half for your mushroom house and save the other for a rainy day {or to repeat this craft later!}
- Now grab your red craft paint and foam paint brush.
- Squirt some paint on the paper plate half.
- Use one of your paint brushes to paint the paper plate piece completely red.
- While the paint is still wet, go ahead and either punch out or cut out a few small hearts from the white cardstock.
- Lay those pieces on the wet paper plate, to give the mushroom some dimension. If they don't stick, use some school glue.
- Now set aside the paper plate piece till the last step.
- Go ahead and now grab your popsicle stick shape from earlier, along with the white craft paint & another paint brush.
- Squirt some white craft paint directly onto the assembled wood piece.
- Use the paint brush to paint it completely white.
- Again, set it aside to allow the paint to dry completely.
- On to the last few steps - grab the remaining cardstock sheets, your scissors again and your black Sharpie marker.
- Cut out a small door, some windows, chimney etc. for your fairy house.
- Use the marker to draw on dimension on each piece {like window panes, door knob, chimney bricks etc.}
- To finish off the Popsicle Stick Mushroom House - glue the "roof" which is the paper plate piece, to the top of the painted popsicle stick shape.
- Follow that up by gluing the remaining paper pieces in place {FYI - the chimney goes on the back of the paper plate roof half!}
- Then set aside again to let it dry completely before displaying proudly!

CLICK HERE TO PRINT THE DIRECTIONS FOR THIS CRAFT