Create something magical this fall season with the help of Glued To My Crafts!
We are soooo excited to present this Paper Plate Pumpkin Fairy House kid craft tutorial to you all today! We even have a FREE printable to get you started on this fresh idea!!!

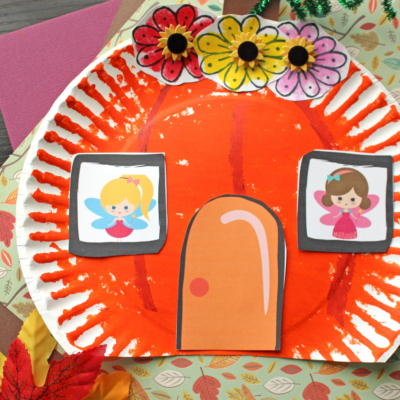
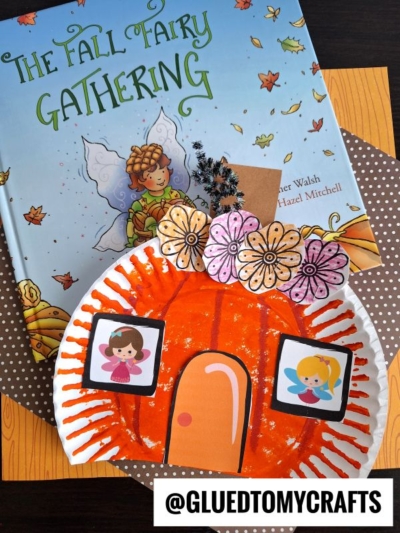
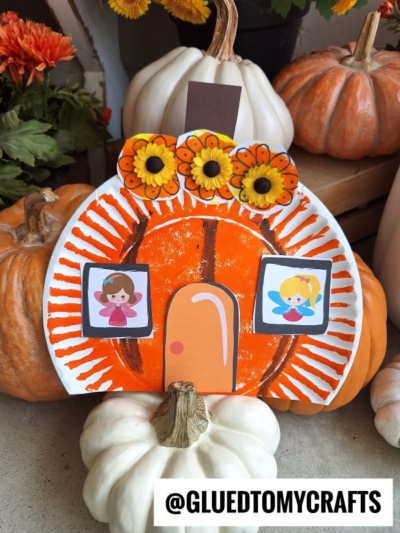
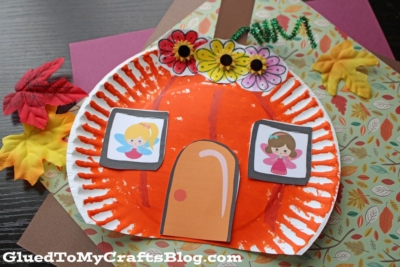
Pumpkin Fairy House Made From A Paper Plate
Welcome to today’s fairy pumpkin house craft tutorial! In this blog post, we will show you how to transform a plain paper plate into a charming safe-haven for your new fairy friends. Get ready to unleash your creativity as we explore different craft mediums, stickers, and glitter to personalize your orange pumpkin fairy house!
This autumn-inspired DIY project is perfect for you and your child to enjoy together. The best part is that you can easily customize your orange pumpkin fairy homes by incorporating your own unique touches using materials readily available in your craft stash. No need to stress about finding anything “frilly” to make this happen!
So, let’s dive in and start creating your pumpkin-inspired paper piece. We have provided a full tutorial along with a free printable template below. Remember, at Glued To My Crafts, we provide the framework, but you are encouraged to customize it according to your preferences. Feel free to explore your imagination and create your own magical fairy house today!
Happy crafting, my friends!!! Don’t forget to share pictures of your finished paper plate fairy pumpkin house creations with us on our Facebook page, so we can admire it from a far! I can’t wait to see what you “build” for your fairy friend today! #gluedtomycrafts
RELATED —> Fairy Craft Collection

Let your imagination soar and give your kids the best fall experience! Create a magical paper plate pumpkin fairy house and enjoy some family time this autumn season!
Craft Supplies:
- Large Paper Plate
- Fairy House Printable – on our landing page
- White Cardstock Paper
- Craft Scissors
- Orange Craft Paint
- Paint Brush
- Markers/Crayons
- Brown Cardstock Paper
- School Glue
- Stapler
RELATED —> Chalk Art Fairy
Directions:
- First things first – cut off a small section of your large paper plate to make the bottom of the fairy house flat.
- Discard the small sliver you just cut off.
- Next up – paint the paper plate completely orange.
- Set aside to let it dry completely.
- Now print the FREE template above. You only need to print one per craft.
- Using scissors, trim out each section in the printable you just printed.
- Use markers or crayons to color in the flower cutouts.
- Add embellishments to the center of the flowers if you like.
- Now decide which windows you are going to use for your craft {you need two windows.} There are several different versions of fairies in the windows OR you can use the provided blank windows & draw whatever you like inside of them {bonus tip -trim out the center of the blank windows and use your child’s pictures to fill the frames!}
- Once the paper plate is dry and you have everything cut out/colored in, now it’s time to start assembling your pumpkin fairy house.
- Grab the brown cardstock paper.
- Cut out a rectangular stem for the pumpkin.
- Staple/secure it to the top of the paper plate.
- Glue/staple the other embellishments in place on the paper plate. You will want the flowers to be placed around the stem of the pumpkin. Stapling might be the easiest on this step, while glue is better for the windows and door.
- Finally – add anything else you like for that custom look, before displaying proudly!
RELATED —> Paper Plate Scarecrow
Cozy up this fall season with tons of crafty inspiration from us! We want YOU to check out our popular Wooden Spoon Fairy, Paper Plate Pumpkin Pie and Fall Keepsake Ideas craft posts!
We also LOVE talking crafts with our lovely readers. Come join our private Facebook group where we chit chat, share and laugh together! Everyone is welcomed!!!

Paper Plate Pumpkin Fairy House Craft
Here’s your checklist of supplies to bring this craft to life:
- School Glue
Prepare your creative haven by laying down a protective cover before the crafting magic begins!
Directions:
- First things first - cut off a small section of your large paper plate to make the bottom of the fairy house flat. Discard the small sliver you just cut off.1 Large Paper Plate
- Next up - paint the paper plate completely orange. Set aside to let it dry completely.Craft Paint
- Using scissors, trim out each section in the printable you just printed.
- Use markers or crayons to color in the flower cutouts. Add embellishments to the center of the flowers if you like.
- Now decide which windows you are going to use for your craft {you need two windows.} There are several different versions of fairies in the windows OR you can use the provided blank windows & draw whatever you like inside of them {bonus tip -trim out the center of the blank windows and use your child's pictures to fill the frames!}
- Once the paper plate is dry and you have everything cut out/colored in, now it's time to start assembling your pumpkin fairy house.
- Grab the brown cardstock. Cut out a rectangular stem for the pumpkin. Staple/secure it to the top of the paper plate.
- Glue/staple the other embellishments in place on the paper plate. You will want the flowers to be placed around the stem of the pumpkin. Stapling might be the easiest on this step, while glue is better for the windows and door.
- Finally - add anything else you like for that custom look, before displaying proudly!


NEED MORE HELP DOWNLOADING OUR FREE PRINTABLES? PLEASE REFER TO OUR FAQ PAGE