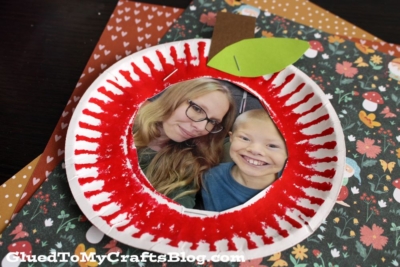
Make a fun and crafty paper plate apple frame. This easy DIY project is perfect for displaying your favorite pictures.


Crafting is a fantastic way to engage children in creative activities that stimulate their imagination. Today’s paper plate apple picture frame craft tutorial is not only easy to make but also offers several educational benefits.
Kids get to practice their fine motor skills, learn about shapes and colors, and even get a little lesson in patience and following instructions. Plus, the end result is a delightful keepsake that can hold a cherished photo, making it a perfect gift for grandparents or teachers.

Make a fun and crafty paper plate apple frame. This easy DIY project is perfect for displaying your favorite pictures from the fall season!
Craft Supplies:
- Small White Paper Plate – 1 per craft
- 4×6″ Printed Facial Picture
- Scissors
- Red Craft Paint
- Foam Paint Brush
- Stapler
- Brown Cardstock Paper
- Green Cardstock Paper
- optional material – ribbon/hot glue gun for hanging
Directions:
- First cut out a circle shape out of the center of your small paper plate {don’t cut the rim though!} to create an opening for your picture.
- Discard the excess paper you just cut out.
- Next up – paint the paper plate shape completely red.
- Set aside to let it dry a bit.
- Grab your brown and green cardstock paper.
- Cut out a stem {brown} and leaf {green} shape for your apple.
- At this point in time you should also go ahead and trim down the printed picture to be placed inside the paper plate frame.
- Now we are ready for assembling.
- Go ahead and staple the cardstock pieces in place, on the painted paper plate.
- Follow that up by stapling the picture in last.
- If desired – add other embellishments or hot glue a piece of ribbon to the back for easy hanging.
- Then display proudly for ALL to see!
RELATED —> Craft Stick Apple Picture Frame

AFFILIATE LINK – PAIR OUR CRAFT IDEA WITH THE “APPLE COUNTDOWN” BOOK
By following the steps outlined in the quick tutorial above, you’ll create a beautiful keepsake and make lasting memories with your child. Plus, you’ll be teaching valuable lessons and skills along the way!
Ready to get started? Gather your materials, set up your craft space, and enjoy the creative process. Happy crafting!
For more fun craft ideas and tips, be sure to subscribe to our newsletter and join our crafting community. Together, we can inspire and nurture the next generation of creative minds!

Paper Plate Apple Picture Frame Craft Idea
Make a fun and crafty paper plate apple frame. This easy DIY project is perfect for displaying your favorite pictures.
Here’s your checklist of supplies to bring this craft to life:
- Small Paper Plate
- Printed Picture
- Craft Paint
- Cardstock Paper
Prepare your creative haven by laying down a protective cover before the crafting magic begins!
Directions:
- First cut out a circle shape out of the center of your small paper plate {don't cut the rim though!} to create an opening for your picture.
- Discard the excess paper you just cut out.
- Next up - paint the paper plate shape completely red.
- Set aside to let it dry a bit.
- Grab your brown and green cardstock paper.
- Cut out a stem {brown} and leaf {green} shape for your apple.
- At this point in time you should also go ahead and trim down the printed picture to be placed inside the paper plate frame.
- Now we are ready for assembling.
- Go ahead and staple the cardstock pieces in place, on the painted paper plate.
- Follow that up by stapling the picture in last.
- If desired - add other embellishments or hot glue a piece of ribbon to the back for easy hanging.
- Then display proudly for ALL to see!

If you've enjoyed our content or have any thoughts to share, we'd love to hear from you! Mention @gluedtomycrafts or tag #gluedtomycrafts on Instagram!