Make your holiday season extra special with this fun and easy paper Christmas car ornament your kids will love to create!

Get creative this holiday season with your little ones! Make a beautiful Christmas ornament from paper with your kids’ help. It’s the perfect way to add personal touches to your festive decorations and make family memories too!
Are you feeling crafty and in the Christmas spirit? Then let’s get creative together by making a one-of-a-kind paper Christmas ornament!
With this easy holiday car ornament craft, you can have your kids make their very own festive decoration that they’ll be proud to hang up on the tree. Not only will it help liven up your holiday decor, but it also allows for some nice family bonding time too!
All you need is some simple materials such as cardstock paper and glue, plus our step-by-step instructions – and soon enough, your child’s personalized handmade ornament will be ready to sparkle and shine throughout the season!
Craft Supplies:
- Car Ornament File – on our landing page
- White Cardstock Paper
- Green Cardstock Paper
- Brown Cardstock Paper
- Crayons, Markers or Coloring Pencils
- Scissors
- Adhesive
- Contact Paper
- Pencil
- Single Hole Punch
- Ribbon or String
- Embellishments and Printed Picture
Directions:
- First things first – grab the mini car printable listed above in the supply list.
- Print out the provided file on white cardstock paper. One print gives you TWO chances to do this craft at once.
- Now color in one of the car designs.
- When done, use scissors to trim it out. Set aside for now.
- Next grab your remaining sheets of cardstock paper, as well as your pencil.
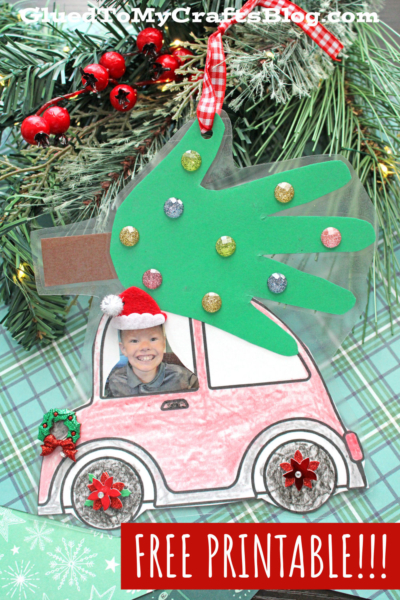
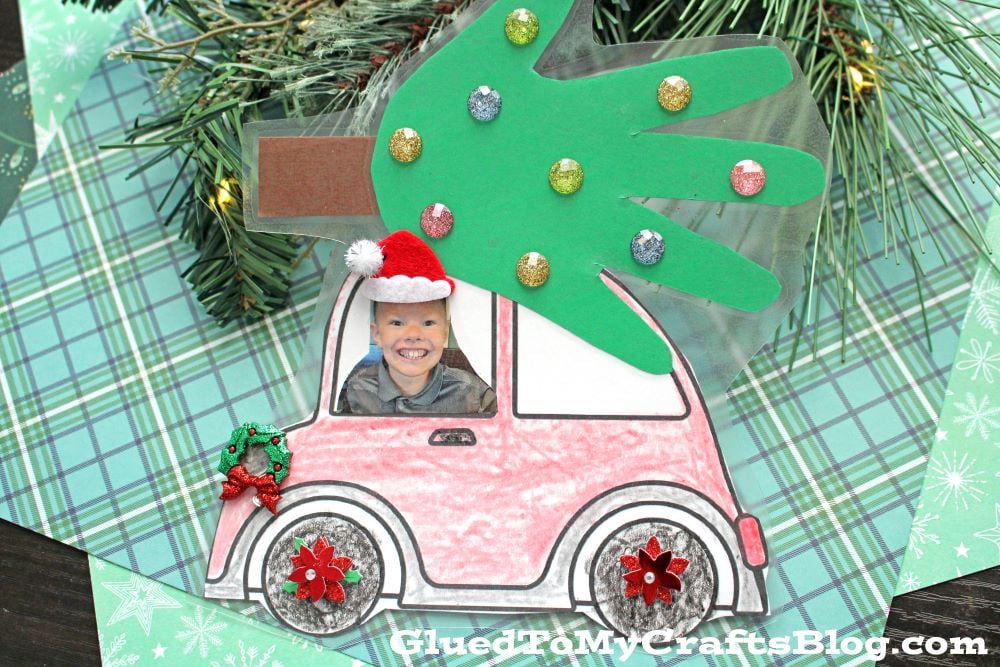
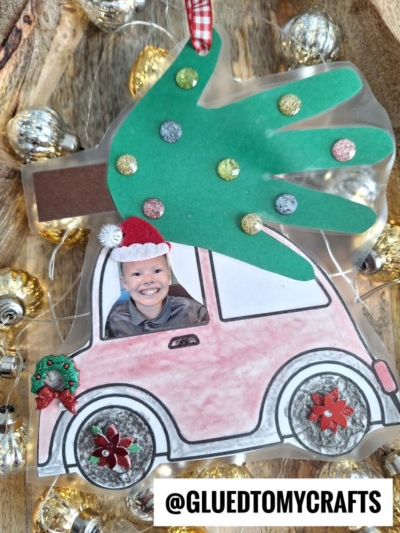
- Trace one hand on the green cardstock paper. Trim it out.
- Out of the brown cardstock paper, trim out a tree trunk. Secure it to the handprint cutout to complete the tree.
- Now grab your printed picture and trim it down so it fits inside the window of the car design.
- Next, you will want to attach the handprint tree AND picture on the car cutout. The tree on top and the picture inside the window.
- Now for the final steps! Before you add ANY embellishments, you will want to seal everything together with the contact paper. Go ahead and cut off two pieces that are bigger than your ornament.
- Peel the backing off of one piece of contact paper and lay it down, sticky side up, on your work surface.
- Lay the decorated car cutout on top.
- Now peel the backing off the second piece of contact paper and lay it on top of the first. Use your hand to make sure everything is sealed together and that no bubbles exist.
- When ready, use scissors to trim off the excess contact paper from around the edges.
- Finally, add ANY and all embellishments to give their Christmas themed car ornament piece a personalized look. This is where your child’s personality will really shine!
- And that’s it! Don’t forget to write your child’s name, age and date on the back!
- Then display/gift away proudly your child’s beautiful handprint tree ornament piece!
RELATED —> Holly Jolly Keepsake

Cozy up this winter season with tons of crafty inspiration from us! We want YOU to check out our SUPER POPULAR Reindeer Frame, Reindeer Car and Red Truck Snow Globe craft posts!
We also LOVE talking crafts with our lovely readers. Come join our private Facebook group where we chit chat, share and laugh together! Everyone is welcomed so come join the fun!!!

Paper Christmas Car Ornament For Kids To Make
Make your holiday season extra special with this fun and easy paper Christmas car ornament your kids will love to create!
Here’s your checklist of supplies to bring this craft to life:
- Cardstock Paper
- Car Ornament Printable
- Clear Contact Paper
- Ribbon or String
- Printed Picture
- Embellishments
Prepare your creative haven by laying down a protective cover before the crafting magic begins!
Directions:
- First things first - grab the mini car printable listed above in the supply list.
- Print out the provided file on white cardstock paper. One print gives you TWO chances to do this craft at once.
- Now color in one of the car designs.
- When done, use scissors to trim it out. Set aside for now.
- Next grab your remaining sheets of cardstock paper, as well as your pencil.
- Trace one hand on the green cardstock paper. Trim it out.
- Out of the brown cardstock paper, trim out a tree trunk. Secure it to the handprint cutout to complete the tree.
- Now grab your printed picture and trim it down so it fits inside the window of the car design.
- Next, you will want to attach the handprint tree AND picture on the car cutout. The tree on top and the picture inside the window.
- Now for the final steps! Before you add ANY embellishments, you will want to seal everything together with the contact paper. Go ahead and cut off two pieces that are bigger than your ornament.
- Peel the backing off of one piece of contact paper and lay it down, sticky side up, on your work surface.
- Lay the decorated car cutout on top.
- Now peel the backing off the second piece of contact paper and lay it on top of the first. Use your hand to make sure everything is sealed together and that no bubbles exist.
- When ready, use scissors to trim off the excess contact paper from around the edges.
- Finally, add ANY and all embellishments to give their Christmas themed car ornament piece a personalized look. This is where your child's personality will really shine!
- And that's it! Don't forget to write your child's name, age and date on the back!
- Then display/gift away proudly your child's beautiful handprint tree ornament piece!


NEED HELP DOWNLOADING OUR FREE PRINTABLES? PLEASE REFER TO OUR FAQ PAGE
If you've enjoyed our content or have any thoughts to share, we'd love to hear from you! Mention @gluedtomycrafts or tag #gluedtomycrafts on Instagram!