Calling all my aspiring little bakers and chefs! Today's popsicle stick baker gnome craft tutorial is extra PERFECT for you!


Calling all my aspiring little bakers and chefs! Today’s popsicle stick baker gnome craft tutorial is extra PERFECT for you!
We are going to turn ordinary wood craft sticks into one-of-a-kind “baking” friends. I promise you it’s super easy to recreate! All it takes is just a little painting and gluing to bring your new kitchen pals to life!

This fun and easy kids’ craft is perfect for aspiring bakers and chefs. With just a few simple supplies, you can make these adorable popsicle stick bakers with your little one today!
Craft Supplies:
These are the materials you’ll need for this craft:
- Jumbo Wood Sticks – 3 per craft
- School Glue
- White Craft Paint
- Small Paper Plate
- Paint Brush
- Scissors
- Scrapbook Paper
- White Cardstock Paper
- Gray Cardstock Paper
- Tan Cardstock Paper
- Chef Hat Printable – on our landing page
Directions:
- Let the fun begin! Start by gathering three popsicle sticks per gnome baker and your painting supplies.
- Pour a small amount of craft paint onto a paper plate.
- Using a paintbrush, fully coat the three popsicle sticks with paint.
- Once painted, use school glue to attach the sticks together in the shape of a triangle. Set the triangle aside to dry completely. Repeat this step for each gnome you’d like to create.
- While the paint dries, grab your scrapbook paper and scissors.
- Cut a triangle from the scrapbook paper to serve as the body of your baker gnome, fitting it within the popsicle stick frame.
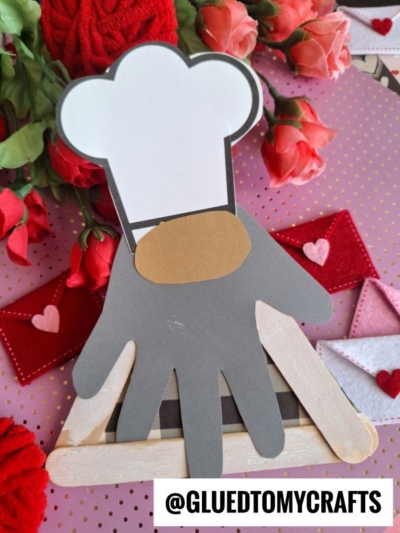
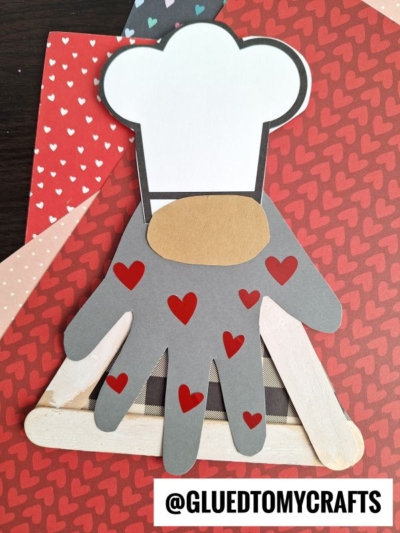
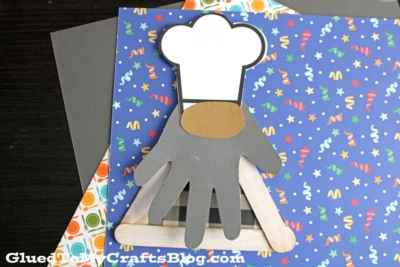
- From the remaining cardstock, cut out a gray handprint-shaped beard, an oval nose, and one of the chef hats from the printable template.
- To assemble your Chef-Inspired Gnome, glue the triangle scrapbook piece to the back of the popsicle stick frame, and attach the beard, nose, and chef hat to the front. Use school glue to secure all parts in place.
- Feel free to add any extra embellishments to give your gnome a personal touch!
- Once complete, let your creation dry fully before proudly displaying it.
- Don’t forget to share photos of your masterpiece with us on social media using #gluedtomycrafts!
RELATED —> Bumble Bee Gnome
If you are looking for even MORE easy craft ideas, from Glued To My Crafts, be sure to check out these fun and super unique posts listed below!
Popsicle Stick Lumberjack Bear

Popsicle Stick Baker Gnome Craft Idea For Kids
Calling all my aspiring little bakers and chefs! Today's popsicle stick baker gnome craft tutorial is extra PERFECT for you!
Here’s your checklist of supplies to bring this craft to life:
- School Glue
Prepare your creative haven by laying down a protective cover before the crafting magic begins!
Directions:
- Let the fun begin! Start by gathering three popsicle sticks per gnome baker and your painting supplies.
- Pour a small amount of craft paint onto a paper plate.
- Using a paintbrush, fully coat the three popsicle sticks with paint.
- Once painted, use school glue to attach the sticks together in the shape of a triangle. Set the triangle aside to dry completely. Repeat this step for each gnome you'd like to create.
- While the paint dries, grab your scrapbook paper and scissors.
- Cut a triangle from the scrapbook paper to serve as the body of your baker gnome, fitting it within the popsicle stick frame.
- From the remaining cardstock, cut out a gray handprint-shaped beard, an oval nose, and one of the chef hats from the printable template.
- To assemble your Chef-Inspired Gnome, glue the triangle scrapbook piece to the back of the popsicle stick frame, and attach the beard, nose, and chef hat to the front. Use school glue to secure all parts in place.
- Feel free to add any extra embellishments to give your gnome a personal touch!
- Once complete, let your creation dry fully before proudly displaying it.
- Don’t forget to share photos of your masterpiece with us on social media using #gluedtomycrafts!


Click Here To Grab The Free Printable On Our Landing Page
NEED HELP DOWNLOADING OUR FREE PRINTABLES? PLEASE REFER TO OUR FAQ PAGE
If you've enjoyed our content or have any thoughts to share, we'd love to hear from you! Mention @gluedtomycrafts or tag #gluedtomycrafts on Instagram!