Keep the kids entertained this upcoming spring season with today’s Popsicle Stick Carrot Stand kid craft idea! It’s super unique and another first-seen-here idea for us!

Produce Stand Craft Idea For Kids
Inspired by a craft foam veggie stand craft kit I recently saw at my local Michaels store, I decided to take my original “lemonade stand” kids craft tutorial and alter it a bit for an EASTER theme. Perfect for any little “bunny” to stand at!
All you need is few basic jumbo wood craft sticks, a glue gun, cardstock paper and maybe even a few Easter themed stickers if you like. That’s it! Super simple materials that anyone can obtain this time of year.
Our unique spring themed DIY is super easy to recreate and sure to bring TONS of craftiness to your child’s fingertips. You can find ALL the details you need to know, along with more details on the supplies, in the full tutorial below. You could even turn the finished craft stick farmer’s market stand piece into a picture frame if you like! Just adhere a small picture in the opening of the wood stick shape and hot glue some magnets to the back for easy displaying on the fridge. Super fun stuff and I hope we inspired you today!!
Well – I’ll let you get to it. Happy crafting my friends! Don’t forget to share pictures with us of your wood stick fruit & veggie stand creations by tagging us on Instagram to see! I can’t wait to see how you customize your pieces!!!
RELATED: Flower Truck Craft and You’ve Been EGGED


Time to get crafty! Put a smile on your little one’s face with this clever popsicle stick DIY Farmer’s Market Stand. It’s fun, easy and perfect for any little crafter!
Craft Supplies:
- Jumbo Popsicle Sticks {six per craft}
- Hot Glue Gun
- Craft Paint/Paint Brushes
- Kid Friendly Scissors
- Cardstock Paper
- Markers
- Easter/Spring Craft Stickers
Directions:
- First get the glue gun hot and ready!
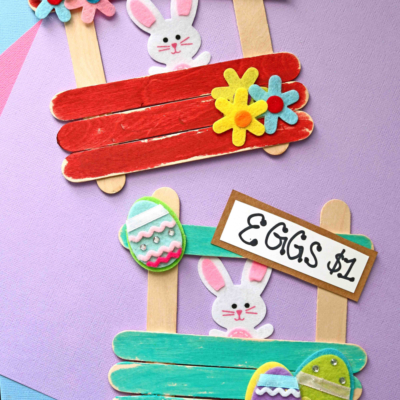
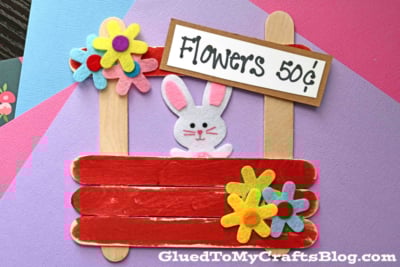
- Start off by gluing together the base of your farmer’s stand. You will need SIX jumbo popsicle sticks per craft. The best way I explain this step, is to make a fence but with a large gap in between. Please use my picture above for example.
- The next step is completely optional and won’t affect the outcome of the craft. Squirt your choice of color in craft paint on a paper plate.
Now set aside the assembled piece till later. - While that is drying, go ahead and cut out embellishments from your various sheets of cardstock to give your piece that one-of-a-kind look. For mine, I did a small rectangle sign to pull the theme together and then I used stickers for the remainder. You HOWEVER can also cut out hand-drawn pieces from cardstock paper or maybe even pull out your Cricut maker if you choose.
- To finish off the Popsicle Stick Farmer’s Market Stand – hot glue your cardstock pieces from earlier and any other touches to the front of your wood shape. The carrots/sign on the front and the bunny on the back/center.
- Use your markers to write on clever sayings like “carrots for $1 or eggs for $5}
- Follow that up by adding small stickers and/or other embellishments to really customize it.
- Then set aside to let it dry completely before displaying proudly!
- Adhere a picture instead the opening {like a picture frame!} and/or add magnets to the back to display the finished piece on the fridge.
RELATED —> Handprint Carrot Garden

AFFILIATE LINK – PAIR OUR CRAFT IDEA WITH THIS BOOK RECOMMENDATION
Love this Easter themed popsicle stick bunny produce stand kid craft idea?
Be sure to also check out our Popsicle Stick Bunny Gnome and Foam Easter Bunny House craft posts!
Both are perfect for a beautiful spring day of crafting with your child, as well!

Popsicle Stick Farmer’s Market Stand Craft Idea
Here’s your checklist of supplies to bring this craft to life:
- 6 Jumbo Popsicle Sticks
- Cardstock Paper
- Embellishments
- 1 Scissors
Prepare your creative haven by laying down a protective cover before the crafting magic begins!
Directions:
- First get the glue gun hot and ready!
- Start off by gluing together the base of your farmer's stand. You will need SIX jumbo popsicle sticks per craft. The best way I explain this step, is to make a fence but with a large gap in between. Please use my picture above for example.
- The next step is completely optional and won't affect the outcome of the craft. Squirt your choice of color in craft paint on a paper plate.
- Now set aside the assembled piece till later.
- While that is drying, go ahead and cut out embellishments from your various sheets of cardstock to give your piece that one-of-a-kind look. For mine, I did a small rectangle sign to pull the theme together and then I used stickers for the remainder. You HOWEVER can also cut out hand-drawn pieces from cardstock paper or maybe even pull out your Cricut maker if you choose.
- To finish off the Popsicle Stick Farmer's Market Stand - hot glue your cardstock pieces from earlier and any other touches to the front of your wood shape. The carrots/sign on the front and the bunny on the back/center.
- Use your markers to write on clever sayings like "carrots for $1 or eggs for $5}
- Follow that up by adding small stickers and/or other embellishments to really customize it.
- Then set aside to let it dry completely before displaying proudly!
- Adhere a picture instead the opening {like a picture frame!} and/or add magnets to the back to display the finished piece on the fridge.

CLICK HERE TO PRINT THE DIRECTIONS FOR THIS CRAFT