Glued To My Crafts

Join thousands of others who have gotten GLUED to our craft tutorials!

  • Home
  • Privacy Policy
  • Craft Safety Guidelines
  • Seasonal Themes
    • New Years
    • Valentine’s Day
    • St. Patrick’s Day
    • Spring
    • Easter
    • Mother’s Day
    • Summer
    • Father’s Day
    • Patriotic
    • Halloween
    • Thanksgiving
    • Fall
    • Winter
    • Christmas
    • Snowmen
    • Story Time
  • About Us
  • Our Amazon Storefront
  • Monthly Themes
    • January Craft Ideas
    • February Craft Ideas
    • March Craft Ideas
    • April Craft Ideas
    • May Craft Ideas
    • June Craft Ideas
    • July Craft Ideas
    • August Craft Ideas
    • September Crafts
    • October Crafts
    • November Crafts
    • December Crafts

Crinkle Paper Reindeer Craft Idea For Christmas

When engaging in craft activities, it is important for young children to have adult supervision at ALL times. It is also recommended to use supplies that are suitable for your child's age. Feel free to modify materials or steps to meet your specific requirements. Please refer to our safety guidelines for more information.

As an Amazon Associate I earn from qualifying purchases. This post may contain affiliate links. For more information, please see our disclosure policy.

UPDATE FOR 2026 - To reduce storage costs and download fees, we recently made some changes to our website. The password for all our files this year is GLUEDTOMYCRAFTS2026. No sign-up is required to download our free printables! You can enjoy our printables without creating an account or paying for Box.com. Simply follow the download instructions on our FAQ PAGE.

Our reindeer craft is going to the EASIEST art project you can throw on the table to entertain the littlest party goers!
SKIP THE FLUFF AND PRINT THE DIRECTIONS
A plastic ziplock bag filled with brown crinkle paper reindeer features googly eyes, a red pom-pom nose, and gold curly pipe cleaner antlers, all set against a red polka dot background.

Are you throwing a children’s Christmas party soon? Maybe you are hosting a family get together in your home this year? Well then – today’s Crinkle Paper Reindeer kid craft idea is going to the EASIEST art project you can throw on the table to entertain the littlest party goers at your event!

All you need is some brown shredded paper, sandwich baggies, cardstock and a little creativity to make your stuffed Rudolph friends come to life.

Keep scrolling for the full how-to tutorial and recreate your own paper reindeer friend today!

A plastic ziplock bag filled with brown crinkle paper reindeer features googly eyes, a red pom-pom nose, and gold curly pipe cleaner antlers, all set against a red polka dot background.

This is the easiest Christmas craft idea that you will find. All you need is some crinkle paper and a few minutes to put this together. Your kids will love it!

I know the holidays can be stressful. On your budget, your sanity and even order in your home! With that being said, you probably have put ANY craft time with the kids off the table because you just don’t need another stress-or on your to-do list.

But friends – what if you told you that today’s crinkle paper reindeer craft idea is NEARLY on the free spectrum AND it only has about THREE simple steps to it. Would that get you super excited?! Plus our latest craft idea is great for a holiday party activity, a snowy day you spend indoors, or even just something you do because it’s CHRISTMAS!

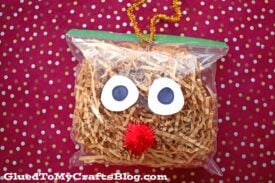
Many of us already have plastic sandwich bags in our pantry right now and with one quick trip to the local dollar store for some brown, shredded crinkle paper {aka – what makes the reindeer’s head take shape} you will be well on your way to pulling this idea together in no time. Just stuff the bag with your paper materials and customize the front to make your red nosed friend come to life within minutes!

So my dear friends, why not up-cycle a few handfuls of that “messy” paper that you will probably “stuff” into your holiday gifts this year and make some awesome reindeer paper pieces to show off instead?! It’s perfect for ALL AGES so even adults can join in on the fun, as well!

Enough chit chat from me, you can find all the crafty details below in our simple tutorial!

Happy crafting my dear friends and may your afternoon be extra creative with the help of Glued To My Crafts! Don’t forget to share pictures with us of your crinkle paper stuffed reindeer friends on your social media sites, like our Facebook page! #gluedtomycrafts

RELATED: Christmas Puppy and Handprint Joy Keepsakes

Two clear zip-lock bags filled with brown crinkle paper reindeer, each decorated with large paper eyes, a red pom-pom nose, and gold pipe cleaner antlers to resemble reindeer, set against a red polka dot background.

Crinkle Paper Stuffed Reindeer

This is the easiest Christmas craft idea that you will find. It is perfect for entertaining little ones. All you need is some crinkle paper, googly eyes and some glue. They will love making these adorable reindeer!

Craft Supplies:

  • Sandwich Baggie – 1 per reindeer craft
  • Brown Shredded Paper
  • White Cardstock Paper
  • Scissors
  • Black Sharpie Marker
  • Large Glue Dots
  • Large Red Pom Poms – 1 per reindeer craft
  • Gold Pipe Cleaners – 1 per reindeer craft
  • Stapler

Directions:

  • First things first – grab ONE sandwich baggie and your brown colored crinkle paper.
  • Open up the baggie – nice and wide!
  • Stuff the sandwich baggie with the brown shredded paper. Just a handful inside the bag until it’s full.
  • Now seal off your baggie at the top.
  • Set it aside.
  • Grab your white cardstock paper and craft scissors.
  • Cut out TWO large eyes for your reindeer friend.
  • Use the black Sharpie marker to draw in the pupils.
  • Now go ahead and grab your red pom pom & large glue dots.
  • Use a glue dot to adhere the newly made paper eyes to the stuffed baggie.
  • Follow that up by using a glue dot to add the pom pom nose under the eyes.
  • Now grab your stapler and gold pipe cleaner.
  • Bend the pipe cleaner in half with your hands. Then “kink” the pipe cleaner a little to make it look like antlers.
  • To finish off the Plastic Baggie and Crinkle Paper Reindeer craft, staple the newly made pipe cleaner antlers to the top of the stuffed, decorated baggie.
  • Add any other embellishments you see fit {maybe a small bow or holiday stickers!}
  • Then display your stuffed reindeer friend made out of crinkle paper for ALL to see and don’t forget to share a picture with us on your social media sites! #gluedtomycrafts
  • Customize It – instead of using crinkle paper, think of other ways you can “fill” up your baggie. Grab large craft pom poms, dark colored leaves from outside, fabric scraps – let those creative juices soar as you make your own reindeer friend come to life!

RELATED —> Crinkle Paper Bunny

A person holds the children’s book How to Catch a Reindeer with a festive green cover, Christmas lights, and a reindeer illustration near a reindeer picture frame in a store aisle. The Instagram handle @GLUEDTOMYCRAFTS appears at the bottom.

AFFILIATE LINK – PAIR OUR CRAFT IDEA WITH THIS BOOK RECOMMENDATION

Learn how to easily transform ordinary craft supplies into creative art projects that shine this Christmas season! We have you covered with SUPER unique ideas!

Before you leave, check out our unique to us Christmas Camper, Red Nose Reindeer Car and Reindeer Gnome craft posts!

stacey-signature-2023

A plastic ziplock bag filled with brown crinkle paper reindeer features googly eyes, a red pom-pom nose, and gold curly pipe cleaner antlers, all set against a red polka dot background.
PRINT

Crinkle Paper Reindeer Craft Idea For Christmas

Our reindeer craft is going to the EASIEST art project you can throw on the table to entertain the littlest party goers!

Here’s your checklist of supplies to bring this craft to life:

  • 1 Sandwich Baggie
  • Crinkle Paper
  • Cardstock Paper
  • Pipe Cleaners
  • Craft Pom Poms
  • Scissors
  • Sharpie Markers
  • Large Glue Dots
  • Stapler
  • Christmas Book Recommendations - link to our Amazon shop

Prepare your creative haven by laying down a protective cover before the crafting magic begins!

Directions:

  • First things first - grab ONE sandwich baggie and your brown colored crinkle paper.
    1 Sandwich Baggie
  • Open up the baggie - nice and wide!
  • Stuff the sandwich baggie with the brown shredded paper. Just a handful inside the bag until it's full.
    Crinkle Paper
  • Now seal off your baggie at the top.
  • Set it aside.
  • Grab your white cardstock paper and craft scissors.
    Cardstock Paper
  • Cut out TWO large eyes for your reindeer friend.
  • Use the black Sharpie marker to draw in the pupils.
  • Now go ahead and grab your red pom pom & large glue dots.
  • Use a glue dot to adhere the newly made paper eyes to the stuffed baggie.
  • Follow that up by using a glue dot to add the pom pom nose under the eyes.
    Craft Pom Poms
  • Now grab your stapler and gold pipe cleaner.
    Pipe Cleaners
  • Bend the pipe cleaner in half with your hands. Then "kink" the pipe cleaner a little to make it look like antlers.
  • To finish off the Plastic Baggie and Crinkle Paper Reindeer craft, staple the newly made pipe cleaner antlers to the top of the stuffed, decorated baggie.
  • Add any other embellishments you see fit {maybe a small bow or holiday stickers!}
  • Then display your stuffed reindeer friend made out of crinkle paper for ALL to see!
    A plastic ziplock bag filled with brown crinkle paper reindeer features googly eyes, a red pom-pom nose, and gold curly pipe cleaner antlers, all set against a red polka dot background.
MINI-HEARTS-page-separator-logo-gluedtomycrafts

CLICK HERE TO PRINT THE DIRECTIONS FOR THIS CRAFT

If you've enjoyed our content or have any thoughts to share, we'd love to hear from you! Mention @gluedtomycrafts or tag #gluedtomycrafts on Instagram!

Craft Activity Safety Guidelines:

Always Ensure Adult Supervision - Young children should be supervised at all times when engaging in craft activities. This is essential to keep them safe and ensure materials are used correctly. Use Age-Appropriate Supplies - Choose craft supplies that are suitable for your child’s age. Check labels for recommendations and avoid items with small parts or sharp edges for younger children. Modify as Needed - Feel free to adapt materials or steps to meet your child's abilities and safety needs. For example, substitute scissors with safety scissors if necessary. Keep an Eye on Allergies - Be mindful of potential allergens in craft materials like glue, paint, or certain fabrics. Opt for non-toxic and hypoallergenic options whenever possible. Organize and Secure Supplies - Keep all craft tools and materials organized. Store sharp objects, small parts, and potentially hazardous items out of reach when not in use. Following these guidelines will ensure that crafts remain fun, creative, and, most importantly, safe for everyone involved!


OUR PRIVACY POLICY

OUR COPYRIGHT POLICY

  • Email
  • Facebook
  • Instagram
  • Pinterest
  • Twitter
  • YouTube

LOOKING FOR SOMETHING?

EXPLORE OUR SITE:

TRENDING TODAY:

  • A pink hand-shaped bookmark with red heart stickers and star confetti surrounds a round note that reads a heartfelt message about love and reading. The image is from GluedToMyCraftsBlog.com. Handprint Bookmark Keepsake: A Gift That Holds Your Spot
  • A handmade Valentine’s Day craft featuring a red rose made of torn paper, two green handprint leaves, a glue bottle, heart decorations, and a message: “LOOK WHAT I MADE - A ROSE THAT WON’T FADE! WISHING YOU LOVE THIS VALENTINE’S DAY!”. Torn Paper Rose Card Craft Tutorial for Valentine’s Day
  • A colorful craft project featuring a yellow felt moon, sparkly stars, and heart shapes, with glue and a heartfelt message. Torn Paper Love You To The Moon and Back Card Craft Idea For Kids
  • A handmade card with a rocket drawing, hearts, and messages of love. Felt hearts and an envelope are around it. Handprint Rocket Keepsake - I Love You Because
  • A colorful paper craft featuring a red and pink painted paper plate with yellow circles in the center, green handprint cutouts as leaves, surrounded by craft supplies, heart decorations, and paint bottles. Paint Splat Valentine's Day Flower Craft Idea
  • A vibrant Valentine's Day craft showcasing a torn-paper bumblebee with googly eyes on a white sheet, accompanied by the text "MY VALENTINE!" The scene is decorated with felt hearts, heart-shaped gems, and patterned papers, with a glue bottle and crafting supplies adding to the creative atmosphere. Torn Paper Bee My Valentine Card Craft Idea For Valentine's Day
  • A flat lay of handmade Valentine’s Day cards and decorations, including paper flowers, felt hearts, an envelope, and printed cards with romantic poems, arranged on a gray and pink background. Capture Memories With These 6 Handprint Flower Poems
  • Flat lay of a torn paper dandelion craft featuring a white sheet with a black dandelion outline. Torn yellow, pink, and purple paper pieces are glued to the dandelion head, simulating seeds. Surrounding the craft are Elmer's glue, felt hearts, paper flowers, and patterned scrapbook paper. The text 'MAKING WISHES, ONE PIECE OF PAPER AT A TIME.' and 'GluedToMyCraftsBlog.com' are printed on the white sheet. Torn Paper Dandelion Craft: Making Wishes, One Piece at a Time
  • A playful torn paper cactus craft with hearts and flowers. Includes glue and felt hearts. Torn Paper Cactus Card: A Sweet Mother's Day Craft
  • A colorful handprint craft made from purple paper with glitter edges sits on a multicolored polka dot background. A round tag with a poem is attached below, tied with red and white string. Flowers are visible in the corner. Easy Handprint Flower Craft with Poem – Perfect Spring DIY for Kids

© 2012–2026 Glued To My Crafts
All activities should be supervised by an adult at all times. Please refer to our safety guidelines for more information.


Please note that all the content of the website, including printables, are for classroom and personal use only. This means that any digital item you download from our site can be used for non-commercial use only. We kindly request that you do not reproduce or sell our creations. We appreciate your understanding and cooperation in respecting our content and intellectual property rights.

Accessibility Adjustments

Powered by OneTap

How long do you want to hide the toolbar?
Hide Toolbar Duration
Select your accessibility profile
Vision Impaired Mode
Enhances website's visuals
Seizure Safe Profile
Clear flashes & reduces color
ADHD Friendly Mode
Focused browsing, distraction-free
Blindness Mode
Reduces distractions, improves focus
Epilepsy Safe Mode
Dims colors and stops blinking
Content Modules
Font Size

Default

Line Height

Default

Color Modules
Orientation Modules