Our zombie craft tutorial is another "eerily cute" DIY to pull together for your child this spook-tacular season!

Celebrate Halloween with a fun DIY project. Learn how to make some zombie puppets out of popsicle sticks with this easy guide, perfect for kids and creative adults!

Halloween calls for creativity, excitement, and a touch of spookiness. If you’re looking for a fun, budget-friendly activity to do with kids or even as a stress-relieving arts and crafts project, this popsicle stick zombie craft is for you!
With minimal supplies, a lot of imagination, and just a little mess, you can create adorable (or creepy!) mini zombie decorations perfect for the season.
Whether you’re a parent pulling together Halloween fun at home, a teacher trying to engage your class, or someone who loves crafting, this guide will help you create your own army of popsicle stick zombies. Let’s get started!

Who knew popsicle sticks could be so spooky? Follow along to make a ghoulishly fun zombie craft that’s perfect for Halloween crafting!
Craft Supplies:
Before jumping into the craft, gather the supplies to ensure you have everything on hand. Most of these materials can be found at local craft stores or may already be in your home:
- Jumbo Craft Sticks – 3 per craft
- Mini Craft Sticks – 2 per craft
- Large Wooden Clothespins – 1 per craft
- Low Temp Glue Gun
- Lime Green or Gray Craft Paint
- Black Craft Paint
- Paint Brush
- Small Paper Plate
- Green or Gray Cardstock Paper
- Black Sharpie Marker
- School Glue
- Wiggle Eye Stickers
Directions:
Follow these simple steps to craft your very own popsicle stick zombies. Feel free to experiment with different designs to make each zombie unique.
- Start by heating up the glue gun until it’s ready to use (remember, adult supervision is a must!).
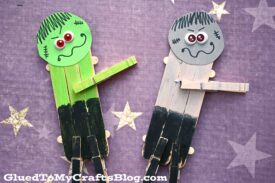
- To create the base of your Popsicle Stick Zombie Friend, glue THREE jumbo popsicle sticks side by side, then secure them by gluing TWO mini popsicle sticks horizontally across the back, forming a small fence-like structure.
- Set the base aside and let it dry completely. Repeat this step for each zombie craft you plan to make.
- Once the popsicle stick base is dry, prepare your craft paint. Squeeze your chosen colors onto a paper plate.
- Take THREE large wooden clothespins. Paint TWO of them black to represent the zombie’s pants, and paint the remaining clothespin green or gray to match the zombie’s body.
- Next, grab the dried popsicle stick base. Paint one half green or gray (for the chest) and the other half black (for the pants).
- Set aside all painted pieces and allow them to dry completely before moving on.
- While everything dries, grab your cardstock, scissors, and a black Sharpie marker. Cut out a large circle from the cardstock to serve as the zombie’s head.
- Use the Sharpie to draw on details like messy hair, stitches, and a wild mouth. Stick wiggle eyes onto the head for extra personality.
- Once the zombie head is ready, glue it to the top of the painted popsicle stick base.
- Attach the painted clothespins to the base: clip one on each side for the legs and one on the side for an arm.
- Add any extra embellishments you like to give your zombie some flair.
- Let the entire craft dry completely, and then proudly display your Popsicle Stick Zombie Friend!
RELATED —> Haunted Pumpkin Patch

Halloween doesn’t have to be expensive or complicated to be memorable. These popsicle stick zombies offer a wonderful mix of creativity, simplicity, and fun that anyone can enjoy. Whether you’re crafting for a classroom, a kids’ party, or just a relaxing weekend project, this budget-friendly idea is sure to bring some spooky charm to your festivities.
Happy crafting, and stay spooky!

Popsicle Stick Zombie Friend Puppet
Our zombie craft tutorial is another "eerily cute" DIY to pull together for your child this spook-tacular season!
Here’s your checklist of supplies to bring this craft to life:
- School Glue
Prepare your creative haven by laying down a protective cover before the crafting magic begins!
Directions:
- Start by heating up the glue gun until it's ready to use (remember, adult supervision is a must!).
- To create the base of your Popsicle Stick Zombie Friend, glue THREE jumbo popsicle sticks side by side, then secure them by gluing TWO mini popsicle sticks horizontally across the back, forming a small fence-like structure.
- Set the base aside and let it dry completely. Repeat this step for each zombie craft you plan to make.
- Once the popsicle stick base is dry, prepare your craft paint. Squeeze your chosen colors onto a paper plate.
- Take THREE large wooden clothespins. Paint TWO of them black to represent the zombie’s pants, and paint the remaining clothespin green or gray to match the zombie's body.
- Next, grab the dried popsicle stick base. Paint one half green or gray (for the chest) and the other half black (for the pants).
- Set aside all painted pieces and allow them to dry completely before moving on.
- While everything dries, grab your cardstock, scissors, and a black Sharpie marker. Cut out a large circle from the cardstock to serve as the zombie’s head.
- Use the Sharpie to draw on details like messy hair, stitches, and a wild mouth. Stick wiggle eyes onto the head for extra personality.
- Once the zombie head is ready, glue it to the top of the painted popsicle stick base.
- Attach the painted clothespins to the base: clip one on each side for the legs and one on the side for an arm.
- Add any extra embellishments you like to give your zombie some flair.
- Let the entire craft dry completely, and then proudly display your Popsicle Stick Zombie Friend!

CLICK HERE TO PRINT THE DIRECTIONS FOR THIS CRAFT
If you've enjoyed our content or have any thoughts to share, we'd love to hear from you! Mention @gluedtomycrafts or tag #gluedtomycrafts on Instagram!