
You know those days when you’re at a loss for what project to do with your kids? Or, how about when you want something fun and creative that won’t take too much time or effort? Well, look no further than this simple and sweet paper plate bunny car craft idea.
Not only is it easy enough for any skill level but it also packs in plenty of fun as kiddos can customize their cars just the way they like.

Paper Plate Bunny Carrot Car
Do you have a little one in your home who is dreaming of a “car” themed craft to do this Easter season? Maybe you are looking for something outside the traditional this year?
As usual with these car themed kid craft ideas on Glued To My Crafts, today’s Paper Plate Carrot Car tutorial is inspired by my young son and his love of anything with wheels. He loves anything transportation related and I love incorporating his love into all the seasons!
Hopefully you can appreciate that crafty gesture too and will find this DIY paper craft idea extra useful! It’s perfect for boys and girls alike to make this spring season! PLUS it’s perfect for a LARGE setting to recreate together. Think Sunday brunch, after Easter Egg Hunts, in a classroom setting etc.!
So keep calm and get your CARROT ON. Find all the crafty details below so you can make the Easter bunny the perfect car for him to get around in this spring season. Happy crafting, my friends!!!
RELATED —> Popsicle Stick Carrots

All you need are a few basic supplies, some creativity, and maybe a bit of help from Mom or Dad — perfect for bonding on a cozy afternoon indoors. Easter comes around once a year so why not make this adorable bunny-mobile together today?!
Craft Supplies:
- Large Paper Plate
- Craft Scissors
- Orange Tissue Paper
- School Glue
- Gray Cardstock Paper
- White Cardstock Paper
- Green Cupcake Liners
- School Glue and/or Stapler
- Sharpie Markers
- Easter themed stickers
Directions:
- First things first – cut your LARGE paper plate in half. Straight up the center! You only need ONE paper plate half per carrot car {but this is the perfect excuse to make TWO cars today!}
- Now go ahead and cut out a small section from your paper plate half, to make the car be more defined with a hood and cab. See our picture for an example.
- Next up – cover the paper plate piece in orange tissue paper squares!
- Now it’s time for making the paper embellishments! Grab all your cardstock paper, cupcake liner and scissors.
- Start off my flattening the green cupcake liner with your hands.
- Then fold it in half and then half again.
- Put one staple in it to secure it and make it look like the greenery from a carrot. Set aside.
- Next up, cut out two large circular wheels and a rectangle window shape from the paper.
- Once the paper plate is dry and you have everything cut out from the paper, it’s time to start assembling your paper orange carrot car.
- Glue/staple the cardstock embellishments in place on the paper plate. The folded cupcake liner will go towards the back of the car.
- Finally – if desired, add anything else you like for that custom look {maybe even draw a bunny person sitting in the front seat of the car} before displaying proudly!
- Now admire your beautiful Paper Plate Bunny Car work of art!
RELATED —> Tissue Paper Carrot
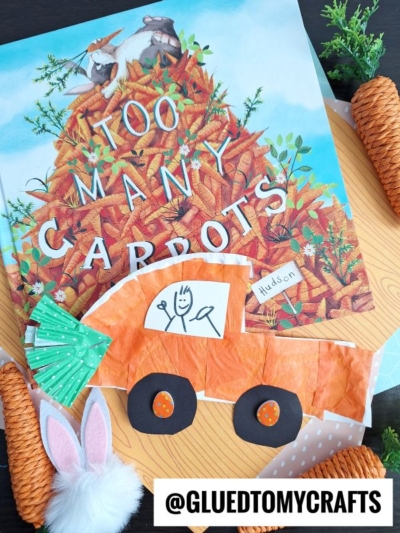
AFFILIATE LINK – PAIR OUR CRAFT IDEA WITH THIS BOOK RECOMMENDATION
Make your Easter celebrations extra memorable with tons of crafty inspiration from us!
Before you leave, we want YOU to check out our popular Superhero Bunny, Bunny Butt and Peeking Easter Bunny craft posts! All of which would pair nicely with today’s tutorial!
We also LOVE talking crafts with our lovely readers. Come join our private Facebook group where we chit chat, share and laugh together! Everyone is welcomed so come join!
This is also a great place to share pictures of your finished paper plate carrot cars – hint hint!

Paper Plate Bunny Car Craft Idea For Kids
Here’s your checklist of supplies to bring this craft to life:
- School Glue
Prepare your creative haven by laying down a protective cover before the crafting magic begins!
Directions:
- First things first - cut your LARGE paper plate in half. Straight up the center! You only need ONE paper plate half per carrot car {but this is the perfect excuse to make TWO cars today!}
- Now go ahead and cut out a small section from your paper plate half, to make the car be more defined with a hood and cab.
- Next up - cover the paper plate piece in orange tissue paper squares!
- Now it's time for making the paper embellishments! Grab all your cardstock paper, cupcake liner and scissors.
- Start off my flattening the green cupcake liner with your hands.
- Then fold it in half and then half again.
- Put one staple in it to secure it and make it look like the greenery from a carrot. Set aside.
- Next up, cut out two large circular wheels and a rectangle window shape from the paper.
- Once the paper plate is dry and you have everything cut out from the paper, it's time to start assembling your paper carrot car.
- Glue/staple the cardstock embellishments in place on the paper plate. The folded cupcake liner will go towards the back of the car.
- Finally - if desired, add anything else you like for that custom look {maybe even draw a bunny person sitting in the front seat of the car} before displaying proudly!


CLICK HERE TO PRINT THE DIRECTIONS FOR THIS CRAFT