Create a charming Paint Splat Snowy Baby Owl with this fun and creative winter craft! Perfect for kids, using paint and simple materials to inspire joy.

Are you looking for a crafty way to entertain your kids this winter? This paint splat snowy baby owl is the perfect activity! Get them creative and have some fun!

Dear fellow crafty friends and long time readers of mine. You should know that when an idea comes to me, I get PRETTY EXCITED and sometimes a little “obsessed” with it.
So it’s safe to say – y’all I’m on the roll with the paint splat ideas on Glued To My Crafts!!! I just can’t stop coming up with new ideas using this simple method!
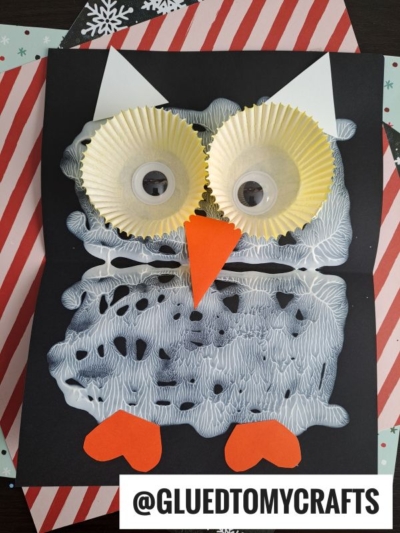
On that note, I recently took our popular paint splat concept and changed it up a bit to make a Paint Splat Snowy Baby Owl. It’s just too cute NOT to share! Like seriously – it’s an adorable “ball of white fluff” on paper. That’s it! SO CUTE! Plus it’s the perfect DIY for the winter season!
Now are you ready to give it a try? Keep scrolling to learn the full how-to below! It’s a super quick tutorial but I know you will get the hang of it! Don’t forget to also check out the video in this very post, to help you along as well!

What makes this craft special: It’s simple, fun, and stress-free! Kids love the excitement of the ‘big reveal’ as they see their creation come to life.
Craft Supplies:
Before we get started, gather these simple supplies:
- Black Cardstock Paper
- White Tulip Puffy Paint
- Yellow/Orange Cardstock Paper
- Scissors
- School Glue
- Embellishments
Directions:
Lay down newspaper, an old tablecloth, or a protective mat to keep your workspace clean. This will minimize mess and make cleanup a breeze. Make sure the kids are dressed in craft-friendly clothing, as paint can be unpredictable.
-
First things first – fold your piece of cardstock paper in half, open back up and squirt some white paint ON ONE SIDE before closing it up again.
-
Once the paper is closed for the second time, gently take your hand and “caress” the white paint around inside, so it makes a fun symmetrical print design on both sides of the paper {keep in mind – paint might ooze from the sides of the cardstock, so be sure to work in an area that can get dirty!}
-
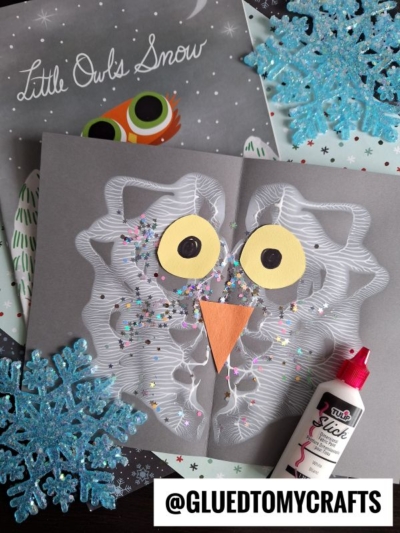
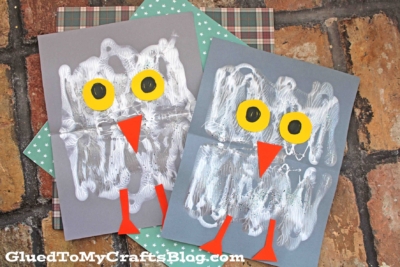
Now you are ready to open it back up and see your snowy owl’s body inside. Which from there you decorate to give it a custom look!
-
Once finished with your paint splat snowy baby owl masterpiece, then set aside to let it dry completely, before displaying proudly!
RELATED —> Snowman Poem Keepsake
Now wasn’t that easy? If this is something you want to do with your child today, I highly encourage you to DO IT!
And if you like it, be sure to also head on over to my blog posts titled “Paint Splat Monsters” and “Paint Splat Yeti.” Both are very similar to today’s craft but with a “monster” theme instead!
So what are you waiting for?! Let the fun begin! Happy crafting, my friends! Don’t forget to share pictures of your paint splat snowy baby owls with us on our Facebook page! I can’t wait to see how adorable they turn out!

Paint Splat Snowy Baby Owl Craft
Create a charming Paint Splat Snowy Baby Owl with this fun and creative winter craft! Perfect for kids, using paint and simple materials to inspire joy.
Here’s your checklist of supplies to bring this craft to life:
Prepare your creative haven by laying down a protective cover before the crafting magic begins!
Directions:
- First things first - fold your piece of cardstock paper in half, open back up and squirt some white paint ON ONE SIDE before closing it up again.
- Once the paper is closed for the second time, gently take your hand and "caress" the white paint around inside, so it makes a fun symmetrical print design on both sides of the paper {keep in mind - paint might ooze from the sides of the cardstock, so be sure to work in an area that can get dirty!}
- Now you are ready to open it back up and see your snowy owl's body inside. Which from there you decorate to give it a custom look!
- Once finished with your paint splat snowy baby owl masterpiece, then set aside to let it dry completely, before displaying proudly!

CLICK HERE TO PRINT THE DIRECTIONS FOR THIS CRAFT
If you've enjoyed our content or have any thoughts to share, we'd love to hear from you! Mention @gluedtomycrafts or tag #gluedtomycrafts on Instagram!