Glued To My Crafts

Join thousands of others who have gotten GLUED to our craft tutorials!

  • Home
  • Safety Guidelines
  • Seasonal Themes
    • New Years
    • Valentine’s Day
    • St. Patrick’s Day
    • Spring
    • Easter
    • Mother’s Day
    • Summer
    • Father’s Day
    • Patriotic
    • Halloween
    • Thanksgiving
    • Fall
    • Winter
    • Christmas
    • Snowmen
    • Story Time
  • About Us
  • Amazon Storefront
  • Monthly Themes
    • January Craft Ideas
    • February Craft Ideas
    • March Craft Ideas
    • April Craft Ideas
    • May Craft Ideas
    • June Craft Ideas
    • July Craft Ideas
    • August Craft Ideas
    • September Crafts
    • October Crafts
    • November Crafts
    • December Crafts
  • Collection Posts
    • 20+ Creative Paper Bag Craft Ideas for Kids to Enjoy Today
    • 20+ Plastic Egg Stamp Crafts for Spring Fun
    • 30+ Creative Thumbprint Craft Ideas for Spring Fun
    • Craft Ideas for Kids Using Egg Stickers
    • Thumbs Up! 50+ Creative Thumbprint Crafts for Kids
    • 40+ Insect Craft Ideas For Kids
    • 50+ Craft Ideas For Kids Using A Plastic Fork As A Paint Brush
    • 30+ Puffy Paint Craft Ideas For Kids To Try Today!
    • 20+ Fun and Easy Paper Bowl Crafts for Kids
    • Pete The Cat Craft Ideas: Fun & Easy Projects for Kids
    • Transform Coffee Filters into 40+ Stunning DIY Projects
    • Transform Crepe Paper Streamers into 60+ Stunning Crafts
    • Pie Server Stamped Craft Ideas Kids Will Adore
    • Paint Splat Pie Craft Idea For Kids

Cupcake Liner Snowy Tree Craft

When engaging in craft activities, it is important for young children to have adult supervision at ALL times. It is also recommended to use supplies that are suitable for your child's age. Feel free to modify materials or steps to meet your specific requirements. Please refer to our safety guidelines for more information.

As an Amazon Associate I earn from qualifying purchases. This post may contain affiliate links. For more information, please see our disclosure policy.

UPDATE FOR 2026 - To reduce storage costs and download fees, we recently made some changes to our website. The password for all our files this year is GLUEDTOMYCRAFTS2026. No sign-up is required to download our free printables! You can enjoy our printables without creating an account or paying for Box.com. Simply follow the download instructions on our FAQ PAGE.

With just a few simple steps and materials, you and your child can make this snowy tree craft idea within minutes!
SKIP THE FLUFF AND PRINT THE DIRECTIONS
Cupcake Liner Snowy Tree Craft

A winter wonderland awaits – create your own snowy tree masterpiece with a few simple cupcake liners and unleash your inner artist!

Cupcake Liner Snowy Tree - Winter Kid Craft

Muffin Cup Snowy Tree Craft Idea For Kids

Hi friends! I’m so glad you stumbled upon our latest winter kid craft idea!

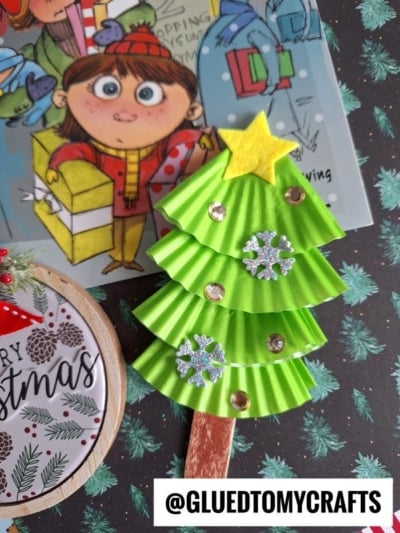
On that note, I want you to keep this festive paper and craft stick craft idea in mind when you happen to stumble upon some MINI white cupcake liners this holiday season, in the baking aisles. Why you might ask? Because they make for AWESOME winter trees when you glue them on popsicle sticks – that’s why!

With just a few simple steps, you and your child can make this cupcake liner snowy tree winter kid craft idea come alive too! You can even add your own custom touches like glitter glue snow and craft felt star stickers to give it a holiday feel!

Ready to give it a try as well? Keep scrolling for all the crafty holiday details and supply list! Then when you recreate it, come share pictures of your white winter tree creations with us on our Facebook page or tag us on Instagram for us to see! I can’t wait to admire your cupcake liner and craft stick snowy tree creations this season! #gluedtomycrafts

RELATED —> Bubble Wrap Snowy Tree

Cupcake Liner Snowy Tree - Winter Kid Craft Cupcake Liner Snowy Tree - Winter Kid Craft

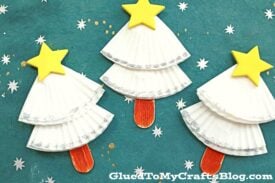
Bring the winter wonderland indoors with this easy and fun Cupcake Liner Snowy Tree craft for kids!

Craft Supplies:

  • White Cupcake Liners
  • School Glue or Glue Stick
  • Brown Craft Paint
  • Small Paint Brush
  • Small Paper Plate
  • Popsicle Sticks
  • Silver Glitter Glue
  • Decorative Star Stickers or Cutouts

Directions:

  • First things thing – squirt some brown craft paint on your paper plate.
  • Grab your wood craft stick and paint it completely brown with the paint brush.
  • When you are done painting, set it aside to allow it to dry completely.
  • Next, while the paint is drying, grab TWO white cupcake liners per winter tree craft.
  • One by one, flatten them with your hands and fold them into fourths {fold in half, then in half again}
  • Place a small amount of glue on the inside of each, so they don’t come apart.
  • Next place a good amount of glue along your painted wood scoop stick, leaving a little bit of “stump” on the bottom of one end.
  • Start placing your folded white cupcake liners on top of the glue, making a TREE shape.
  • To finish off the Cupcake Liner Snowy Tree craft – have children use a little bit of silver glitter glue to add “snow” on the cupcake liners, as well as adding a “star” shape to the top.
  • Then set aside to let it dry completely, before displaying proudly for everyone to see!!!

RELATED —> Footprint Snowman Card

Continue the WINTER snowy tree fun with this bubble wrap craft!!!

Cupcake Liner Snowy Tree - Winter Kid Craft

And that’s a wrap on this quick winter craft idea! We really do hope you enjoyed today’s cupcake liner snowy winter tree kid craft idea from us!

Be sure to also check out our Chalk Art Snowy Day On Paper and Popsicle Stick Christmas Yeti Friend tutorials! Both of these posts are sure to beat the winter boredom blues in your home today and pair nicely with today’s DIY as well!

Happy crafting, my dear friends! Don’t forget to share those pictures with us!

stacey-signature-2023

Cupcake Liner Snowy Tree Craft
PRINT

Cupcake Liner Snowy Tree Craft

With just a few simple steps and materials, you and your child can make this snowy tree craft idea within minutes!

Here’s your checklist of supplies to bring this craft to life:

  • Large Cupcake Liners
  • Craft Paint
  • 1 Wood Scoop Stick
  • Glitter Glue
  • Embellishments
  • School Glue or Glue Stick
  • Small Paint Brush
  • Small Paper Plate

Prepare your creative haven by laying down a protective cover before the crafting magic begins!

Directions:

  • First things thing - squirt some brown craft paint on your paper plate.
    Craft Paint
  • Grab your wood craft stick and paint it completely brown with the paint brush.
    1 Wood Scoop Stick
  • When you are done painting, set it aside to allow it to dry completely.
  • Next, while the paint is drying, grab TWO white cupcake liners per winter tree craft.
    Large Cupcake Liners
  • One by one, flatten them with your hands and fold them into fourths {fold in half, then in half again}
  • Place a small amount of glue on the inside of each, so they don't come apart.
  • Next place a good amount of glue along your painted wood scoop stick, leaving a little bit of "stump" on the bottom of one end.
  • Start placing your folded white cupcake liners on top of the glue, making a TREE shape.
  • To finish off the Cupcake Liner Snowy Tree craft - have children use a little bit of silver glitter glue to add "snow" on the cupcake liners, as well as adding a "star" shape to the top.
    Glitter Glue, Embellishments
  • Then set aside to let it dry completely, before displaying proudly for everyone to see!!!
    Cupcake Liner Snowy Tree - Winter Kid Craft
MINI-HEARTS-page-separator-logo-gluedtomycrafts

CLICK HERE TO PRINT THE DIRECTIONS FOR THIS CRAFT

If you've enjoyed our content or have any thoughts to share, we'd love to hear from you! Mention @gluedtomycrafts or tag #gluedtomycrafts on Instagram!

Craft Activity Safety Guidelines:

Always Ensure Adult Supervision - Young children should be supervised at all times when engaging in craft activities. This is essential to keep them safe and ensure materials are used correctly. Use Age-Appropriate Supplies - Choose craft supplies that are suitable for your child’s age. Check labels for recommendations and avoid items with small parts or sharp edges for younger children. Modify as Needed - Feel free to adapt materials or steps to meet your child's abilities and safety needs. For example, substitute scissors with safety scissors if necessary. Keep an Eye on Allergies - Be mindful of potential allergens in craft materials like glue, paint, or certain fabrics. Opt for non-toxic and hypoallergenic options whenever possible. Organize and Secure Supplies - Keep all craft tools and materials organized. Store sharp objects, small parts, and potentially hazardous items out of reach when not in use. Following these guidelines will ensure that crafts remain fun, creative, and, most importantly, safe for everyone involved!


OUR PRIVACY POLICY

OUR COPYRIGHT POLICY

  • Email
  • Facebook
  • Instagram
  • Pinterest
  • Twitter
  • YouTube

LOOKING FOR SOMETHING?

EXPLORE OUR SITE:

TRENDING TODAY:

  • A pink hand-shaped bookmark with red heart stickers and star confetti surrounds a round note that reads a heartfelt message about love and reading. The image is from GluedToMyCraftsBlog.com. Handprint Bookmark Keepsake: A Gift That Holds Your Spot
  • A colorful craft project featuring a yellow felt moon, sparkly stars, and heart shapes, with glue and a heartfelt message. Torn Paper Love You To The Moon and Back Card Craft Idea For Kids
  • A handmade card with a rocket drawing, hearts, and messages of love. Felt hearts and an envelope are around it. Handprint Rocket Keepsake - I Love You Because
  • A vibrant Valentine's Day craft showcasing a torn-paper bumblebee with googly eyes on a white sheet, accompanied by the text "MY VALENTINE!" The scene is decorated with felt hearts, heart-shaped gems, and patterned papers, with a glue bottle and crafting supplies adding to the creative atmosphere. Torn Paper Bee My Valentine Card Craft Idea For Valentine's Day
  • Flat lay of a torn paper dandelion craft featuring a white sheet with a black dandelion outline. Torn yellow, pink, and purple paper pieces are glued to the dandelion head, simulating seeds. Surrounding the craft are Elmer's glue, felt hearts, paper flowers, and patterned scrapbook paper. The text 'MAKING WISHES, ONE PIECE OF PAPER AT A TIME.' and 'GluedToMyCraftsBlog.com' are printed on the white sheet. Torn Paper Dandelion Craft: Making Wishes, One Piece at a Time
  • A flat lay of handmade Valentine’s Day cards and decorations, including paper flowers, felt hearts, an envelope, and printed cards with romantic poems, arranged on a gray and pink background. Capture Memories With These 6 Handprint Flower Poems
  • A colorful handprint craft made from purple paper with glitter edges sits on a multicolored polka dot background. A round tag with a poem is attached below, tied with red and white string. Flowers are visible in the corner. Easy Handprint Flower Craft with Poem – Perfect Spring DIY for Kids
  • A purple paper butterfly made from handprint cutouts is decorated with glitter and a smiling face. A round poem about sending love is in the center. The background is colorful and the GluedToMyCraftsBlog.com watermark is visible. Handprint & Popsicle Stick Butterfly Poem Keepsake
  • A craft project with yellow crepe paper fries in a red-striped paper container, a label reading Youre UN-FRY-GETTABLE!, red heart decorations, Elmers glue, and a roll of yellow crepe paper on a purple background. Torn Crepe Paper Fries Craft Idea For Kids
  • A spring-themed craft featuring pink and purple paper flowers, small decorative bees, and a “Spring has sprung, so let’s get our creativity blooming!” sign on a blue background—perfect for pairing with Spring Printables. Crepe Paper & Fingerprint Daisy Spring Paint Brush Craft

© 2012–2026 Glued To My Crafts
All activities should be supervised by an adult at all times. Please refer to our safety guidelines for more information.


Please note that all the content of the website, including printables, are for classroom and personal use only. This means that any digital item you download from our site can be used for non-commercial use only. We kindly request that you do not reproduce or sell our creations. We appreciate your understanding and cooperation in respecting our content and intellectual property rights.

Accessibility Adjustments

Powered by OneTap

How long do you want to hide the toolbar?
Hide Toolbar Duration
Select your accessibility profile
Vision Impaired Mode
Enhances website's visuals
Seizure Safe Profile
Clear flashes & reduces color
ADHD Friendly Mode
Focused browsing, distraction-free
Blindness Mode
Reduces distractions, improves focus
Epilepsy Safe Mode
Dims colors and stops blinking
Content Modules
Font Size

Default

Line Height

Default

Color Modules
Orientation Modules