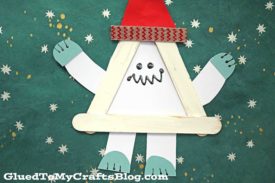
No need to be scared of today’s creature! It’s another awesome DIY kid craft that is perfect for the winter season we are currently in!!!
So let’s welcome our Popsicle Stick Christmas Yeti Friend tutorial to the Glued To My Crafts archives, shall we?!
This adorable guy is simple perfect to craft up on a cold winter day. He may be an abominable snowman creation but he can ALWAYS be used in your home decor or in your child’s creative imaginative play!
So let’s grab our supplies and throw some crafty dust in the air, as we make these adorable & completely customizable friends together!
Then display as is OR set up shop for some “pretend” playtime in the living room. Whatever you do – we hope Glued To My Crafts inspired you AND your child to have crafty fun today. Isn’t that the best part when it comes to crafting during the holidays?
Stay warm and happy crafting my friends! Don’t forget to share those pictures with us! You can ALWAYS tag us on Facebook or Instagram for easy sharing. We LOVE seeing it come to life in your home and can’t wait to give you a virtual high five from a far! #gluedtomycrafts
Are you YETI for Christmas? Keep the kids entertained with this fun and easy craft idea that will bring the holiday cheer into your home!
Craft Supplies:
- Jumbo Popsicle Sticks – 3 per craft
- School Glue
- Small Paper Plate
- White Craft Paint
- Paint Brush
- White Cardstock Paper
- Red Cardstock Paper
- Light Blue Cardstock Paper
- Craft Scissors
- Black Sharpie Marker or Black Puffy Paint
Directions:
- First grab three jumbo popsicle sticks {three per yeti} and glue them together to look like a triangle.
- Set aside to let it dry completely. Repeat for each yeti friend you want to make.
- Once your popsicle stick shape is dry enough, go ahead and paint it completely white. Just squirt some paint on a small paper plate and use the paint brush.
- Set aside when done.
- While that is drying, grab your white cardstock and cut out a triangle piece to fit inside the popsicle stick shape. This will be the yet’s body.
- At this time you should also grab the remaining cardstock and cut out a triangular Christmas hat & arms/legs for the yeti. I used the light blue cardstock to make his half-circle paws {with some black paint for his claws!}
- To finish off the Popsicle Stick Christmas Yeti – have children glue their paper pieces in place and top off with some squiggles for his eyes and mouth.
- Add any other embellishments {like some ribbon on his hat} you see fit.
- Once done, set aside your yeti friend to let it dry completely before displaying proudly!
RELATED —> Snowmen Poem Keepsake
AFFILIATE LINK – PAIR OUR CRAFT IDEA WITH THIS BOOK RECOMMENDATION
THE TUTORIAL MAY BE OVER BUT THE CRAFTY FUN DOESN’T HAVE TO STOP HERE! You should also check out our Grinch & Friends, Gingerbread Cookies In Oven and Ugly Sweater Friends craft posts!
And as always – we love seeing the inspiration come to life. Share your pictures with us using our special branded hashtag #gluedtomycrafts for us to see!
Popsicle Stick Christmas Yeti Craft Idea For Kids
Here’s your checklist of supplies to bring this craft to life:
- 3 Jumbo Popsicle Sticks
- Craft Paint
- Cardstock Paper
- Embellishments
Prepare your creative haven by laying down a protective cover before the crafting magic begins!
Directions:
- First grab three jumbo popsicle sticks {three per yeti} and glue them together to look like a triangle.
- Set aside to let it dry completely. Repeat for each yeti friend you want to make.
- Once your popsicle stick shape is dry enough, go ahead and paint it completely white. Just squirt some paint on a small paper plate and use the paint brush.
- Set aside when done.
- While that is drying, grab your white cardstock and cut out a triangle piece to fit inside the popsicle stick shape. This will be the yet's body.
- At this time you should also grab the remaining cardstock and cut out a triangular Christmas hat & arms/legs for the yeti. I used the light blue cardstock to make his half-circle paws {with some black paint for his claws!}
- To finish off the Popsicle Stick Christmas Yeti Friends – have children glue their paper pieces in place and top off with some squiggles for his eyes and mouth.
- Add any other embellishments {like some ribbon on his hat} you see fit.
- Once done, set aside your yeti friend to let it dry completely before displaying proudly!

CLICK HERE TO PRINT THE DIRECTIONS FOR THIS CRAFT


