Banish the winter blues for good, with our super easy to melted snowman craft idea!

This easy kids craft is perfect for combating the winter blues. With just a few simple supplies, you can create a melted snowman that’s sure to bring a smile to your child’s face.

Looking for a fun and creative way to keep your kids entertained during the chilly winter months? This Paint Splat Melted Snowman Craft is the perfect blend of art and imagination!
With just a few simple supplies like puffy paint, cardstock, and scissors, your little ones can create their own unique snowman puddle masterpieces.
Whether it’s for a cozy afternoon indoors, a classroom activity, or a family crafting session, this easy and mess-friendly project is sure to bring smiles and spark creativity.
Follow our step-by-step guide and let the winter crafting fun begin!

Get ready to melt away the winter blues with this adorable paint splat melted snowman on paper craft! Watch as your little ones have a blast creating their own unique snowman puddle masterpieces.
Craft Supplies:
- White Puffy Paint
- Blue Cardstock Paper
- Orange Cardstock Paper
- Black Cardstock Paper
- Colored Cardstock Paper
- Craft Scissors
- School Glue
Directions:
- First things first – fold your BLUE cardstock paper in half and open it back up.
- Grab your white Tulip puffy paint and squirt some white craft paint ON ONE SIDE before closing it up again.
- Once the paper is closed for the second time, gently take your hand and “caress” the paper so the white paint inside, makes a fun symmetrical print design on both sides of the paper {keep in mind – paint might ooze from the sides of the cardstock, so be sure to work in an area that can get dirty!}
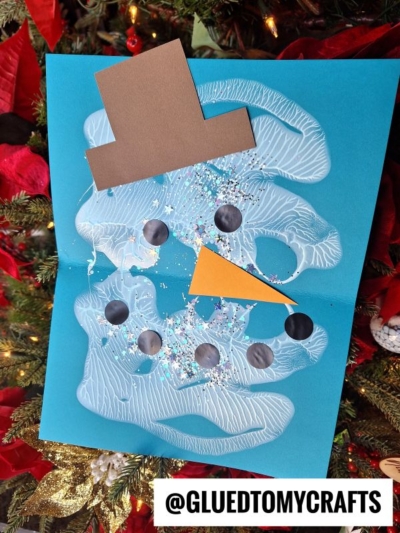
- Now you are ready to open it back up and see the BEGINNING of what your melted puddle of snowmen will eventually be. From there you decorate it to bring it to life and give it life.
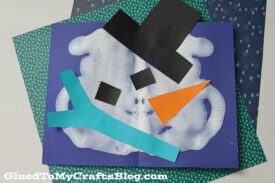
- Next up, grab the remaining sheets of cardstock paper and your scissors.
- Cut out a scarf, eyes, carrot nose, hat etc. from the paper.
- Finally – the last step in completing this melted snowman paper craft is to glue down ALL the cardstock cutout pieces, on top of the paint splat design.
- Once finished with your custom melted snowman masterpiece, then set aside to let it dry completely, before displaying proudly! And of course – repeat as many times as you like! No two pieces will be the same and I think that’s what makes it even more fun!
- Be sure to also check out out Washi Tape Bear In Sweater tutorial to pair with today’s tutorial as well!
RELATED —> Paper Plate Snowman House

If you are looking for even MORE winter themed kid craft ideas, from Glued To My Crafts, be sure to check out these fun posts listed below.
And “if” you decide to make today’s paint smush melted snowman kids craft idea, please share a picture on our Facebook page for us to see. We love seeing our inspiration come to life and can’t wait to hear from you!
- Stained Glass Snowmen
- Bubble Wrap Snowy Tree
- Snowman Sensory Bin
- Cotton Ball Melted Snowman
- Snowman Playdough
- Terra Cotta Pot Snowman
- Cotton Ball Snowman
- Popsicle Stick Snowman Puppet
- Cotton Pad Snowman Puppets
- Flat Clothespin Snowmen Puppets

Paint Splat Melted Snowman Craft
Banish the winter blues for good, with our super easy to melted snowman craft idea!
Here’s your checklist of supplies to bring this craft to life:
- School Glue
Prepare your creative haven by laying down a protective cover before the crafting magic begins!
Directions:
- First things first - fold your BLUE cardstock paper in half and open it back up.Cardstock Paper
- Grab your white Tulip puffy paint and squirt some white craft paint ON ONE SIDE before closing it up again.Tulip Puffy Paint
- Once the paper is closed for the second time, gently take your hand and "caress" the paper so the white paint inside, makes a fun symmetrical print design on both sides of the paper {keep in mind - paint might ooze from the sides of the cardstock, so be sure to work in an area that can get dirty!}
- Now you are ready to open it back up and see the BEGINNING of what your melted puddle of snowmen will eventually be. From there you decorate it to bring it to life and give it life.
- Next up, grab the remaining sheets of cardstock paper and your scissors.
- Cut out a scarf, eyes, carrot nose, hat etc. from the paper.
- Finally - the last step in completing this melted snowman paper craft is to glue down ALL the cardstock cutout pieces, on top of the paint splat design.
- Once finished with your custom melted snowman masterpiece, set aside to let it dry completely, before displaying proudly!

CLICK HERE TO PRINT THE DIRECTIONS FOR THIS CRAFT
If you've enjoyed our content or have any thoughts to share, we'd love to hear from you! Mention @gluedtomycrafts or tag #gluedtomycrafts on Instagram!