Glued To My Crafts

Join thousands of others who have gotten GLUED to our craft tutorials!

  • Home
  • Privacy Policy
  • Craft Safety Guidelines
  • Craft Themes
    • New Years
    • Valentine’s Day
    • St. Patrick’s Day
    • Spring
    • Easter
    • Mother’s Day
    • Summer
    • Father’s Day
    • Patriotic
    • Halloween
    • Thanksgiving
    • Fall
    • Winter
    • Christmas
    • Snowmen
    • Story Time
  • Favorite Craft Materials
    • Cupcake Liners
    • Torn Paper Crafts
    • Paper Plates
    • Popsicle Sticks
    • Sidewalk Chalk
    • Clothespin Crafts
    • Tulip Puffy Paint
    • Paper Bags
    • Craft Foam Hearts
    • Puffy Paint
  • About Us
  • Most Popular Tutorials

Popsicle Stick Frosty The Snowman Hat

When engaging in craft activities, it is important for young children to have adult supervision at ALL times. It is also recommended to use supplies that are suitable for your child's age. Feel free to modify materials or steps to meet your specific requirements. Please refer to our safety guidelines for more information.

As an Amazon Associate I earn from qualifying purchases. This post may contain affiliate links. For more information, please see our disclosure policy.

Popsicle Stick Frosty The Snowman Hat - Kid Craft

Crafting is always a wonderful way to spark creativity, spend quality time with family, and make adorable decorations for your home. If you’re looking for an easy, budget-friendly project with a wintery twist, you’re in the right place.

Today, we’ll guide you step by step on how to create a Popsicle Stick Frosty The Snowman Hat.

Whether you’re crafting for fun, for kids, or to add festive ornaments to your seasonal décor, this project is sure to bring smiles (and maybe a snowman or two!)

Popsicle Stick Frosty The Snowman Hat

Bring the classic story of Frosty The Snowman to life with this simple, fun craft idea for kids!

Craft Supplies:

Before we get started, make sure you have everything you’ll need on hand. Most of these materials are inexpensive and likely available at craft stores or can be sourced online.

  • Jumbo Popsicle Sticks – 9 per craft
  • School Glue
  • Black Craft Paint
  • Paint Brush
  • Red Cardstock Paper
  • Scissors
  • Snowflake Stickers or Sequins

Directions:

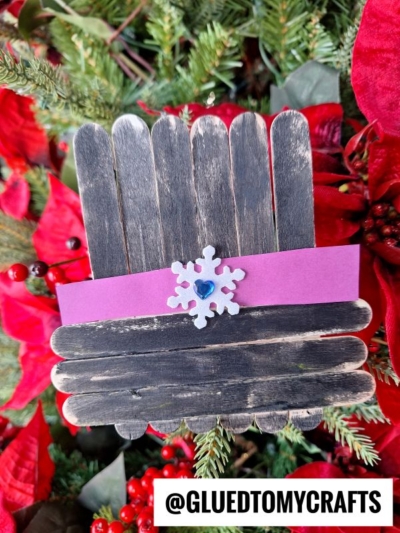
  • First assemble the base of your hat by gluing your NINE popsicle sticks together to look like a hat {6 next to each and 3 across on the bottom}
  • Set aside to let it dry completely.
  • Once dry, have children paint their wood shape completely black.
  • Again, set aside to let it dry completely.
  • Now grab your red cardstock and cut out a simple strip, no bigger than the wood shape.
  • To finish off the Popsicle Stick Frosty The Snowman Hat, glue your cardstock piece in place in the center of the wood shape.
  • Then add other embellishments {like snowflake sequins like us or a pink flower like in the book!}
  • When it’s dry enough, display proudly in your home.
  • You can always just prop it against something on a shelf or hot glue string and/or magnets to the back for displaying.

RELATED —> Paper Plate Snowman House

popsicle-stick-frosty-snowman-ornament-hat-kid-craft-idea

If you are looking for even MORE snowman themed kid craft ideas, from Glued To My Crafts, be sure to check out these fun posts below listed below.

And “if” you decide to make this popsicle stick snowman hat craft, please share a picture on our Facebook page for us to see. We love seeing our inspiration come to life!

Stained Glass Snowmen
Snowman Sensory Bin Idea
Homemade Snowman Playdough
Potato Stamped Snowman Card
Paint Splat Melted Snowman
Paper Doily Melted Snowman Card
Paper Plate Peppermint Candy
Paper Plate Winter Hat Friends

stacey-signature-2023

Craft Activity Safety Guidelines:

Always Ensure Adult Supervision - Young children should be supervised at all times when engaging in craft activities. This is essential to keep them safe and ensure materials are used correctly. Use Age-Appropriate Supplies - Choose craft supplies that are suitable for your child’s age. Check labels for recommendations and avoid items with small parts or sharp edges for younger children. Modify as Needed - Feel free to adapt materials or steps to meet your child's abilities and safety needs. For example, substitute scissors with safety scissors if necessary. Keep an Eye on Allergies - Be mindful of potential allergens in craft materials like glue, paint, or certain fabrics. Opt for non-toxic and hypoallergenic options whenever possible. Organize and Secure Supplies - Keep all craft tools and materials organized. Store sharp objects, small parts, and potentially hazardous items out of reach when not in use. Following these guidelines will ensure that crafts remain fun, creative, and, most importantly, safe for everyone involved!


OUR PRIVACY POLICY

  • Email
  • Facebook
  • Instagram
  • Pinterest
  • Twitter
  • YouTube

LOOKING FOR SOMETHING?

EXPLORE OUR SITE:

© 2012–2025 Glued To My Crafts
All activities should be supervised by an adult at all times. Please refer to our safety guidelines for more information.


Please note that all the content of the website, including printables, are for classroom and personal use only. This means that any digital item you download from our site can be used for non-commercial use only. We kindly request that you do not reproduce or sell our creations. We appreciate your understanding and cooperation in respecting our content and intellectual property rights.