
Today I present to you our Paper Plate Ice Cream Snowman craft tutorial that is not only perfect for the younger children in your home to complete but it’s also REALLY inexpensive too!
We are talking cents to make it happen! Keep scrolling for all the details and the free download to get you started in a winter snap!

Snowman Ice Cream Cone Craft For Winter!
Say goodbye to a long, boring winter season stuck indoors! Glued To My Crafts is to the rescue today and we are so excited you landed on this very blog post!
I personally “think” you are going to love our latest paper snowman craft tutorial.
No wait – I just KNOW you and your child are going to love this paper ice cream snowman idea & will want to recreate it this afternoon!
It’s just a matter of downloading our FREE ice cream cone file, printing it out and doing a few cut & paste steps to make a snowman made to look like he is sitting in an ice cream cone. Oh so simple {the concept and the steps} but oh so impressive to look at, at the same time.
So friends – don’t let this creative snowman craft idea MELT away! Just keep scrolling to check out the full tutorial below to see what I’m talking about! Then take the time today to make some “crafty flurries” with your child this afternoon. I’m sure it’s going to set a sparkling scene for a great day celebrating this time of year!
Happy crafting my snowy friends! Share the love and be sure to post some pictures of your child’s finished paper plate snowmen ice cream cone creations on our Facebook page. It really does make my day to see {and hear} from you! #gluedtomycrafts
RELATED —> Popsicle Stick Snowman

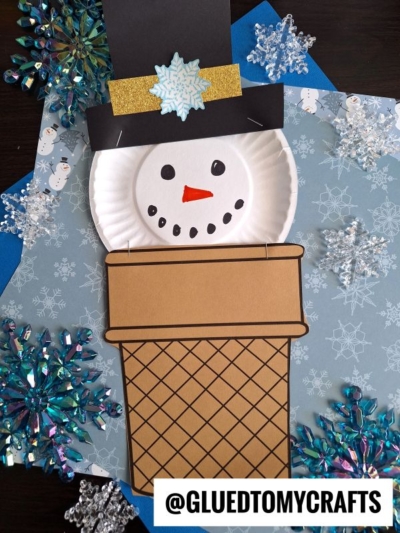
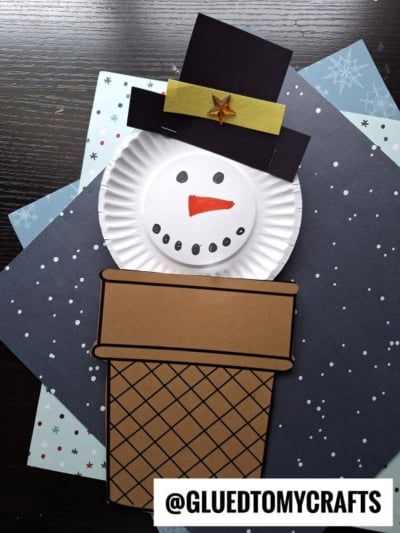
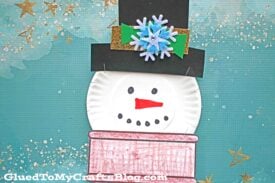
Paper Ice Cream Cone Snowman
Looking for an adorable and affordable winter craft idea for kids? Look no further than this paper plate ice cream cone snowman!
Craft Supplies:
- Cone Printable – on our landing page
- White Cardstock Paper
- Crayons, Markers, Coloring Pencils etc.
- Scissors
- Small Paper Plate
- Black Marker
- Black Cardstock Paper
- Embellishments
- Stapler
Directions:
- First download and print our blank ice cream cone printable. You only need ONE print per snowman craft.
- Once you have it printed out, grab your choice of coloring material and color in the ice cream cone design however you like.
- When done coloring, go ahead and trim out the ice cream cone shape with your scissors.
- Discard excess paper and set aside your decorated paper cone till later.
- Now grab your small paper plate and the Sharpie markers.
- Use the orange marker to draw on a triangle, carrot nose in the center of the paper plate.
- Follow that up with the black Sharpie marker that you use to draw on circular eyes and a mouth.
- When done decorating the paper plate, set it aside till the last step.
- Now grab your black cardstock and scissors.
- Cut out a simple hat shape for on top of your snowman’s head.
- Go ahead and decorate it with various embellishments for that custom look.
- Now the LAST STEP! To finish off the snowman ice cream cone craft, grab all your paper pieces and the stapler.
- Staple the decorated paper plate to the ice cream cone cutout.
- Follow that up by stapling on the hat, just like a cherry on top!
- Add even more embellishments you see fit and display proudly for ALL to see!!
RELATED —> Plate Plate Ice Cream Cone Bear
Now don’t let the crafty fun stop here! Gather up a few more simple craft supplies and let your child’s creative side REALLY shine BRIGHT this winter season!
Our truly one-of-a-kind snowman inspired tutorials will show you how to make it happen on a budget AND with limited time, as well {and ALL the parents rejoiced!} WE promise to make it super easy as well!
So on that note, be sure to stay on Glued To My Crafts for even more trust-worthy tutorials to recreate in your home today! My personal favs are my Cotton Ball Snowman, Snowman Poem and Snowman House tutorials are sure to melt away the stress of this time of year!
We also have our UNIQUE Cotton Ball Snowman Cupcake tutorial to entice you today! Check them all out and report back to us on what you think of them! We also can’t wait to see pictures of what you create!

Paper Plate Ice Cream Cone Snowman Craft Idea
Here’s your checklist of supplies to bring this craft to life:
Prepare your creative haven by laying down a protective cover before the crafting magic begins!
Directions:
- First print out our provided printable, in color, on a single sheet of white cardstock paper. You only need one print per craft.
- Once you have it printed out, grab your choice of coloring material and color in the ice cream cone design however you like.
- When done coloring, go ahead and trim out the ice cream cone shape with your scissors.
- Discard excess paper and set aside your decorated paper cone till later.
- Now grab your small paper plate and the Sharpie markers.
- Use the orange marker to draw on a triangle, carrot nose in the center of the paper plate.
- Follow that up with the black Sharpie marker that you use to draw on circular eyes and a mouth.
- When done decorating the paper plate, set it aside till the last step.
- Now grab your black cardstock and scissors.
- Cut out a simple hat shape for on top of your snowman's head.
- Go ahead and decorate it with various embellishments for that custom look.
- Now the LAST STEP! To finish off the snowman ice cream cone craft, grab all your paper pieces and the stapler.
- Staple the decorated paper plate to the ice cream cone cutout.
- Follow that up by stapling on the hat, just like a cherry on top!
- Add even more embellishments you see fit and display proudly for ALL to see!!


NEED MORE HELP DOWNLOADING OUR FREE PRINTABLES? PLEASE REFER TO OUR FAQ PAGE