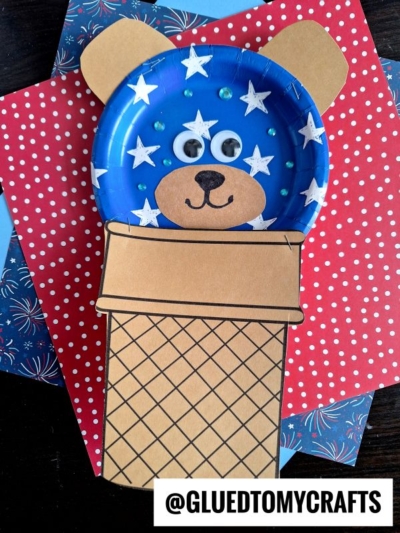
Have scoops of fun with this bear ice cream cone craft tutorial that only uses a handful of materials to make it happen.

When it comes to entertaining little ones with craft activities, combining cuteness with creativity always seems to do the trick. And what could be cuter and more creative than making your very own plate plate ice cream cone bear?
This delightful project is not only a feast for young imaginations but also an irresistible arts and crafts idea sure to scoop up plenty of fun!

Today, I’m thrilled to share with you a creative and fun way for kids to express their artistic side: the Paper Plate Ice Cream Cone Bear Craft!
This craft is not only easy and enjoyable but also wonderfully budget-friendly. With basic materials that can be found around the house, your little ones will be able to create an adorable keepsake.
So, gather your supplies and get ready for a scoop of crafting fun!


Have scoops of fun with today’s Paper Plate Ice Cream Cone Bear tutorial that only uses a handful of materials to make it happen.
Craft Supplies:
- Ice Cream Cone Printable – from our landing page
- White Cardstock Paper
- Crayons, Markers, Coloring Pencils
- Scissors
- Small Paper Plate
- Washable Craft Paint
- Paint Brush
- Colored Cardstock Paper
- Black Sharpie Marker
- Wiggle Eyes – 2 per craft
- Stapler
Directions:
- First print out our blank ice cream cone printable. You only need ONE print per bear ice cream craft.
- Once you have it printed out, grab your choice of coloring material and color in the ice cream cone design however you like.
- When done coloring, go ahead and trim out the ice cream cone shape with your scissors.
- Discard excess paper and set aside your decorated paper cone till later.
- Now grab your small paper plate and your choice of color in craft paint.
- Squirt a small amount of craft paint in the center of the paper plate.
- Use the foam paint brush to move the paint around, until the paper plate is completely covered.
- When done, set it aside to allow it to dry a bit.
- Now grab your sheets of cardstock paper for the bear embellishments.
- Start off by cutting out pieces for his face. Cut out a large oval piece for the nose/mouth, as well as two half-circle ears.
- Go ahead and secure those pieces to the painted paper plate.
- Use a marker to draw on a simple mouth/nose design.
- Follow that up by adhering the wiggle eyes in place, so he can see.
- Now the LAST STEP! To finish off the bear ice cream cone craft, grab your cone paper piece cutout, the decorated paper plate and your stapler.
- Staple the decorated paper plate to the ice cream cone cutout. That’s it!
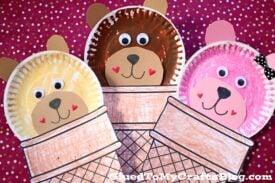
- Add even more embellishments you see fit {maybe some small bows or stickers} and display proudly for ALL to see!
- Don’t forget to share pictures with us on your various social media sites! #gluedtomycrafts
RELATED —> Pumpkin Ice Cream Cone

At Glued To My Crafts we believe ANYONE can be a crafty star. ALL AGES are encouraged to give our tutorials a try!
On that note, be sure to check out my personal favorites Valentine Camper, Punny Toast Card and Valentine Candy Dish craft tutorials! All three are perfect to pair with today’s latest craft tutorial!

Plate Plate Ice Cream Cone Bear Craft Idea For Kids
Have scoops of fun with this bear ice cream cone craft tutorial that only uses a handful of materials to make it happen.
Here’s your checklist of supplies to bring this craft to life:
Prepare your creative haven by laying down a protective cover before the crafting magic begins!
Directions:
- First print out our provided printable, in color, on a single sheet of white cardstock paper. You only need one print per craft.
- Once you have it printed out, grab your choice of coloring material and color in the ice cream cone design however you like.
- When done coloring, go ahead and trim out the ice cream cone shape with your scissors.
- Discard excess paper and set aside your decorated paper cone till later.
- Now grab your small paper plate and your choice of color in craft paint.
- Squirt a small amount of craft paint in the center of the paper plate.
- Use the foam paint brush to move the paint around, until the paper plate is completely covered.
- When done, set it aside to allow it to dry a bit.
- Now grab your sheets of cardstock paper for the bear embellishments.
- Start off by cutting out pieces for his face. Cut out a large oval piece for the nose/mouth, as well as two half-circle ears.
- Go ahead and secure those pieces to the painted paper plate.
- Use a marker to draw on a simple mouth/nose design.
- Follow that up by adhering the wiggle eyes in place, so he can see.
- Now the LAST STEP! To finish off the bear ice cream cone craft, grab your cone paper piece cutout, the decorated paper plate and your stapler.
- Staple the decorated paper plate to the ice cream cone cutout. That's it!
- Add even more embellishments you see fit {maybe some small bows or stickers} and display proudly for ALL to see!


NEED MORE HELP DOWNLOADING OUR FREE PRINTABLES? PLEASE REFER TO OUR FAQ PAGE
If you've enjoyed our content or have any thoughts to share, we'd love to hear from you! Mention @gluedtomycrafts or tag #gluedtomycrafts on Instagram!