Sometimes it's the quirkiest idea that is the best! Although this paper plate pumpkin ice cream cone is outside the norm, it's super fun for fall!

Searching for the perfect and super unique fall craft to make with your child this season? Look no further! We have the ultimate craft tutorial for you: the Paper Plate Pumpkin Ice Cream Cone.
It’s simple, fun, and requires just a few materials that you probably already have at home!

Pumpkin Ice Cream Cone Paper Plate Craft
Welcome to our super creative crafting session! Today, we have a unique fall craft that you can make with your child this season – our Paper Plate Pumpkin Ice Cream Cone tutorial. It’s the perfect choice for a fun and adorable autumn-themed craft.
This craft requires only a few materials, which you probably already have at home. So, there’s really no excuse not to give it a try!
Scroll down for the full step-by-step guide and don’t forget to grab the FREEBIE ICE CREAM CONE PRINTABLE listed in the supply list below. Enjoy crafting! #gluedtomycrafts
RELATED —> Cupcake Liner Ice Cream Cone


Get your kids excited about crafting with this easy and fun paper plate pumpkin ice cream cone craft. Perfect for fall-time activities!
Craft Supplies:
- Ice Cream Cone Printable – on our landing page
- White Cardstock Paper
- Brown Crayon, Marker or Coloring Pencil
- Scissors
- Small Paper Plate
- Orange Craft Paint
- Foam Paint Brush
- Black Craft Paint
- Small Paint Brush
- Glitter Glue or School Glue
- Loose Craft Glitter
- Brown Cardstock Paper
- Green Pipe Cleaner
- Stapler
Directions:
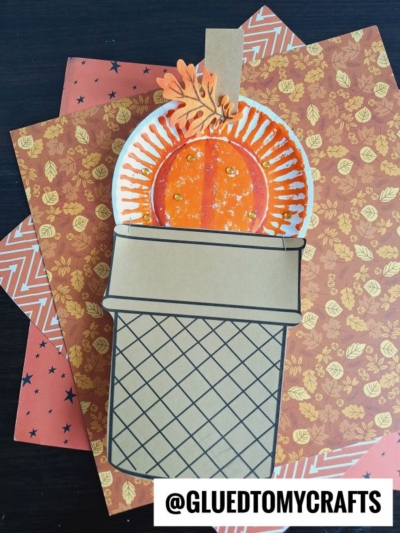
- First print out our blank ice cream cone printable. You only need ONE print per pumpkin ice cream craft.
- Once you have it printed out, grab your choice of coloring medium and color in the ice cream cone design completely brown.
- When done coloring, go ahead and trim out the ice cream cone shape with your scissors.
- Discard excess paper and set aside your decorated paper cone till later.
- Now grab your small paper plate and your orange craft paint.
- Squirt a small amount of craft paint in the center of the paper plate.
- Use the foam paint brush to move the paint around, until the paper plate is completely covered.
- Now grab your small paint brush and black craft paint.
- Dip the tip of your small paint brush into the black craft paint bottle. You don’t need a lot of paint on the brush.
- Paint a few lines on the orange painted paper plate to give the “pumpkin” some dimension.
- Next up – the “sprinkles” of the craft. Grab your glitter glue.
- Squirt/draw on some lines of glitter glue on the top your painted paper plate.
- When done decorating the paper plate, set it aside to allow it to dry a bit.
- Now grab your sheet of brown cardstock paper, as well as the scissors.
- Cut out a medium sized rectangle “stem” for on top of the pumpkin cone. This will be the “cherry” of the craft.
- Set it aside.
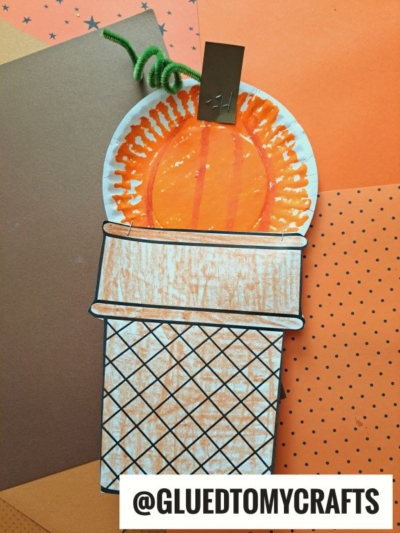
- Now grab your green pipe cleaner.
- Twirl it around your finger to make what I call the “licorice vine” for the pumpkin ice cream cone.
- Now the LAST STEP! To finish off the pumpkin ice cream cone craft, grab your cone paper piece cutout, the decorated {dry} paper plate, the embellishments and your stapler.
- Staple the decorated paper plate to the ice cream cone cutout, as well the cardstock stem and pipe cleaner vine.
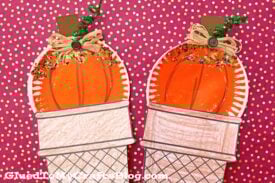
- And that’s it! Add even more embellishments you see fit {maybe some small bows or stickers} and display proudly for ALL to see!
- Don’t forget to share pictures with us on your various social media sites! You can find us on Instagram or Facebook #gluedtomycrafts
RELATED —> Handprint Pumpkin Keepsake
Get ready to be wowed this fall season, while making lasting memories with your entire family! At Glued To My Crafts we teach YOU how to take inexpensive craft materials and turn them into one-of-a-kind art projects!
We really doing strive to keep the crafty fun going beyond just one idea! So before you leave us, be sure to also check out these past impressive blog posts, listed below and recreate them with your child today! You won’t regret it!
Popsicle Stick Acorn Fairy House

Paper Plate Pumpkin Ice Cream Cone Craft
Sometimes it's the quirkiest idea that is the best! Although this paper plate pumpkin ice cream cone is outside the norm, it's super fun for fall!
Here’s your checklist of supplies to bring this craft to life:
- Glitter Glue
Prepare your creative haven by laying down a protective cover before the crafting magic begins!
Directions:
- First print out our blank ice cream cone printable. You only need ONE print per pumpkin ice cream craft.
- Once you have it printed out, grab your choice of coloring medium and color in the ice cream cone design completely brown.
- When done coloring, go ahead and trim out the ice cream cone shape with your scissors.
- Discard excess paper and set aside your decorated paper cone till later.
- Now grab your small paper plate and your orange craft paint.
- Squirt a small amount of craft paint in the center of the paper plate.
- Use the foam paint brush to move the paint around, until the paper plate is completely covered.
- Now grab your small paint brush and black craft paint.
- Dip the tip of your small paint brush into the black craft paint bottle. You don't need a lot of paint on the brush.
- Paint a few lines on the orange painted paper plate to give the "pumpkin" some dimension.
- Next up - the "sprinkles" of the craft. Grab your glitter glue.
- Squirt/draw on some lines of glitter glue on the top your painted paper plate.
- When done decorating the paper plate, set it aside to allow it to dry a bit.
- Now grab your sheet of brown cardstock paper, as well as the scissors.
- Cut out a medium sized rectangle "stem" for on top of the pumpkin cone. This will be the "cherry" of the craft.
- Set it aside.
- Now grab your green pipe cleaner.
- Twirl it around your finger to make what I call the "licorice vine" for the pumpkin ice cream cone.
- Now the LAST STEP! To finish off the pumpkin ice cream cone craft, grab your cone paper piece cutout, the decorated {dry} paper plate, the embellishments and your stapler.
- Staple the decorated paper plate to the ice cream cone cutout, as well the cardstock stem and pipe cleaner vine.
- And that's it! Add even more embellishments you see fit {maybe some small bows or stickers} and display proudly for ALL to see!


NEED MORE HELP DOWNLOADING OUR FREE PRINTABLES? PLEASE REFER TO OUR FAQ PAGE
If you've enjoyed our content or have any thoughts to share, we'd love to hear from you! Mention @gluedtomycrafts or tag #gluedtomycrafts on Instagram!