Create a fun torn paper ladybug craft using simple materials. Perfect for Mother's Day celebrations with your child.


Mother’s Day is a special opportunity for children to show their love and appreciation, and what better way than with a heartfelt homemade craft?
This year, ditch the store-bought cards and try something simple, creative and fun with your kids. The torn paper ladybug craft is a delightful project that’s perfect for little hands. It’s easy to make, requires minimal materials, and gives children a chance to create something truly unique for mom.

Make a heartfelt Mother’s Day gift with this torn paper ladybug craft. Easy, fun, and perfect for kids! Follow our step-by-step guide to create yours today.
Craft Supplies:
One of the best things about this craft is how simple and affordable the materials are. Here’s what you’ll need:
- Red Construction Paper
- White Cardstock Paper
- Mother’s Day Ladybug Printable – on our landing page
- School Glue
- Crayons, Markers or Coloring Pencils
- Black Coding Dots
- Embellishments
Gather these materials, and in no time, you’ll be ready to craft an adorable ladybug that Mom will cherish.
Directions:
Here’s how to help your child create a wonderful torn paper ladybug craft for Mother’s Day:
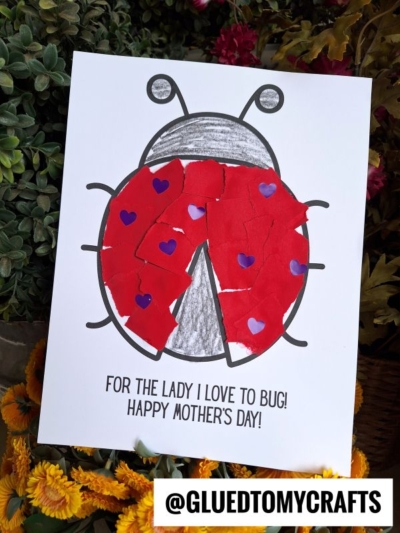
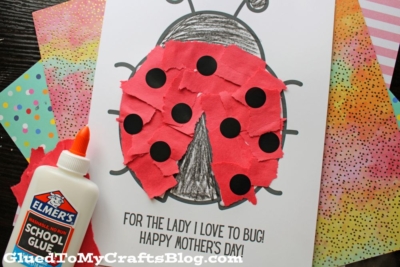
- First things first – download and print out the FREE provided “for the lady I love to bug” ladybug printable listed above, on a single piece of white cardstock paper.
- Have kids color in the “head and small triangle” in the ladybug design. They can use any type of coloring material and/or colors.
- Next up, help your child cut/tear their RED construction paper into small pieces.
- Now have them use school glue to glue those pieces inside the “ladybug” design.
- The final step is to have kids black coding dots for the ladybug’s spots {you can also have them use black craft paint and their index finger instead!}
- When they are done decorating, allow the finished design to dry completely before gifting.
- Be sure to also snap a photo and share it with the hashtag #GluedToMyCrafts or tag us to showcase their “BUGGY” artwork. We’d love to see what you create!
RELATED —> Cupcake Liner Ladybugs
There’s nothing quite as special as a gift made with love. This torn paper ladybug craft is the perfect way for kids to express their creativity and show their appreciation for Mom on her special day. Easy to make, full of charm, and bursting with personality, these little ladybugs are sure to bring a smile to her face.
Want more fun craft ideas for kids? Sign up for our newsletter and receive free activities and inspiration delivered right to your inbox.
Happy Crafting, and Happy Mother’s Day!

Torn Paper Ladybug Craft for Mother’s Day
Create a fun torn paper ladybug craft using simple materials. Perfect for Mother's Day celebrations with your child.
Here’s your checklist of supplies to bring this craft to life:
- School Glue
Prepare your creative haven by laying down a protective cover before the crafting magic begins!
Directions:
- First things first - download and print out the FREE provided "for the lady I love to bug" ladybug printable listed above, on a single piece of white cardstock paper.
- Have kids color in the "head and small triangle" in the ladybug design. They can use any type of coloring material and/or colors.
- Next up, help your child cut/tear their RED construction paper into small pieces.
- Now have them use school glue to glue those pieces inside the "ladybug" design.
- The final step is to have kids black coding dots for the ladybug's spots {you can also have them use black craft paint and their index finger instead!}
- When they are done decorating, allow the finished design to dry completely before gifting.


NEED MORE HELP DOWNLOADING OUR FREE PRINTABLES? PLEASE REFER TO OUR FAQ PAGE
If you've enjoyed our content or have any thoughts to share, we'd love to hear from you! Mention @gluedtomycrafts or tag #gluedtomycrafts on Instagram!