Glued To My Crafts

Join thousands of others who have gotten GLUED to our craft tutorials!

  • Home
  • Privacy Policy
  • Craft Safety Guidelines
  • Craft Themes
    • New Years
    • Valentine’s Day
    • St. Patrick’s Day
    • Spring
    • Easter
    • Mother’s Day
    • Summer
    • Father’s Day
    • Patriotic
    • Halloween
    • Thanksgiving
    • Fall
    • Winter
    • Christmas
    • Snowmen
    • Story Time
  • Favorite Craft Materials
    • Cupcake Liners
    • Torn Paper Crafts
    • Paper Plates
    • Popsicle Sticks
    • Sidewalk Chalk
    • Clothespin Crafts
    • Tulip Puffy Paint
    • Paper Bags
    • Craft Foam Hearts
    • Puffy Paint
  • About Us
  • Most Popular Tutorials

Torn Paper Turtle Craft Idea For Kids

When engaging in craft activities, it is important for young children to have adult supervision at ALL times. It is also recommended to use supplies that are suitable for your child's age. Feel free to modify materials or steps to meet your specific requirements. Please refer to our safety guidelines for more information.

As an Amazon Associate I earn from qualifying purchases. This post may contain affiliate links. For more information, please see our disclosure policy.

If you’re on the lookout for the perfect project to do with your little ones, look no further! In this tutorial, we’re going to show you how to make a charming torn paper turtle craft that’s super adorable AND doubles as a handmade card for Mother’s Day, Father’s Day or just because moments!

Torn Paper Turtle Craft Idea For Kids

With just a few simple materials and a bit of imagination, your kids can create a thoughtful and unique piece within minutes!

This torn paper turtle is a fun project that lets kids express their creativity and love! Perfect for little hands, this activity combines art with motor skill development. Plus, it’s a heartfelt homemade gift as well!
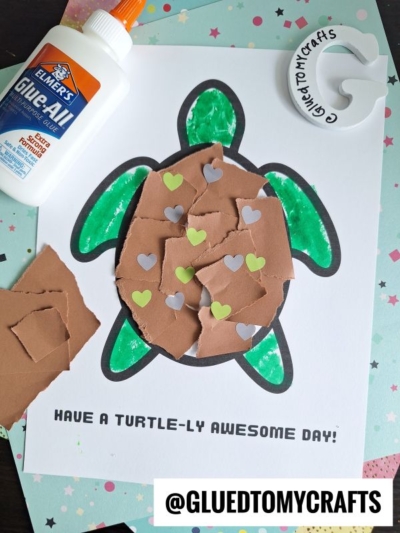
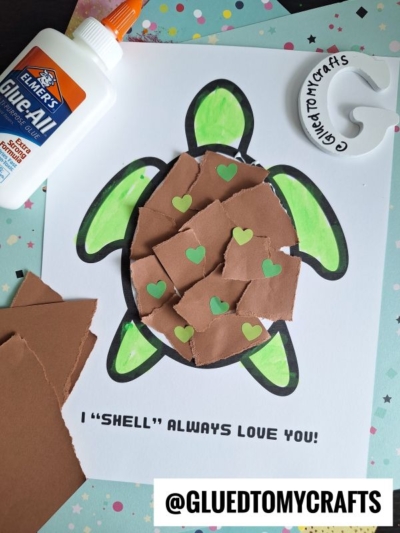
Craft Supplies:

  • Turtle SHELL Printable – on box.com
  • Turtle AWESOME Printable – on box.com
  • White Cardstock Paper
  • Green Crayon
  • Brown Construction Paper
  • School Glue
  • Scissors
  • Googly Eyes
  • Heart Stickers

Directions:

  • First download and print EITHER of the turtle printables listed above, on a single piece of cardstock paper.
  • Go ahead and color in the head, arms and legs in the printable GREEN.
  • Now cut/tear your brown construction paper into small squares.
  • Next grab the school glue and put a good amount of glue ALL over the inside of the shell design on the printable.
  • One by one, place your torn pieces of paper on top of the glue {adding more if needed} until the shell of the turtle is completely covered.
  • The final step is to add the googly eyes and a few heart stickers to pull together the theme.
  • Once done decorating, set aside to let it all dry completely before displaying/gifting proudly!
  • Don’t forget to share pictures of your adorable mixed media turtle craft with us! #gluedtomycrafts

RELATED —> Torn Paper Bear Craft

Torn Paper Turtle Craft Idea For Kids Torn Paper Turtle Craft Idea For Kids

If you enjoyed this turtle shell tutorial from us, you may also enjoy these fun craft posts on our website right now:

  • Paper Plate Seahorse
  • Torn Paper Unicorn
  • Popsicle Stick Robots
  • Fork Painted Gruffalo
  • Popsicle Stick Fish
  • Paint Splat Turtle Friends

stacey-signature-2023


Craft Activity Safety Guidelines:

Always Ensure Adult Supervision - Young children should be supervised at all times when engaging in craft activities. This is essential to keep them safe and ensure materials are used correctly. Use Age-Appropriate Supplies - Choose craft supplies that are suitable for your child’s age. Check labels for recommendations and avoid items with small parts or sharp edges for younger children. Modify as Needed - Feel free to adapt materials or steps to meet your child's abilities and safety needs. For example, substitute scissors with safety scissors if necessary. Keep an Eye on Allergies - Be mindful of potential allergens in craft materials like glue, paint, or certain fabrics. Opt for non-toxic and hypoallergenic options whenever possible. Organize and Secure Supplies - Keep all craft tools and materials organized. Store sharp objects, small parts, and potentially hazardous items out of reach when not in use. Following these guidelines will ensure that crafts remain fun, creative, and, most importantly, safe for everyone involved!


OUR PRIVACY POLICY

  • Email
  • Facebook
  • Instagram
  • Pinterest
  • Twitter
  • YouTube

LOOKING FOR SOMETHING?

EXPLORE OUR SITE:

© 2012–2025 Glued To My Crafts
All activities should be supervised by an adult at all times. Please refer to our safety guidelines for more information.


Please note that all the content of the website, including printables, are for classroom and personal use only. This means that any digital item you download from our site can be used for non-commercial use only. We kindly request that you do not reproduce or sell our creations. We appreciate your understanding and cooperation in respecting our content and intellectual property rights.