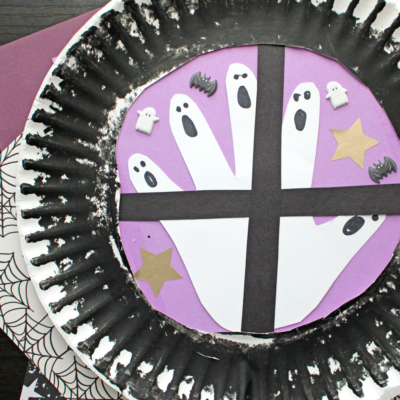
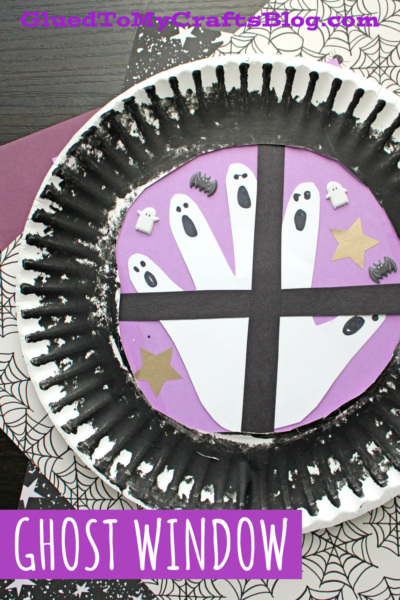
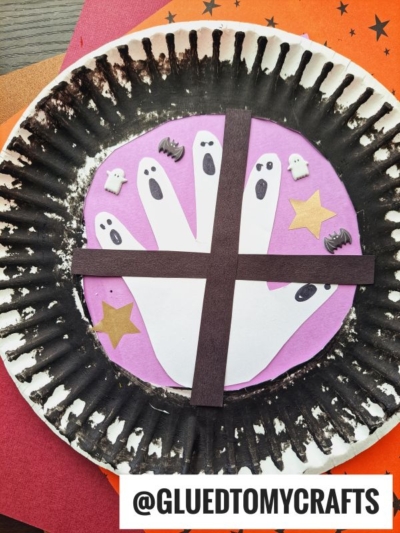
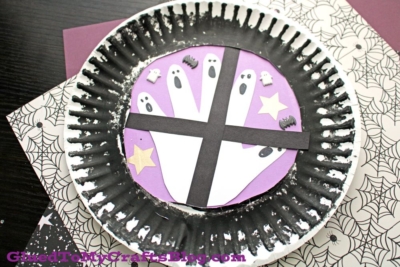
Learn how to make an original ghost window craft. Cut, paint and embellish a paper plate. Trace a handprint design onto white cardstock paper and add facial features with a marker.
Get your little ghosts ready for Halloween with this fun and spooky DIY window paper plate craft! It’s sure to make kids of all ages smile this holiday season!
Paper Plate Halloween Window Craft Idea For Kids
Your kids will get into the Halloween spirit with this spooktacular ghost in window paper plate craft idea from us. It’s an easy and fun craft to make that’ll have your little ones feeling creative and festive throughout the month of October!

We’re crafting up some ghostly fun with our “paper plate & handprint ghost window” craft idea. Are you ready to get creative? Check out the full tutorial below!
Craft Supplies:
- Large Paper Plate – 1 per craft
- Scissors
- Black Paint Crayon
- White Cardstock Paper
- Purple Cardstock Paper
- Black Cardstock Paper
- Black Marker
- Embellishments
Directions:
- First things first – cut the center out of the paper plate, only living the rim for the “window.” Discard excess piece.
- Now take the paint crayon and paint the rim completely black.
- Set aside to let it dry completely.
- Now grab your white cardstock paper and the marker.
- Trace your hand on it.
- Trim out the handprint design and use the marker to add on facial features to each fingertip.
- Now grab your purple cardstock paper.
- Trim it down {into a square} so it fits inside/on the back of the decorated paper.
- Secure that in place on the back of the paper plate.
- Go ahead and now glue in the handprint design.
- To finish off the spooky window craft, cut two strips from the black paper, to make the window “cross” design. Glue those in place.
- Add any other embellishments you see fit. Then get ready to take a walk on the spooky side by displaying it proudly for all to see!
RELATED —> Stained Glass Ghost
Looking for more easy Halloween crafts to pair with today’s “Paper Plate Ghost In Window” craft ? Check out these past posts for some spooky inspiration!
- Paper Plate Jack O’ Lantern
- Pom Pom Stamped Spider
- Eyeball Frame Decor
- Popsicle Stick Ghost Window
- Paper Plate Black Cat
- Paper Plate Witch
- Popsicle Stick Ghost
- Paper Plate Witch
- Marbled Art Spider Web
- Paper Plate Spider

Paper Plate Ghost In Window Craft
Learn how to make an original ghost window craft. Cut, paint and embellish a paper plate. Trace a handprint design onto white cardstock paper and add facial features with a marker.
Here’s your checklist of supplies to bring this craft to life:
- 1 Large Paper Plate
- Cardstock Paper purple, black and white
- Embellishments
Prepare your creative haven by laying down a protective cover before the crafting magic begins!
Directions:
- First things first - cut the center out of the paper plate, only living the rim for the "window." Discard excess piece.
- Now take the paint crayon and paint the rim completely black.
- Set aside to let it dry completely.
- Now grab your white cardstock paper and the marker.
- Trace your hand on it.
- Trim out the handprint design and use the marker to add on facial features to each fingertip.
- Now grab your purple cardstock paper.
- Trim it down {into a square} so it fits inside/on the back of the decorated paper.
- Secure that in place on the back of the paper plate.
- Go ahead and now glue in the handprint design.
- To finish off the spooky window craft, cut two strips from the black paper, to make the window "cross" design. Glue those in place.
- Add any other embellishments you see fit. Then get ready to take a walk on the spooky side by displaying it proudly for all to see!

CLICK HERE TO PRINT THE DIRECTIONS FOR THIS CRAFT
If you've enjoyed our content or have any thoughts to share, we'd love to hear from you! Mention @gluedtomycrafts or tag #gluedtomycrafts on Instagram!