
Transform ordinary TP rolls into something extraordinary! Follow our step-by-step tutorial to make spooky little bats your kids will love!

Are you looking for a simple and fun craft activity for the kids? Maybe something for the Halloween season? Look no further than a toilet paper roll bat!
This easy tutorial uses everyday items that you most likely have around the house, so picking up materials won’t add to your errand list.
Moreover, this amazing homemade creation will have your little ones flapping their wings with delight! In just a few simple steps they’ll be able to assemble their own friendly flightless bats which can double as unique decorations or even playthings — plus, it’s an incredibly economical way to keep children entertained.
So what are you waiting for? Get ready to get creative and fly into this spooky-fun craft project! Find all the details you need to know, in the full tutorial below. Happy crafting, my friends!


Crafting with kids not only fosters creativity but also strengthens the bond between parents and children. With just a few materials, you can turn empty toilet paper rolls into adorable bats that will delight your little ones. This tutorial will walk you through every step, making it easy and fun for kids of all ages to follow along.
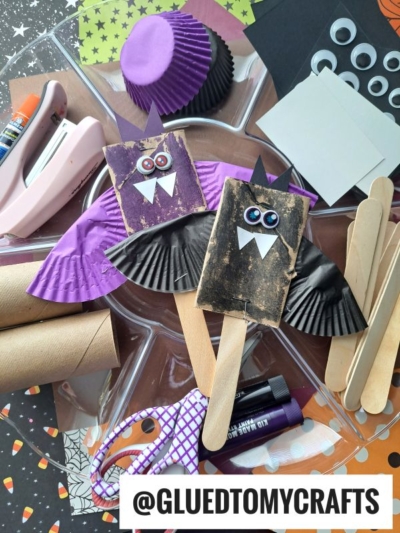
Craft Supplies:
Before we get started, gather the following materials. Don’t worry if you don’t have everything on hand; improvisation is part of the fun!
- Toilet Paper Roll
- Stapler
- Paint Crayons
- Cardstock Paper
- Large Cupcake Liners
- Scissors
- Small Googly Eyes
- Jumbo Popsicle Sticks
Directions:
Clear a table and cover it with newspaper or a plastic tablecloth. This will make cleanup easier and keep your workspace tidy.
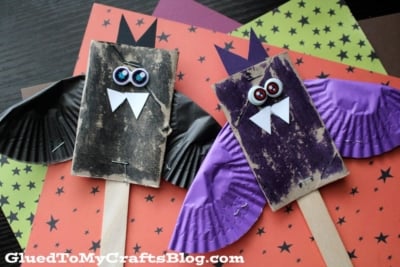
- First flatten out your cardboard tube and staple it on each end, to make a rectangle shape. This will be the bat’s body.
- Go ahead and use your paint crayon to “paint” one side of the toilet paper roll.
- Set it aside for now.
- Now grab your TWO large cupcake liners.
- Flatten them out with your hands and fold them in half.
- Use the stapler to secure the pieces, so the liners won’t come apart. These will become the bat wings.
- Next grab your sheets of cardstock paper. Cut out fangs and bat ears.
- We are now ready to start assembling! Grab all your elements along the stapler and glue.
- Start off by stapling the jumbo popsicle stick, to the back of your flattened cardboard tube. This way you can hold him like a puppet.
- Follow that up with the wings and then his face & ears.
- Finally, add other embellishments you see fit before displaying/playing with your proudly!!!
Story Time Recommendations:
Take a look at these book recommendations that complement our craft tutorial perfectly.
- I’m Not Scary by Raahat Kaduji
- Bats at the Library by Brian Lies
- It’s Raining Bats & Frogs by Rebecca Colby
- Stellaluna by Janell Cannon
- There Was an Old Lady Who Swallowed a Bat! by Lucille Colandro
- Fiona the Fruit Bat by Dan Riskin
RELATED —> Handprint Bat Keepsake
If you are looking for even MORE Halloween crafts, from Glued To My Crafts, be sure to check out these fun blog posts below. And if you do decide to make any of our craft projects – please share a picture on our Facebook page or tag us on Instagram with #gluedtomycrafts, so we can see our inspiration come to life!
- Halloween Keepsake Art
- Pumpkin Keepsake Canvas
- Popsicle Stick Halloween Gnome
- Paper Plate Handprint Bat
- Chalk Art Bat In The Night
- Wooden Spoon Bat Puppet
- Cupcake Liner Bat Cards
- Styrofoam Cup Bat

Toilet Paper Roll Bat Tutorial for Kids
Here’s your checklist of supplies to bring this craft to life:
- Toilet Paper Roll
- Cardstock Paper white
- 2 Large Cupcake Liners black
- 2 Small Googly Eyes
- 1 Jumbo Popsicle Sticks
Prepare your creative haven by laying down a protective cover before the crafting magic begins!
Directions:
- First flatten out your cardboard tube and staple it on each end, to make a rectangle shape. This will be the bat's body.
- Go ahead and use your paint crayon to "paint" one side of the toilet paper roll.
- Set it aside for now.
- Now grab your TWO large cupcake liners.
- Flatten them out with your hands and fold them in half.
- Use the stapler to secure the pieces, so the liners won't come apart. These will become the bat wings.
- Next grab your sheets of cardstock paper. Cut out fangs and bat ears.
- We are now ready to start assembling! Grab all your elements along the stapler and glue.
- Start off by stapling the jumbo popsicle stick, to the back of your flattened cardboard tube. This way you can hold him like a puppet.
- Follow that up with the wings and then his face & ears.
- Finally, add other embellishments you see fit before displaying/playing with your proudly!!!

Grab our favorite books via our Amazon affiliate link! In our Amazon storefront you will find books, toys and craft supplies we absolutely love using for our Glued To My Crafts tutorials!